
Themes Instructions
Select a Theme from the drop down menu
Table of Contents
- 1.Introduction
- 2.Theme Installation
- 3.Theme Activation
- 4.How to import Demo?
- 5.Site Identity
- 6.Colors
- 7.Header Image
- 8.Background Image
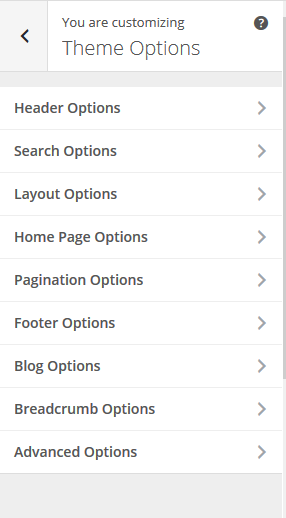
- 9.Theme Options
- 10.Header Options
- 10.1.How to change logo in Header?
- 10.2.How to show/hide site title?
- 10.3.How to show/hide site tagline?
- 10.4.How to change contact number?
- 10.5.How to change contact email?
- 10.6.How to show/hide notice in header?
- 10.7.How to change notice type in header?
- 10.8.How to change notice text in header?
- 10.9.How to change notice url in header?
- 10.10.How to show/hide quick links text in header?
- 11.Search Options
- 12.Layout Options
- 13.Home Page Options
- 13.1.How to show/hide home page content?
- 13.2.How to enable/disable news section on home page?
- 13.3.How to change news section title on home page?
- 13.4.How to select news category on home page?
- 13.5.How to change number of news posts on home page?
- 13.6.How to change excerpt length of news post on home page?
- 13.7.How to change read more text of new section on home page?
- 13.8.How to enable/disable Events section on home page?
- 13.9.How to change Events section title on home page?
- 13.10.How to select events category on home page?
- 13.11.How to change number of events posts on home page?
- 13.12.How to change excerpt length of Event post on home page?
- 14.Pagination Options
- 15.Footer Options
- 16.Blog Options
- 17.Breadcrumb Options
- 18.Advanced Options
- 19.Featured Slider
- 20.Featured Content
- 21.Navigation Menus
- 22.Widgets
- 23.How to set Static Front Page?
- 24.How to Reset All Theme Settings?
- 25.Automatic updates using Dashboard
- 26.Updating Theme Using FTP
Education Hub
Education Hub is a clean and elegant WordPress education theme with simplistic but unique look and feel.
There are two approaches to installing the theme. You can either install it easily via the WordPress admin dashboard or Upload and install the theme through FTP client.
- Log in to the WordPress Administration Panels.
- Select the Appearance panel, then Themes.
- Select Add New.
- Type “Education Hub” in Search themes… box
- It will show Education Hub and click on it and Install. Once installation is complete you can activate it.
You can use FTP client like FileZilla to connect your web server.
- Download education-hub.zip to your Desktop.
- Unzip education-hub.zip to your Desktop.
- Using an FTP client to access your host web server, go to /wp-content/themes/ and upload your new copy of Education Hub Theme.
- Now, log into the WordPress Dashboard with your login details.
- Select the Appearance panel, then Themes.
- You will see the theme “Education Hub” in the list.
- Then click Activate button.
- Now the theme will be activate and go through the following options to set up the theme step wise.
After successfully installing the required theme, you need to activate your theme. Follow the given steps to activate the theme.
- Select the Appearance panel, then Themes.
- You will see the Education Hub theme in the list.
- Click Activate button.
- After clicking in activate button the theme will be activate.
Free themes are hosted in WordPress.org and while hosting there, we are not allowed to add demo content in the theme. So, you need to download the demo content file manually and import them.
Please follow the instructions below to import demo file:
- First, download the demo content zip file by clicking the button below
- Log in to the WordPress Administration Panels.
- Go to “Appearance => Plugins => Add New” and in plugin search box, type “Catch Themes Demo Import“.
- It will show the plugin, click on “Install Now” button and wait for it to show “Activate” button and click on it.
- After activation, it will redirect you to demo import dashboard at “Appearance => Catch Themes Demo Import”.
- Now, you need to unzip/extract the education-hub-demo-data.zip file that you have downloaded, which contains 3 files.
- Browse education-hub-content.xml file under Choose a XML file for content import:
- Browse education-hub-widgets.wie file under Choose a WIE or JSON file for widget import:
- Browse education-hub-customizer.dat file under Choose a DAT file for customizer import:
- Finally, click on Import Demo Data button only once and wait for it to complete import.
- It can take a couple of minutes, and will display “That’s it, all done!” message after the import is completed.
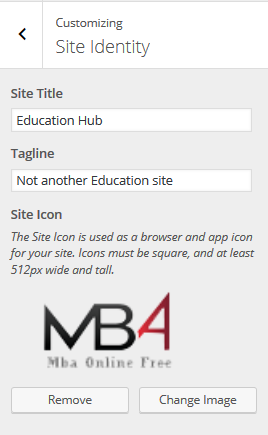
- From “Customize” section, go to “Site Identity” option.
- Put the site title in the text-box there.
- If the preview is fine, click on “Save & Publish” to keep that text as the site title.
- From “Customize” section, go to “Site Identity” option.
- Put site tagline in the text-box.
- If the preview is fine, click on “Save & Publish” to keep that text as the tagline.
- From “Customize” section, go to “Site Identity” option.
- Select the site icon available on media library or upload from other location.
- If the preview is fine, click on “Save & Publish” to keep recently uploaded/selected icon as site icon.
Note: Your theme recommends square site icon, and at least 512px wide and tall.
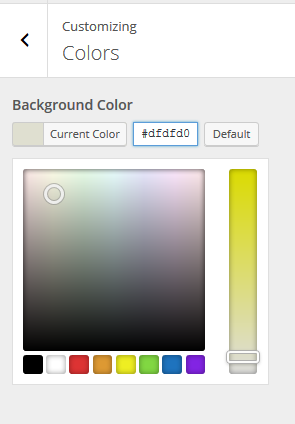
- From “Customize” section, go to “Colors” Section.
- Select the color for site background.
- If the preview is fine, click on “Save & Publish” to apply recently uploaded/selected background color.
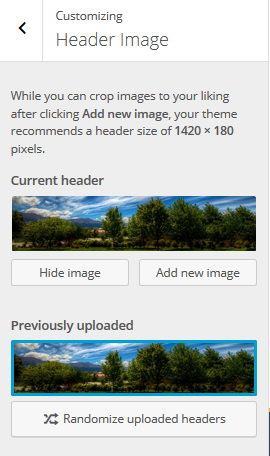
- From “Customize” section, go to “Header Image” Section.
- Select the image for Header section available on media library or upload from other location.
- If the preview is fine, click on “Save & Publish” to apply recently uploaded logo.
Note: Your theme recommends a header size of 1420×180 pixels.
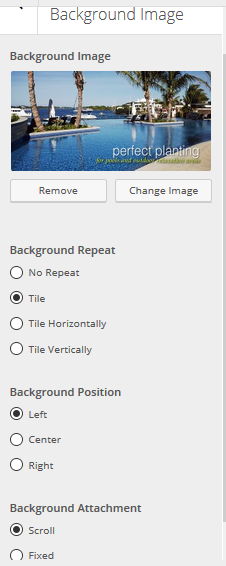
- From “Customize” section, go to “Background Image” Section.
- Select the image for site background available on media library or upload from other location.
- If the preview is fine, click on “Save & Publish” to apply recently selected/uploaded image as background image.
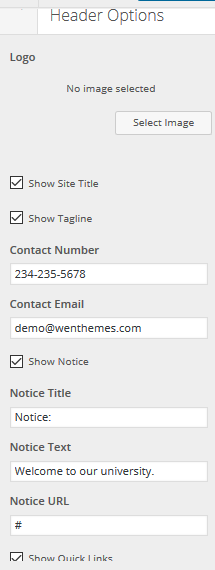
- From “Customize” section, go to “Theme Options & Header Options” section.
- Select the image for site logo.
- Remove option help you to remove the image. Click “Remove” button to remove the image.
- “Change Image” button help you to change the image. Click on “Change Image” button and select another image for background.
- Click on “Save & Publish” to save the changes.
- From “Customize” section, go to “Theme Options & Header Options” section.
- Check on “Show Site Title” to show the site title on header.
- If preview looks fine, click on “Save & Publish” button to save the changes.
- From “Customize” section, go to “Theme Options & Header Options” section.
- Check on “Show Tagline” to show the site title on header.
- If preview looks fine, click on “Save & Publish” button to save the changes.
- From “Customize” section, go to “Theme Options & Header Options” section.
- Input contact number in the Input box.
- If preview looks fine, click on “Save & Publish” button to save the changes.
- From “Customize” section, go to “Theme Options & Header Options” section.
- Insert contact email address in the Input box.
- If preview looks fine, click on “Save & Publish” button to save the changes.
- From “Customize” section, go to “Theme Options & Header Options” section.
- Check on “Show Notice” to show the notice on header.
- If preview looks fine, click on “Save & Publish” button to save the changes.
- From “Customize” section, go to “Theme Options & Header Options” section.
- Select on dropdown to show the notice type on header.
- If preview looks fine, click on “Save & Publish” button to save the changes.
- From “Customize” section, go to “Theme Options & Header Options” section.
- Insert text on Input box to show the notice on header.
- If preview looks fine, click on “Save & Publish” button to save the changes.
- From “Customize” section, go to “Theme Options & Header Options” section.
- Insert url on Input box to links the notice to specific page.
- If preview looks fine, click on “Save & Publish” button to save the changes.
- From “Customize” section, go to “Theme Options & Header Options” section.
- check on “Show Quick Links” to show quick links text in header. .
- If preview looks fine, click on “Save & Publish” button to save the changes.
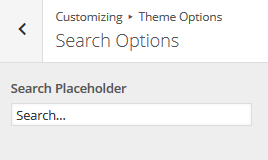
- From “Customize” section, go to “Theme Options & “Search Options”.
- Change the text of the placeholder.
- If the preview is fine, click on “Save & Publish” to apply the placeholder text.
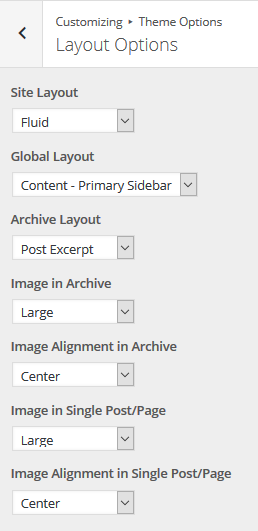
From “Customize” section go to Theme Options -> Layout Options.
- To change site layout, choose the available options from drop down arrow. Boxed and Fluid are available options.
- To change site global layout, choose the available options From drop down arrow. Primary sidebar-content, Content-primary sidebar, No sidebar and Three columns are available options.
- To change archive layout, choose the available options from drop down arrow. Full Post and Post Excerpt are available options.
- To change Image Alignment in Archive, choose the available options from drop down. None, Left, Center and Right are the available options.
- To change Image in single post/page, choose the available options From drop down arrow.No Image and Large are the available options.
- To change image alignment in post/page, choose the available options from drop down arrow. The available options are None, Left, Center and Right.
- If preview is fine, click on “Save and Publish” to save the above changes.
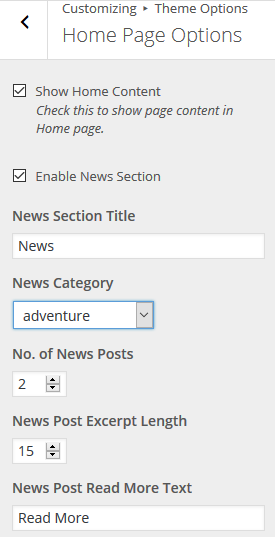
- From “Customize” section go to Theme Options -> Home Page Options.
- Check on “Show Home Content” to show home page content.
- If preview is fine, click on “Save and Publish” to save the above changes.
- From “Customize” section go to Theme Options-> Home Page Options.
- Check on “Enable News Section” to show news section on home page.
- If preview is fine, click on “Save and Publish” to save the above changes.
- From “Customize” section go to Theme Options-> Home Page Options.
- Insert text on Input field to change news section title on home page.
- If preview is fine, click on “Save and Publish” to save the above changes.
- From “Customize” section go to Theme Options-> Home Page Options.
- Select news category from the drop down option.
- If preview is fine, click on “Save and Publish” to save the above changes.
- From “Customize” section go to Theme Options-> Home Page Options.
- Input number of news post on the home page.
- If preview is fine, click on “Save and Publish” to save the above changes.
- From “Customize” section go to Theme Options-> Home Page Options.
- Input number of words on Input field to menage length of excerpts on the home page.
- If preview is fine, click on “Save and Publish” to save the above changes.
- From “Customize” section go to Theme Options-> Home Page Options.
- Input read more text in Input field to show read more link on news section at home page.
- If preview is fine, click on “Save and Publish” to save the above changes.
- From “Customize” section go to Theme Options-> Home Page Options.
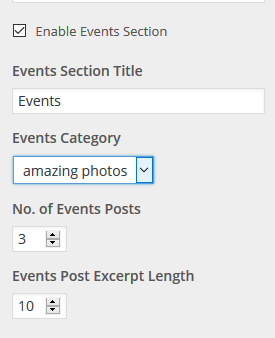
- Check on “Enable Event Section” to enable event section on home page.
- If preview is fine, click on “Save and Publish” to save the above changes.
- Form “Customize” section go to Theme Options-> Home Page Options.
- Input event section title on input field to change event section title on home page.
- If preview is fine, click on “Save and Publish” to save the above changes.
- Form “Customize” section go to Theme Options-> Home Page Options.
- Select event category from the drop down option.
- If preview is fine, click on “Save and Publish” to save the above changes.
- Form “Customize” section go to Theme Options-> Home Page Options.
- Input number of news post on the home page.
- If preview is fine, click on “Save and Publish” to save the above changes.
- Form “Customize” section go to Theme Options-> Home Page Options.
- Input number of words on input field to menage length of excerpts of event post on the home page.
- If preview is fine, click on “Save and Publish” to save the above changes.
- From “Customize” section, go to “Theme Options-> Pagination Options”.
- Select Default Older post/Newer post or Numeric.
- If preview is fine, click on “Save and Publish” to save the above changes.
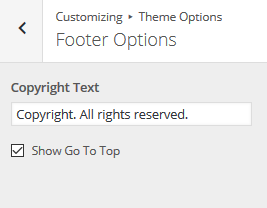
- From “Customize” section, go to “Theme Options-> Footer Options” section.
- Modify “Copyright Text”.
- Click on “Save & Publish” to save the changes.
- From “Customize” section, go to “Theme Options-> Footer Options” section.
- Check on “Show Go To Top” to enable Go to top on footer and unchecked to disable.
- Click on “Save & Publish” to save the changes.
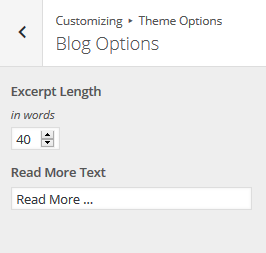
- From “Customize” section, go to “Theme Options-> Blog Options” section.
- Change the excerpt length From here. Default excerpt text length is 40 words.
- Click on “Save & Publish” to save the changes.
- From “Customize” section, go to “Theme Options-> Blog Options” section.
- Change the read more text from here. Default Read More text is “Read More”.
- Click on “Save & Publish” to save the changes.
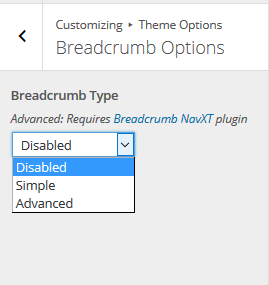
- From “Customize” section, go to “Theme Options-> Breadcrumb Options”.
- Select Disabled or Simple or Advanced option.
- If preview is fine, click on “Save and Publish” to save the above changes.
- Add Custom CSS here and find the changes.
- If preview is fine click on “Save and Publish” button to save the changes.
- From “Customize” section, go to “Featured Slider-> Slider Type”.
- Select options from the drop down. Available options are Disabled, Entire Site, Entire Site Except Blog Index Page and Static Front page only.
- If preview is fine, click on “Save and Publish” to save the above changes.
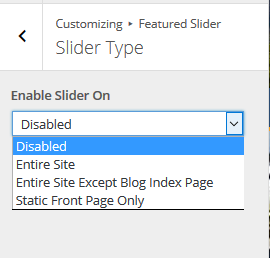
1. From Customize section, go to Featured Sections-> Slider Type.
2. Here you will see different options. They are:
- Enable Slider on: Select Option from the drop down. Available Options are Disabled and Static Front Page Only.
- Select Slider Type: Here you will see one options as drop-down. It is:
- Featured Pages: Selecting this option displays image of the pages in slider.
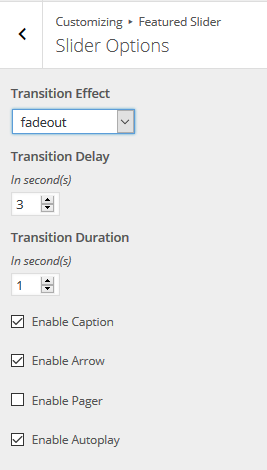
- From “Customize” section, go to “Featured Slider-> Slider Options”.
- Select transition effect options From the drop down. Available options are fade, fade out, none and scrollHorz.
- If preview is fine, click on “Save and Publish” to save the above changes.
- From “Customize” section, go to “Featured Slider-> Slider Options”.
- Input transition delay in second into Input field to change transition delay.
- If preview is fine, click on “Save and Publish” to save the above changes.
- From “Customize” section, go to “Featured Slider-> Slider Options”.
- Input transition duration in second into Input field to change transition duration of slider.
- If preview is fine, click on “Save and Publish” to save the above changes.
- From “Customize” section, go to “Featured Slider-> Slider Options”.
- Check on different options caption, arrow, pager and auto play to enable or uncheck to disable.
- If preview is fine, click on “Save and Publish” to save the above changes.
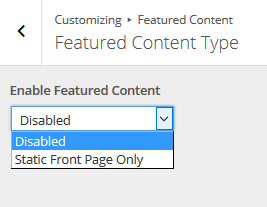
- From “Customize” section, go to “Featured Content-> Featured Content Type”.
- Select options to show content on home page or disable.
- If preview is fine, click on “Save and Publish” to save the above changes.
The theme supports 4 menus. Select which menu appears in each location.
You can edit your menu content on the Menus screen in the Appearance section.
From “Customize” section, go to “Menus-> Menu Locations” section.
- Select the menu for Primary menu. Primary menu appears as a main menu in header section.
- Select the menu for Footer menu. Footer menu appears on the footer section.
- Choose the Social menu, which shows the social links title as a menu.
- Choose the Quick Links menu, which shows the custom links title as a menu.
- Select the menu for 404. This menu appears on 404 page.
- If preview looks fine, save the changes by clicking on “Save and publish” button.
Several widgets are available in the theme. All the available widgets are easy to operate. Set the value or select the available options as needed. Operating method of every widgets are described below.
For managing the widgets,
- Go to Appearance-> Widgets
- Drag and drop or simply click the widget to add on the available widgets area.
or,
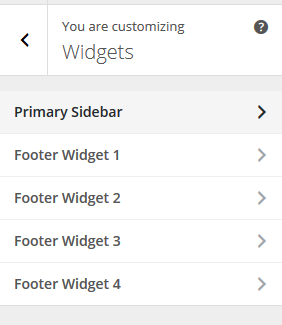
- Go to “Customize” and “Widgets”.
- Set the available widgets on necessary widget area.
- Click on Save and Publish button to save the changes.
Set desired widgets to available widget area.
Available widget areas
- Primary Sidebar
- Footer Widget 1
- Footer Widget 2
- Footer Widget 3
- Footer Widget 4
1. From Customize section, go to Static Front Page.
2. From Static Front Page, you will be able to set any page as A Static Page and you will find your latest posts page option as well.
1. From Customize section, go to Reset All Theme settings.
2. From check to reset all settings all the changes and configurations you have done to all of your options will changes back to the default.
You can update Themes directly from the Administration Panel by following these steps .
- Go to your WordPress Admin section.
- Now go to your dashboard and go to Updates .
- You have to go to the Themes section, if update is available you can update the theme checking the box and update themes.
To update Theme though FTP, follow these basic steps:
- Download the latest version of Education Hub theme from your WordPress Theme Directory Education Hub Theme Download to your Desktop.
- Unzip education-hub.zip to your Desktop.
- Using an FTP client to access your host web server, go to /wp-content/themes/ and upload your new copy of Education Hub theme which shall replace the old files.
