
Themes Instructions
Select a Theme from the drop down menu
Table of Contents
- 1.Introduction
- 2.Theme Installation
- 3.How to setup front page as shown in the demo?
- 4.Theme Options
- 5.Theme Options
- 5.1.Header Options
- 5.1.1.How to change logo in Header?
- 5.1.2.How to show/hide site title?
- 5.1.3.How to show/hide site tagline?
- 5.1.4.How to Enable Sticky Menu?
- 5.1.5.How to show/hide category dropdown in header?
- 5.1.6.How to show category as navigation in header?
- 5.1.7.How to change 'Menu' text in header?
- 5.1.8.How to change 'Category' text in header?
- 5.1.9.How to show/hide search form in header?
- 5.1.10.How to Enable Shrunk Header in inner pages?
- 5.2.Search Options
- 5.3.Layout Options
- 5.4.Home Page Options
- 5.5.Masonry Options
- 5.6.Effect Options
- 5.7.Breadcrumb Options
- 5.8.Pagination Options
- 5.9.Footer Options
- 5.10.Blog Options
- 5.11.Advanced Options
- 5.12.Font Family Options
- 5.13.Color Options
- 5.1.Header Options
- 6.Featured Slider
- 7.Navigation Menu
- 8.Widgets
Photo Perfect Pro
Photo Perfect Pro is a responsive photography WordPress Theme for professional photographer, photo bloggers and creative peeps. Don’t forget to add in your site URL when you post a message.
After you purchase the theme, you can download your theme from My Account page. Just for your note, some modern browser like Safari has auto zip extractor and will extract the zip file as soon as you download the zip file. In this case, open Safari and go to “Safari => Preferences” and in the “General” tab, uncheck Open “safe” files after downloading. This will stop Safari from automatically unzipping the files and then you can download the zip file.
After you download the theme, you can choose either of the approaches given below to install your theme.
You can download Themes directly to your blog by using the Add New Themes option in the Appearance sub-menu.
- Download zip file of theme and keep it in your Desktop
- Log in to the WordPress Administration Panel
- Go to Appearance -> Themes -> Add New
- Click on ‘Uploads’ and browse the downloaded file from the Desktop where you have it downloaded
- Click on ‘Install Now’ and then ‘Activate’ to install the Theme
To add a new Theme to your WordPress installation, follow these basic steps:
- Download zip file of theme and keep it in your Desktop.
- Extract zip file.
- Using an FTP client to access your host we.b server. Go to ‘/wp-content/themes/’.
- Upload extracted folder to ‘/wp-content/themes/’.
- Activate theme through Appearance -> Themes, in your WordPress Dashboard.
There are basically three main sections as you can see on the front page of the demo.
- 1. Main Header Section
- 2. Popular Section
- 3. Galleries Section
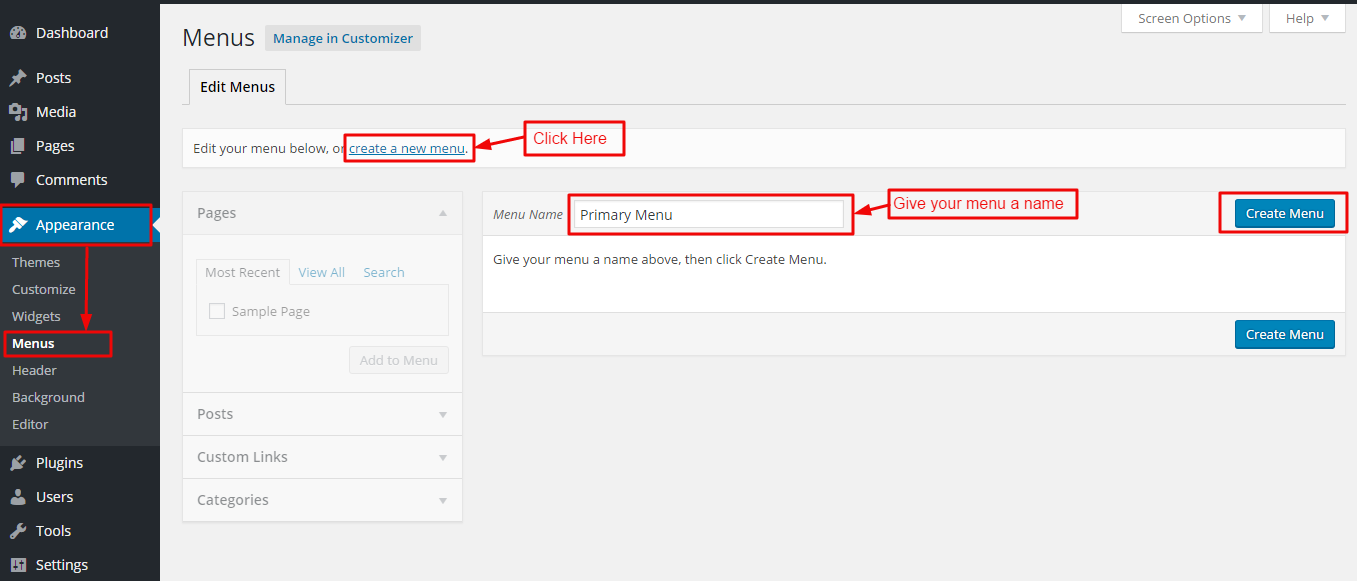
To create menu you need to go to Admin Panel / Appearance and do as shown in this image.
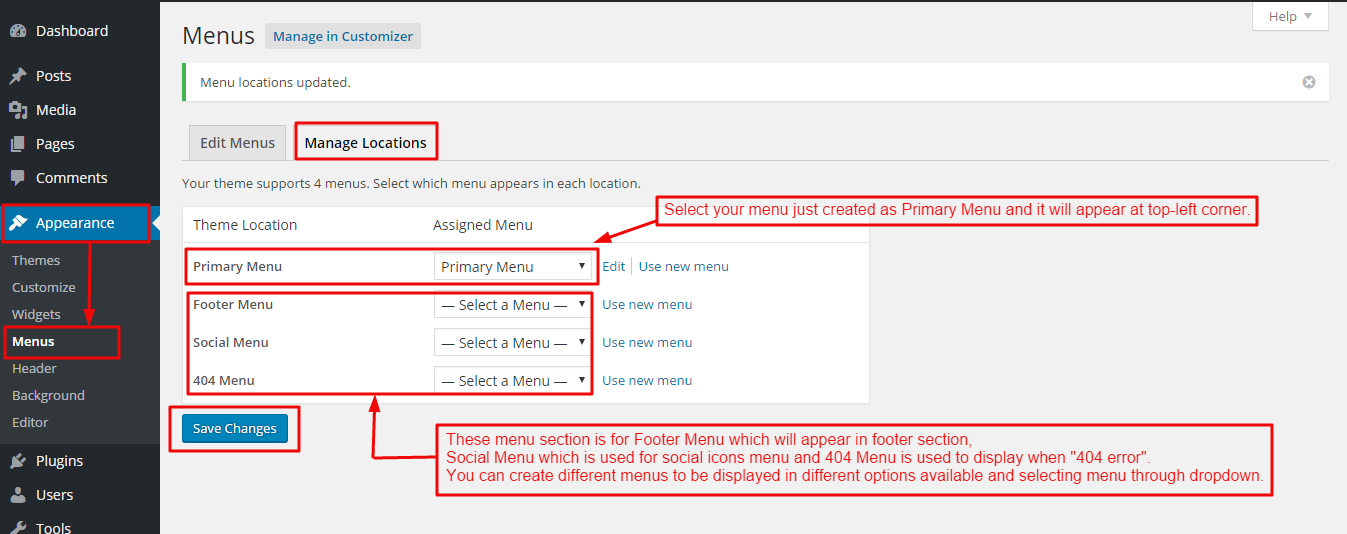
You can create more menus in similar way. After creating menu you need to manage location of that menu. As shown in this image.
Now when you visit the site you will see menu at top-left corner but we haven’t added any pages to that menu so it will be empty.
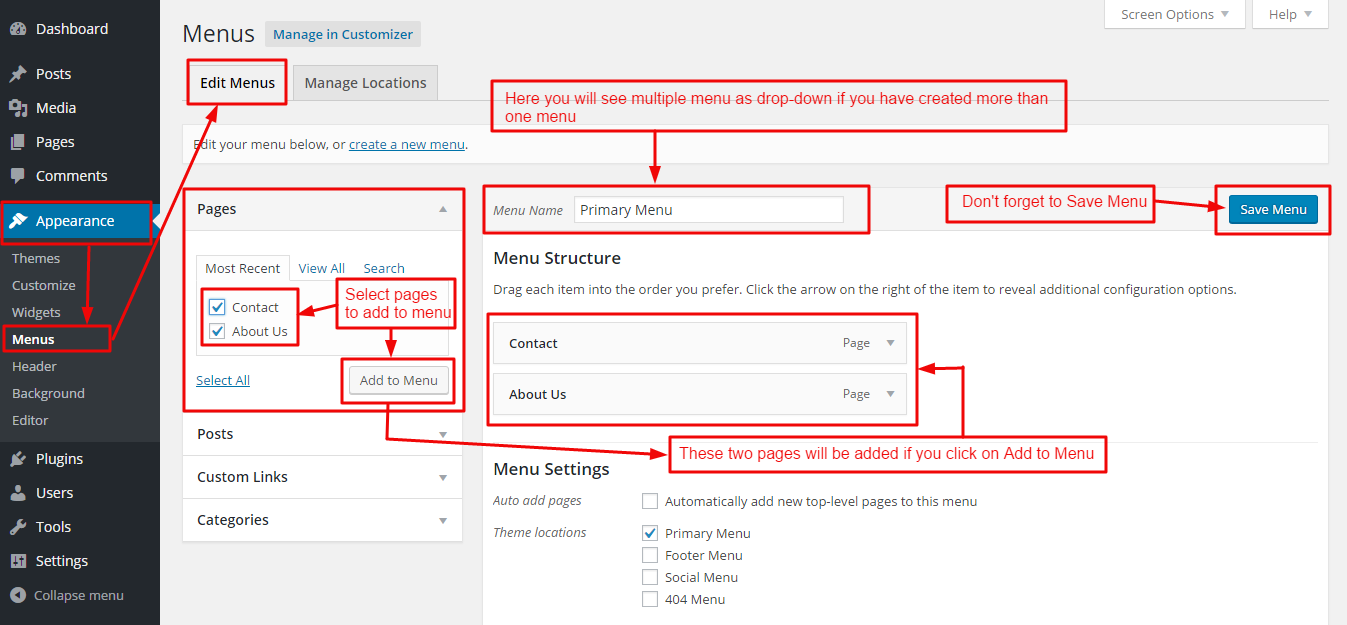
To add pages to the menu you need to create some pages (For e.g: “About Us” , “Contact”). After creating pages you need to add that pages to the menu as shown in this image.
Now you will see these pages you added as a drop-down in MENU at top-left corner.
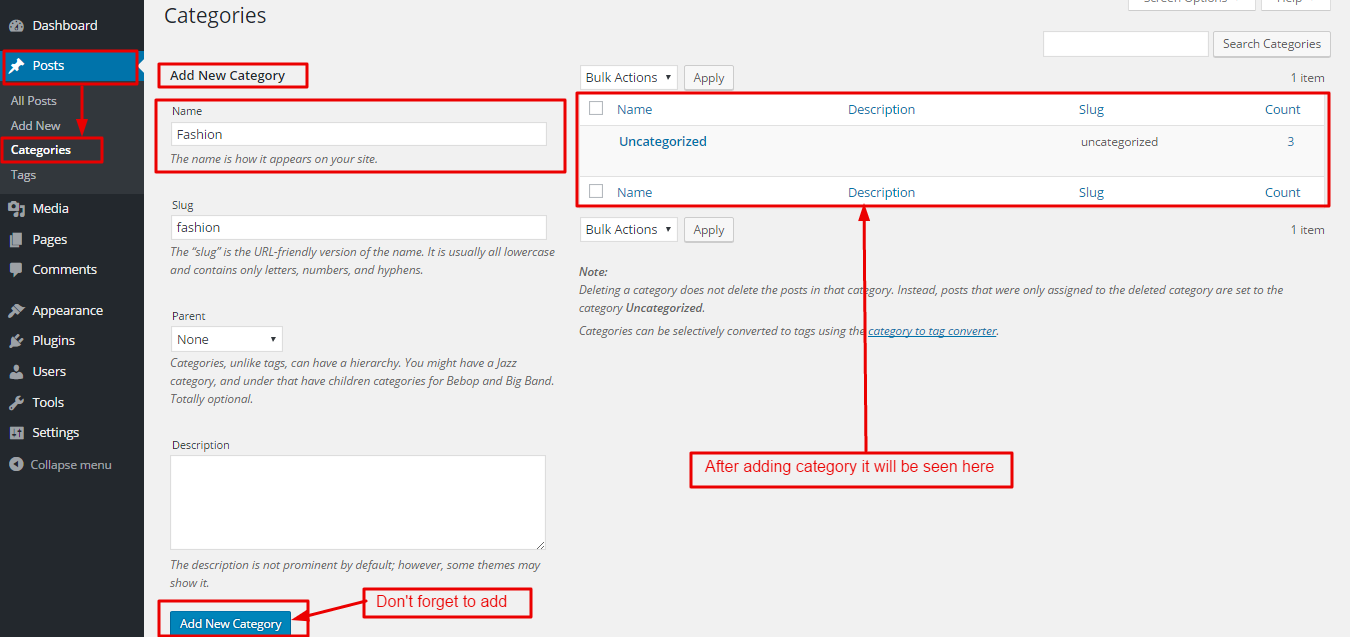
To add items to CATEGORY menu you need to create category at first.
To create category you need to do as shown in this image.
Now you will see this category as drop-down in CATEGORY menu in top-right corner when you visit your site.
Further you can add more categories which will be automatically to this CATEGORY menu as drop-down.
To add search-form in header image you need to go to Admin Panel / Appearance / Customize / Theme Options / Header Options. In this section when you scroll down you need to check the check-box saying Show Search Form as shown in this image.
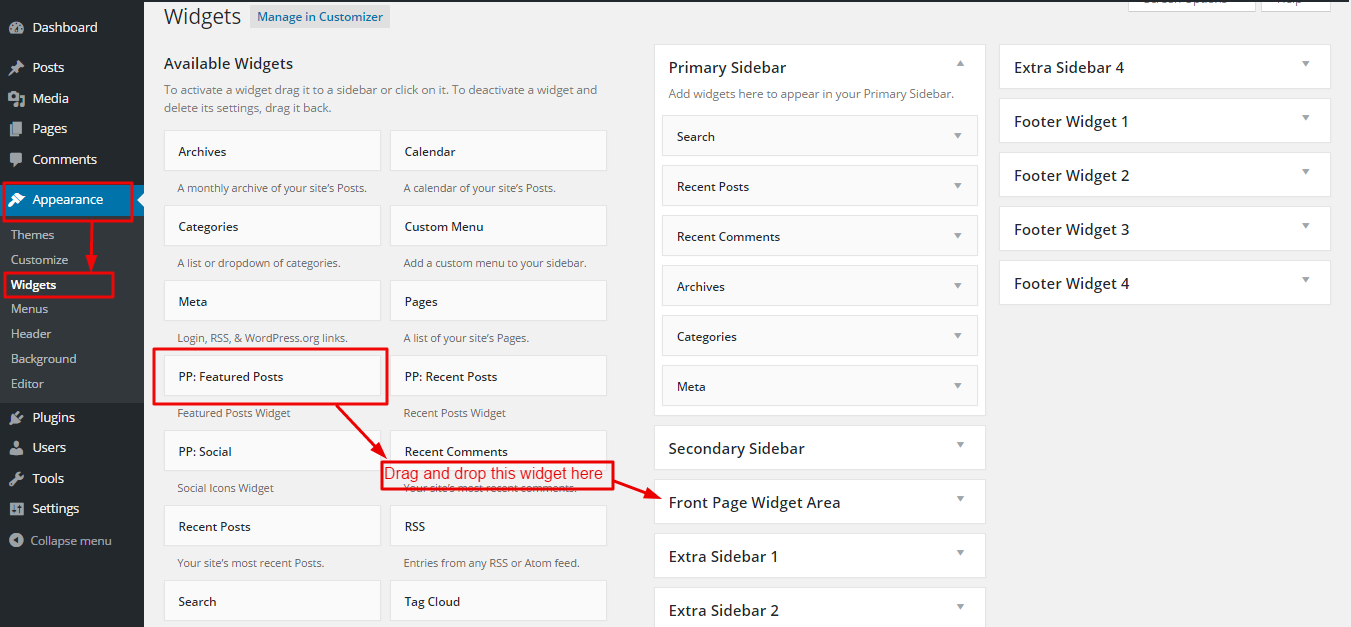
To add popular section you need to add widget to front-page.
To add widget to front-page you need to go to Admin Panel / Appearance / Widgets and do as shown in this image.
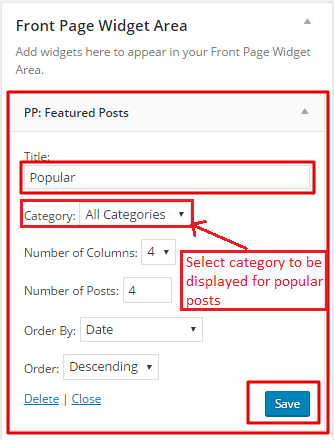
After this setup that widget as shown in below image.
You can choose posts from different category (If you have created different categories) to be displayed as popular posts.
Note: You need to have posts assigned to that category. If you select certain category and if that category doesn’t have any post then your popular setcion will be empty. To know how to create post you can refer below in Galleries Section.
Now you will see popular section when you visit your site as shown in the demo.
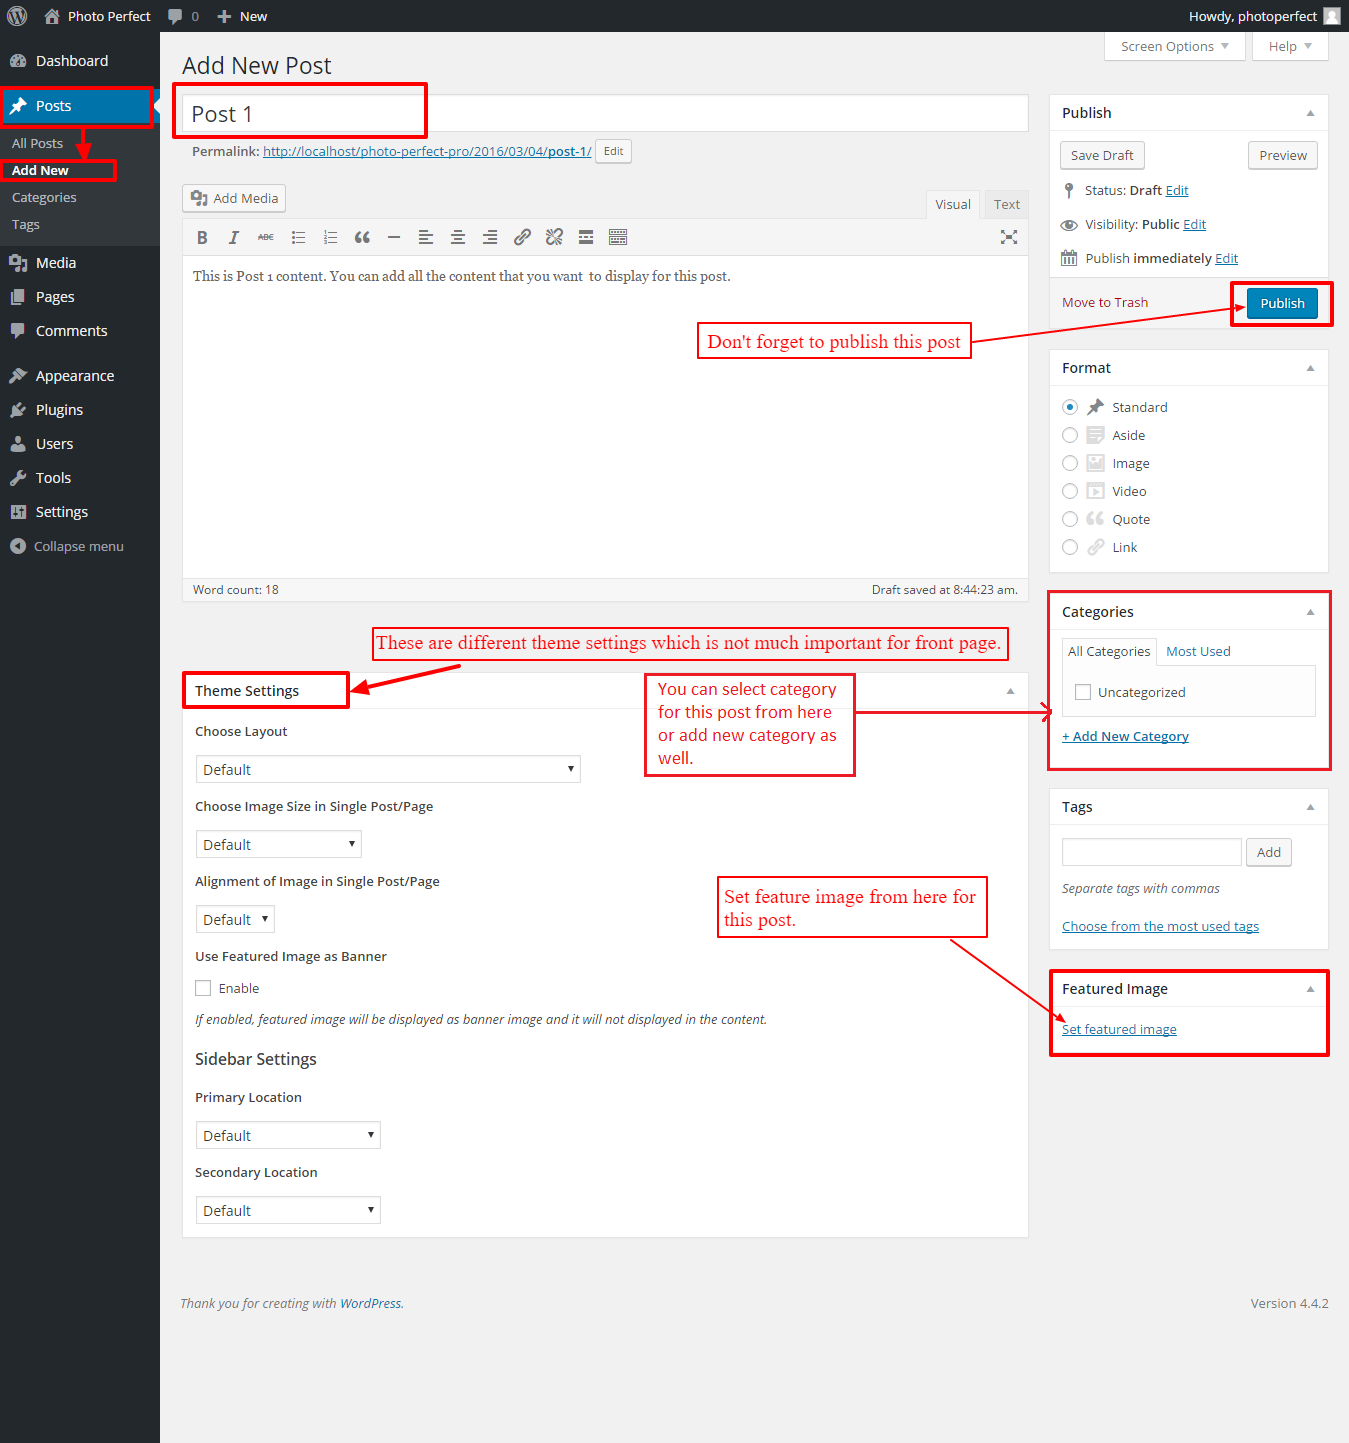
To create posts go to Admin Panel and do as shown in this image.
Now you will see this post on front page Galleries Section. Add some more post with featured image similarly to make your site look beautiful as in demo.
Following are steps to customize theme options. These are general guidelines to perform some of the basic yet useful features of Photo Perfect Pro Theme. ( Hint: We assume we are in “Customize” section for whole theme customization part i.e. Appearance > Customize.)
- From “Customize” section, go to “Header Image” Section.
- Select the image for Header section available on media library or upload from other location.
- If the preview is fine, click on “Save and Publish” to apply recently uploaded logo.
- Other Header Options:
- Alt Text: Alternate text for header image.
- Link URL: Link that opens when header-image is clicked.
- Check-box : Which when clicked, the header-image opens in the new window.
Note: Your theme recommends a header size of 1600 × 650 pixels.
- From “Customize” section, go to “Header Image” Section.
- In this section you will see Default Shrinked Image for Inner pages option. Select the image available on media library or upload from other location.
- Note: To enable shrink images on inner page you need to Enable Header Image on Entire Site and check the check-box saying Enable Shrunk Header from Customize / Theme Options / Header Options.
- From “Customize” section, go to “Background Image” Section.
- Select the image for site background available on media library or upload from other location.
- If the preview is fine, click on “Save and Publish” to apply recently selected/uploaded image as background image.
- From “Customize” section, go to “Colors” Section.
- Select the color for site background.
- If the preview is fine, click on “Save and Publish” to apply recently uploaded/selected background color.
- From “Customize” section, go to “Site Identity” Section.
- Put the site title in the text-box there.
- If the preview is fine, click on “Save and Publish” to keep that text as the site title.
- From “Customize” section, go to “Site Identity” Section.
- Put the tagline in the text-box there.
- If the preview is fine, click on “Save and Publish” to keep that text as the tagline.
- From “Customize” section, go to “Site Identity” Section.
- Select the site icon available on media library or upload from other location.
- If the preview is fine, click on “Save and Publish” to keep recently uploaded/selected icon as site icon.
Note: Your theme recommends square site icon, and at least 512px wide and tall..
- From “Customize” section, go to “Theme Options > Header Options” section.
- Select the image for site logo.
- Remove option help you to remove the Background image. Click “Remove” button to remove the image.
- “Change Image” button help you to change the Background image. Click on “Change Image” button and select another image for background.
- Click on “Save and Publish” to save the changes.
- From “Customize” section, go to “Theme Options > Header Options” section.
- Check on “Show Site Title” to show the site title on header.
- If preview looks fine, click on “Save and Publish” button to save the changes.
- From “Customize” section, go to “Theme Options > Header Options” section.
- Check on “Show Tagline” to show the site title on header.
- If preview looks fine, click on “Save and Publish” button to save the changes.
- From “Customize” section, go to “Theme Options > Header Options” section.
- Check on ” Enable Sticky Menu” to have sticky menu on header.
- If preview looks fine, click on “Save and Publish” button to save the changes.
- From “Customize” section, go to “Theme Options > Header Options” section.
- Check on “Show Category Dropdown” to show the site title on header.
- If preview looks fine, click on “Save and Publish” button to save the changes.
- From “Customize” section, go to “Theme Options > Header Options” section.
- Check on “Show Category as Navigation” to show show category as navigation on header.
- If preview looks fine, click on “Save and Publish” button to save the changes.
- From “Customize” section, go to “Theme Options > Header Options” section.
- Locate “Menu Text” & write the text you want to show in the textbox there & that will be displayed in as the “Menu” text in navigation on header.
- If preview looks fine, click on “Save and Publish” button to save the changes.
- From “Customize” section, go to “Theme Options > Header Options” section.
- Locate “Category Text” & write the text you want to show in the text-box there & that will be displayed as the “Category” text in navigation on header.
- If preview looks fine, click on “Save and Publish” button to save the changes.
- From “Customize” section, go to “Theme Options > Header Options” section.
- Locate “No of categories” & choose the number from the drop-down there.
- If preview looks fine, click on “Save and Publish” button to save the changes.
- From “Customize” section, go to “Theme Options > Header Options” section.
- Locate “Level of categories” & choose the number from the drop-down there. This will display level or depth of categories that will be shown in the navigation in header.
- If preview looks fine, click on “Save and Publish” button to save the changes.
- From “Customize” section, go to “Theme Options > Header Options” section.
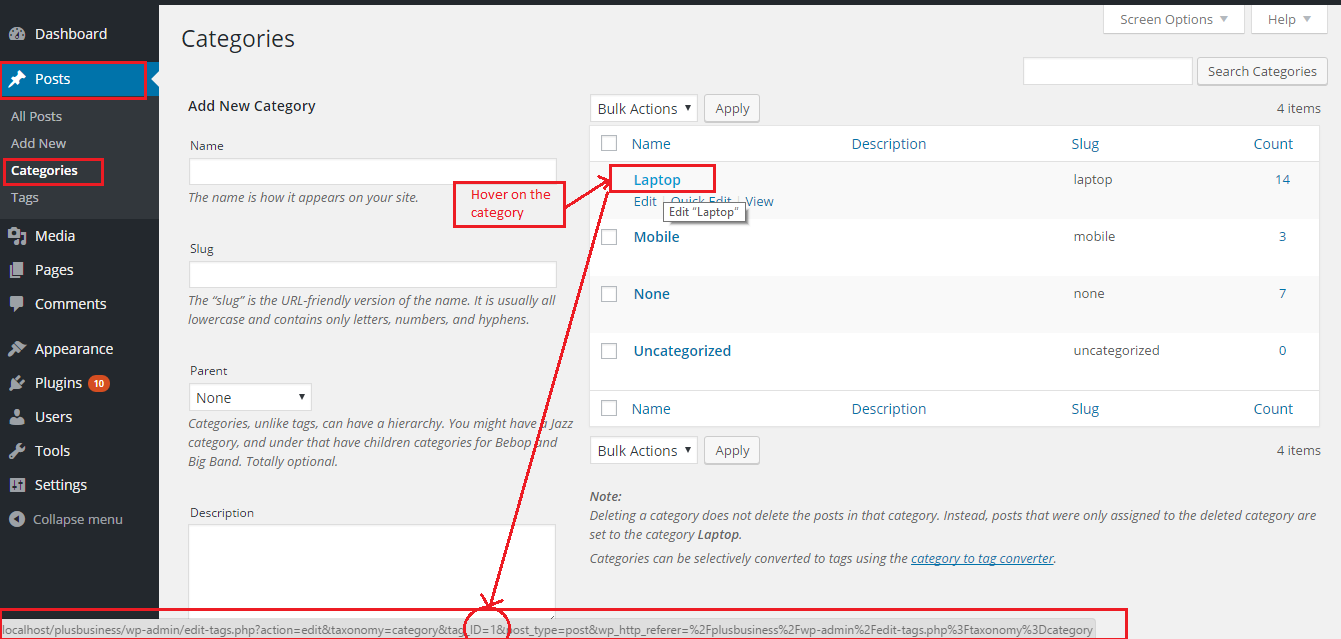
- Here you will see Exclude categories option. Now you need to enter categories IDs separated by comma to exclude in the category menu. As you see below image for how to find category ID.
- Click on “Save and Publish” button to save the changes.
- From “Customize” section, go to “Theme Options > Header Options” section.
- Check on “Show Search Form” to show the search form on header.
- If preview looks fine, click on “Save and Publish” button to save the changes.
- From “Customize” section, go to “Theme Options > Header Options” section.
- Here you will see check-box Enable Shrunk Header. Now you need to check this check-box to enable shrunk header images.
- This will enable shrunk header image that you have set from Customize > Header Image > Default Shrinked Image for Inner pages.
- Click on “Save and Publish” button to save the changes.
- From “Customize” section, go to “Theme Options > Search Options”.
- Change the text of the placeholder.
- If the preview is fine, click on “Save and Publish” to apply the placeholder text.
Form “Customize” section go to Theme Options > Layout Options.
- To change site global layout, choose the available options form drop down arrow.
- To change archive layout, choose the available options from drop down arrow. Masonry, Excerpt and Full options are available.
- To change Image in post/page, choose the available options form drop down arrow.
- To change image alignment post/page, choose the available options from drop down arrow. The available options are None, Left, Center and Right.
- If preview is fine, click on “Save and Publish” to save the above changes.
From “Customize” section go to Theme Options > Home Page Options.
- To disable Swirl Design ( Seperator image in the home page ) you need to check the check-box saying Disable Swirl Design.
- This will disable the swirl image ( Seperator Image ) in home page.
- Click on “Save and Publish” button to save the changes.
From “Customize” section go to Theme Options > Home Page Options.
- Under Home Page Options you will see Change Swirl Image option.
- Now Select Image available on media library or upload from other location.
- This will change the Swirl Image ( Seperator Image ) in home page.
- Click on “Save and Publish” button to save the changes.
- From “Customize” section, go to “Theme Options > Masonry Options”.
- Select 3 or 4 Columns.
- If preview is fine, click on “Save and Publish” to save the above changes.
- From “Customize” section go to Theme Options > Effect Options.
- In this section you will see a check-box saying Disable Zoom Effect.
- Now check this check-box to diable zooming effect in masonry images.
- Click on “Save and Publish” button to save the changes.
- From “Customize” section, go to “Theme Options > Breadcrumb Options”.
- Select Disabled or Simple or Advanced option.
- If preview is fine, click on “Save and Publish” to save the above changes.
- From “Customize” section, go to “Theme Options > Pagination Options”.
- Select Default Older post/Newer post or Numeric or Infinite Scroll – Scroll or Infinite Scroll – Click .
- If preview is fine, click on “Save and Publish” to save the above changes.
- From “Customize” section, go to “Theme Options > Footer Options” section.
- Modify “Copyright Text”.
- Click on “Save and Publish” to save the changes.
- From “Customize” section, go to “Theme Options > Footer Options” section.
- Modify “Powered By Text”.
- Click on “Save and Publish” to save the changes.
- From “Customize” section, go to “Theme Options > Footer Options” section.
- Check on “Show Go To Top” to enable Go to top on footer and unchecked to disable.
- Click on “Save and Publish” to save the changes.
- From “Customize” section, go to “Theme Options > Blog Options” section.
- Change the excerpt length form here. Default excerpt text length is 40 words.
- Click on “Save and Publish” to save the changes.
- From “Customize” section, go to “Theme Options > Blog Options” section.
- Change the read more text form here. Default Read More text is “Read More”.
- Click on “Save and Publish” to save the changes.
- Add Custom CSS here and find the changes.
- If preview is fine click on “Save and Publish” button to save the changes.
– From “Customize” section, go to “Theme Options > Font Family Options” section.
- Site Title: You can choose font family from drop down for site-title at header.
- Site Tagline: You can choose font family from drop down for site-tagline at header.
- Default: You can choose font family for default.
- Content title: You can choose font family from drop down for content-title.
- Content Body: You can choose font family from drop down for body content.
- Heading Tags: You can choose font family from drop down for header tags.
- Navigation: You can choose font family from drop down for navigation at header.
– From “Customize” section, go to “Color Options” section.
- Basic Color Options: It includes color options for Background, Text, Link, Link-hover, Heading, Button Text, Button Background, Button Text Hover & Button Background Hover for overall site.
- Reset Color Options: Resetting color options to default.
- Header Color Options: It includes color options for Site Title, Site Title Hover, Title Border, Site Tagline, Site Identity Background, Search Form Background, Search Button Background, Search Button Background Hover, Search Button Text & Search Button Text Hover for Header.
- Primary Menu Color Options: It includes color options for Main Background, Link, Link-hover, Link Background Hover, Heading, Button Text, Button Background, Button Text Hover & Button Background Hover for Primary Menu.
- Category Menu Color Options: It includes color options for Main Background, Link, Link-hover, Link Background Hover, Heading, Button Text, Button Background, Button Text Hover & Button Background Hover for Category Menu.
- Content Color Options: It includes color options for Background, Title, Link Hover, Text, Link, Meta Text, Meta Link, Meta Link Hover & Meta-icon for content.
- Content Masonry Color Options: It includes color options for Title, Icon, Icon Background Hover & Icon Hover for content masonry.
- Content Excerpt Color Options: It includes color options for Thumbnail Border & Content Background for content excerpt.
- Home Page Widgets Color Options: It includes color options for Widget Area Background & Widget Title for widgets on homepage.
- Breadcrumb Color Options: It includes color options for Link, Link Hover, Link Background & Link Background Hover for breadcrumb.
- Go To Top Color Options: It includes color options for Icon, Icon Hover, Background & Background Hover for Go to top button .
- Pagination Color Options: It includes color options for Link, Background Hover, Link Background, Link & Link Hover for pagination.
- Footer Widgets Color Options: It includes color options for Background, Title, Text, Link & Link Hover for footer widgets.
- Footer Area Color Options: It includes color options for Background, Title, Text, Link & Link Hover for footer area.
- From “Customize” Section go to Featured Slider > slider Type.
- In this section you will see Slider Status. You need to select Enabled Option from drop-down to enable slider in front page.
- After enabling this option you will be able to Select No of Slides and add Image and Link respectively.
- You can choose image from media gallery of from different folder.
- After enabling and adding images to slider you will see slider in front page.
- Click on “Save and Publish” button to save the changes.
- From “Customize” section go to Featured Slider > Slider Option.
- Under this section you will see following different options.
- Transition Effect: This changes the sliding effect when sliding from one image to another.
- Transition Delay: This changes the interval of changing of each image.
- Transition Duration: This is how long will the transition effect last.
- Enable Arrow: Checking this check-box enables the arrow in the slider image in below right section.
- Enable Pager: Checking this check-box enables the pager in the slider which is small circle icon in the image below left section.
- Enable Autoplay: Checking this check-box enables the auto play of the slider images.
- Click on “Save and Publish” button to save the changes.
The theme supports four menus. Select which menu appears in each location. You can edit your menu content on the Menus screen in the Appearance section.
From “Customize” section, go to “Menus > Menu Locations” section.
- Select the menu for Primary menu. Primary menu appears as a main menu in header section.
- Select the menu for Footer menu. Footer menu appears on the footer section.
- Choose the Social menu, which shows the social links title as a menu.
- Select the menu for 404. This menu appears on 404 page.
- If preview looks fine, save the changes by clicking on “Save and Publish” button.
Several widgets are available in the theme. All the available widgets are easy to operate. Set the value or select the available options as needed. Operating method of every widgets are described below.
For managing the widgets,
- Go to Appearance > Widgets
- Drag and drop or simply click the widget to add on the available widgets area.
or,
- Go to “Customize” and “Widgets”.
- Set the available widgets on necessary widget area.
- Click on Save and Publish button to save the changes.
Set desired widgets to available widget area.
Available widgets
- PP: Social – Displays social icons. Icons are fetched from Social Menu.
- PP: Recent Posts – Displayes recent posts with thumbnail. Suitable for sidebars.
- PP: Featured Posts – Dislayed featured posts. Suitable for Front Page Widget Area
