
Themes Instructions
Select a Theme from the drop down menu
Table of Contents
- 1.Introduction
- 2.Theme Installation
- 3.How to manage Site Title, Tagline and Site Icon?
- 4.How to change Background Color?
- 5.How to change Background Image?
- 6.How to manage Themes Options?
- 6.1.How to manage Header?
- 6.2.How to manage Icons?
- 6.3.How to show blog listing in home page?
- 6.4.How to manage Search?
- 6.5.How to manage Pagination?
- 6.6.How to manage Layout?
- 6.7.How to manage Footer?
- 6.8.How to manage Blog?
- 6.9.How to manage Breadcrumb?
- 6.10.How to manage Social Icons?
- 6.11.How to add Custom CSS?
- 7.How to change Featured Slider Section?
- 8.How to change Featured Content?
- 9.How to manage Breaking News?
- 10.How to create a Menu?
- 11.How to manage Widgets?
- 12.How to set Static Front Page?
- 13.Automatic updates using Dashboard
- 14.Updating Theme Using FTP
Magzimum
Magzimum is a simple, clean and responsive WordPress. Don’t forget to add in your site URL when you post a message.
Thank you for purchasing and using Magzimum Theme. The following steps will guide you and explain how to use different features of the theme.
- Log in to the WordPress Administration Panels.
- Select the Appearance panel, then Themes.
- Select Add New.
- Then select Upload Theme.
- Click Browse Locate magzimum.zip Theme in your computer.
- Select magzimum.zip and click Install Now.
You can use FTP client like FileZilla to connect your web server.
- Unzip magzimum.zip to your Desktop.
- Using an FTP client to access your host web server, go to /wp-content/themes/ and upload your new copy of Magzimum Pro Theme.
- Now, log into the WordPress Dashboard with your login details.
- Select the Appearance panel, then Themes.
- You will see the theme in the list.
- Then click Activate button.
- Now the theme will be activate and go through the following options to set up the theme step wise.
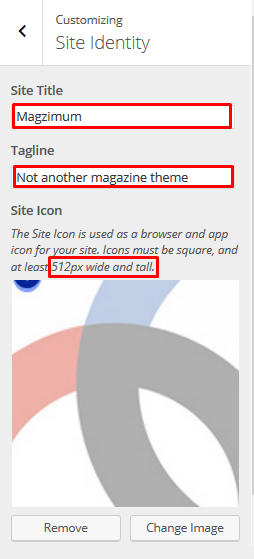
From Customize section, go to Site Identity.
2. From Site Identity, you will be able to add various options related to site identity like:
- Site Title: It changes the main site title of the site.
- Tagline: It changes the tagline (i.e. Description) of the site. Just below site title.
- Site Icon: The Site Icon is used as a browser and app icon for your site. Icon must be square, and at least 512 px wide and tall.
3. If preview is fine, click on Save and Publish button to save the changes.
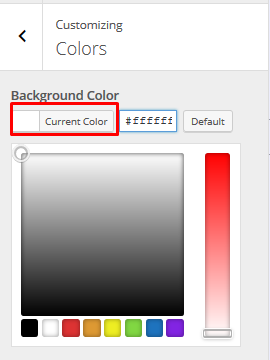
1. From Customize section, go to Colors.
2. From Colors, you will be able to change the background color
3. If preview is fine, click on Save and Publish button to save the changes.
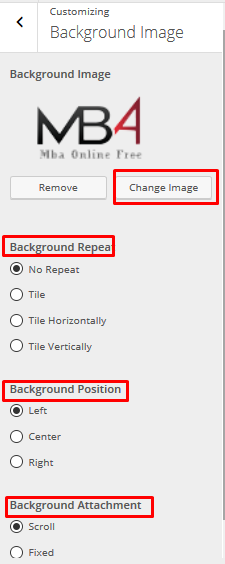
1. From Customize section, go to Background Image.
2. From Background Image, you will be able to change the background image and select its properties Background Repeat, Background Position and Background Attachment.
3. If preview is fine, click on Save and Publish button to save the changes.
1. From Customize section, go to Themes Options.
2. Now, here you have different sections and settings for:
- Header
- Icons
- Layout
- Home Page
- Search
- Pagination
- Layout
- Footer
- Blog
- Breadcrumb
- Social Icons
- Custom CSS
The above mentioned section are described below:
1. From Customize section, go to Themes Options and inside it there is Header .
2. From here, you can set:
- Logo: You can change your site’s logo by clicking on “Select Image” and choosing/upload image from Media.
- Show Tagline: Check this to show tagline on header
- Show Social Icons: Check this to show social icons on header
3. If preview is fine, click on Save and Publish button to save the changes.
1. From Customize section, go to Themes Options and inside it there is Icons .
2. From here, you can set:
- Favicon: You can change your site’s logo on tab bar by clicking on “Select Image” and choosing/upload image from Media.
- Web Clip Icon You can provide a custom icon that users can display on their Home screens using the web clip feature. Users tap the icon to reach your web content in one easy step. Change web clip icon by clicking on “Select Image” and choosing/upload image from Media.
3. If preview is fine, click on Save and Publish button to save the changes.
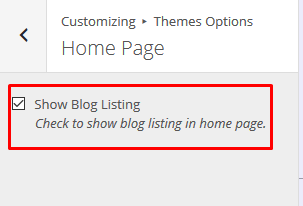
1. From Customize section, go to Themes Options and inside it there is Home Page .
2. From here, you can choose to show blog listing in home page.
3. If preview is fine, click on Save and Publish button to save the changes.
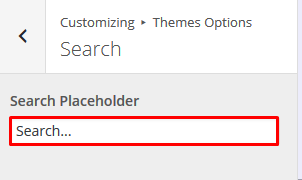
1. From Customize section, go to Themes Options and inside it there is Search .
2. From here, you can set the placeholder text inside the “Search” field.
3. If preview is fine, click on Save and Publish button to save the changes.
1. From Customize section, go to Themes Options and inside it there is Pagination.
2. Here you can set pagination type as Default or Numeric.
3. If preview is fine, click on “Save and Publish” button to save the changes.
1. From Customize section, go to Themes Options and inside it there is Layout .
2. Now, here you can set layouts for:
- Site Layout: (Options: Boxed or Fluid).
- Global Layout: (Options: Primary Sidebar – Content, Content – Primary Sidebar, Three Columns or No Sidebar).
- Archive Layout: (Options: Post Excerpt or Full Post).
- Image in Single Post/Page: (Options: No Image, thumbnail, medium, large, full, magzimum-thumb, magzimun slider).
3. If preview is fine, click on Save and Publish button to save the changes.
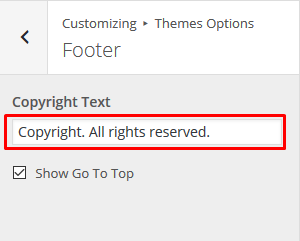
1. From Customize section, go to Themes Options and inside it there is Footer.
2. Here you can set Copyright Text and Show Go to Top
3. You can write text in the field Copyright Text.
4. In order to show the button Show Go To Top, check the box to display the functionality to take the user to the top of the page.
5. If preview is fine, click on Save and Publish button to save the changes.
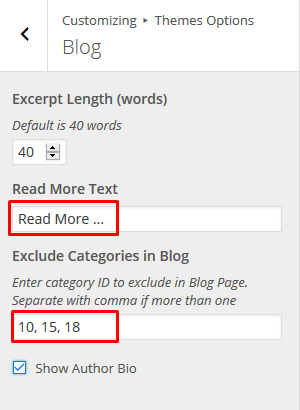
1. From Customize section, go to Themes Options and inside it there is Blog Options.
2. Here you can set Excerpt Length (in Words), Read More Text, Exclude Categories in Blog and option for Show Author Bio .
3. If preview is fine, click on Save and Publish button to save the changes.
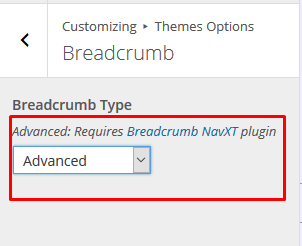
1. From Customize section, go to Themes Options and inside it there is Breadcrumb.
2. Here you can select Disabled, Simple and Advanced.
3. If preview is fine, click on Save and Publish button to save the changes.
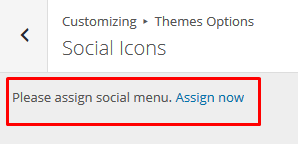
1. From Customize section, go to Themes Options and inside it there is Social Icons.
2. Here you can manage social menu. At first you have to create social menu before managing it.
3. If preview is fine, click on Save and Publish button to save the changes.
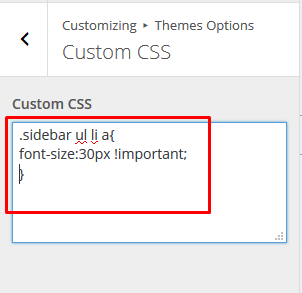
1. From Customize section, go to Themes Options and inside it there is Custom CSS.
2. Here you can add custom css code.
3. If the preview is fine, click on Save and Publish to save the above changes.
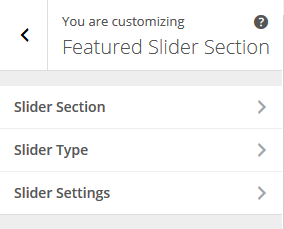
1. From Customize section, go to Featured Slider Section.
2. From Featured Slider, you will be able to change:
- Slider Section
- Slider Type
- Slider Settings
1. From Customize section, go to Featured Slider Section and inside it there is an option Slider Section.
2. Here you can Enable Slider On: (Options: Home Page + Blog Page, Home Page Only, Entire Site or Disabled).
3. If the preview is fine, click on Save and Publish to save the above changes.
1. From Customize section, go to Featured Slider and inside it there is an option Slider Type.
2. Here you can set:
- Select Slider Type: (Option: featured category).
- Select Category: Select a category for featured slider section.
- Number of Slides: Select no of slides.
3. If the preview is fine, click on Save and Publish to save the above changes.
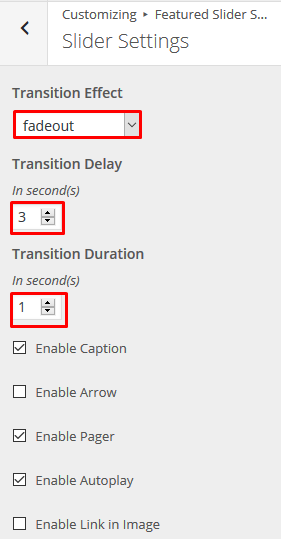
1. From Customize section, go to Featured Slider Section and inside it there is Slider Settings.
2. Here you can set:
- Transition Effect: (Options: fade, fadeout, none, scrollHorz).
- Transition Delay in second(s)
- Transition Duration in second(s)
3. From here, you can also set various options such as:
- Enable Caption: Enabling this will give you control to add texts on each slider images.
- Enable Arrow: Enabling this will by default display the left and right arrows to slide through images.
- Enable Pager: If enabled, pagination on the slider would be displayed.
- Enable Autoplay: If Enabled, the slider transitions automatically based on the selection of Transition Effect, Transition Delay and Transtiion Duration.
- Enable Link in Image: If enabled, link in the image would be displayed.
4. If the preview is fine, click on Save and Publish to save the above changes.
From Customize section, go to Featured Content and inside it there are Featured Content Type and Content Settings.
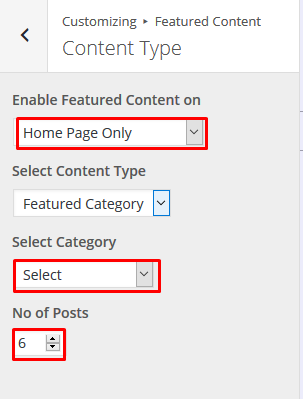
1. From Customize section, go to Featured Content and inside it there is an option Content Type.
2. Here you can set:
- Enable Featured Content on: (Options: Home Page + Blog Page, Home Page Only, Entire Site or Disabled).
- Select Content Type: Available Option: Featured Category.
- Select Category: Select a Category for featured content.
- No of Posts Select No of Posts.
3. If the preview is fine, click on Save and Publish to save the above changes.
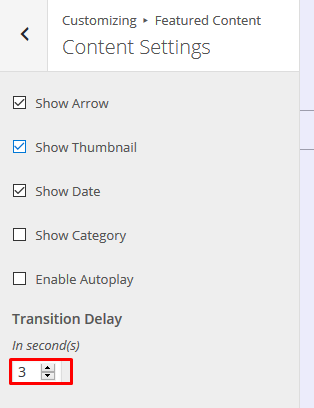
1. From Customize section, go to Featured Content and inside it there is Content Settings.
2. Here you can set various options such as:
- Enable Arrow: Enabling this will by default display the left and right arrows to slide through images.
- Enable Thumbnail: If enabled, thumbnail size image would be displayed on featured content.
- Show Date: If Enabled, the date would be displayed on featured content.
- Show Category: If Enabled, the category would be displayed of the post on featured content.
- Enable Autoplay: If enabled, Featured content would be autoplayed.
- Transition Delay: Select the delay in seconds between successive featured content.
3. If the preview is fine, click on Save and Publish to save the above changes.
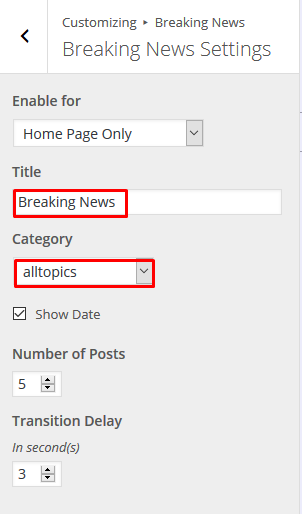
1. From Customize section, go to Breaking News and inside it you will find Breaking News Settings.
2. Here you can set:
- Enable for: (Options: Disabled, Entire Site, Home Page + Blog Page or Home Page only).
- Title: Write the title
- Category: Select a category for breaking news.
- Show Date: If enabled date would be displayed alongside post title.
- Number of Posts: Select number of Posts to be displayed on breaking news section.
- Transition Delay: Select delay between the posts in seconds.
3. If the preview is fine, click on Save and Publish to save the above changes.
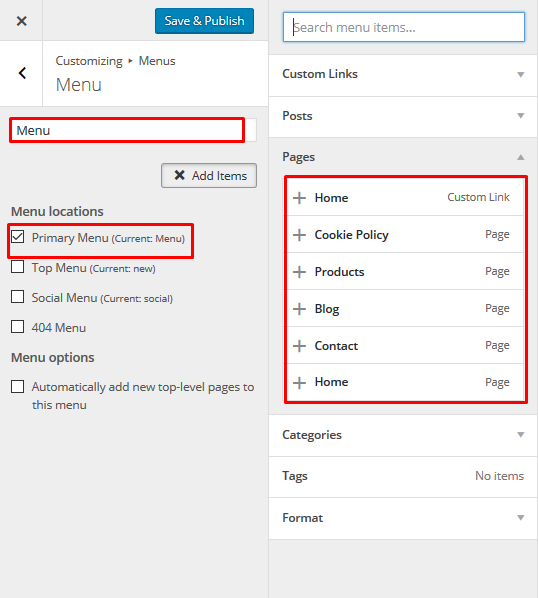
1. From Customize section, go to Menus.
2. From Menus, click “Add a menu” button and you will be able to add items on newly created menu.
3. If the preview looks fine, save the changes by clicking on Save and publish button.
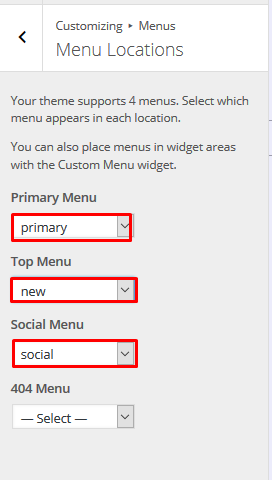
1. From Customize section, go to Menus and inside it you will find Menu Locations.
2. Here you can:
- Select the menu for Primary menu. Primary menu appears as a main menu in header section.
- Select the menu for Top menu. Top menu appears on the top of the site.
- Choose the Social menu, which shows the social links title as a menu.
- Select the menu for 404. This menu appears on 404 page.
3. If the preview looks fine, save the changes by clicking on Save and publish button.
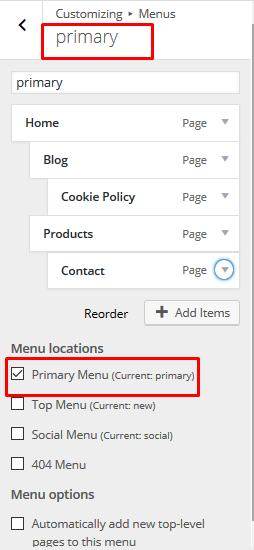
1. From Customize section, go to Menus.
2. From Menus, click “All Pages” and you will be able to see the created menu, options to reorder menu and add menu items.
3. From Menus, you will be able to add different menu types where you will be able to see the created menu, options to reorder menu, add menu items and choose Menu Locations.
4. If the preview looks fine, save the changes by clicking on Save and publish button.
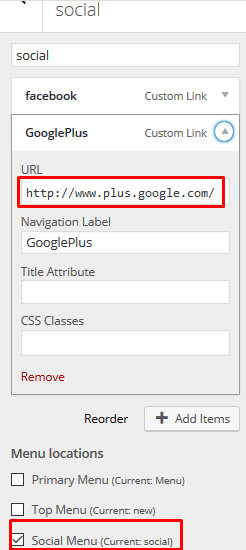
1. From Customize section, go to Menus.
2. From Menus, select Social Menu.
3. Now, add custom links and put your valid social media URL’s in each of the links to get social icons in the social menu. You should have enabled social menu from Theme Options -> Header to show social menu.
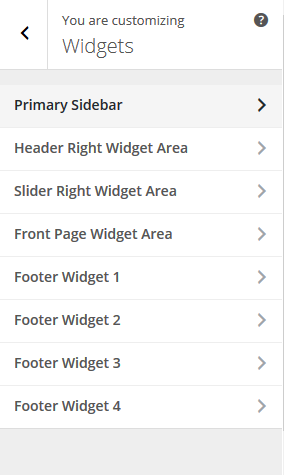
1. From Customize section, go to Widgets.
2. From Widgets, you will be able to manage widgets on various areas of the site:
- Primary Sidebar
- Header Right Widget Area
- Slider Right Widget Area
- Front Page Widget Area
- Footer Widget 1
- Footer Widget 2
- Footer Widget 3
- Footer Widget 4
3. Here, you will be able to Add or Remove Widgets according to your requirement.
4. You can simply click on Add a Widget button and select various available options according to your requirement.
5. If the preview is fine, you can click on Save & Publish.
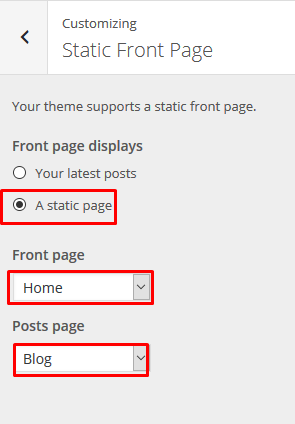
1. From Customize section, go to Static Front Page.
2. From Static Front Page, you will be able to set a page as Static Front Page and you will find your latest posts page option as well.
You can update Themes directly from the Administration Panel by following these steps .
- Go to your WordPress Admin section.
- Now go to your dashboard and go to Updates .
- You have to go to the Themes section, if update is available you can update the theme checking the box and update themes.
To update Theme though FTP, follow these basic steps:
- Download the latest version of Magzimum theme from your WordPress Theme Directory Magzimum Theme Download to your Desktop.
- Unzip magzimum.zip to your Desktop.
- Using an FTP client to access your host web server, go to /wp-content/themes/ and upload your new copy of Magzimum Theme which shall replace the old files.
