

Plugins Instructions
Select a Plugin from the drop down menu
Table of Contents
- 1.Introduction
- 2.Installation
- 3.Overview
- 4.Basic
- 5.Notice Types
- 6.Display
- 7.Visibility
- 8.All Subscribers
- 9.Settings
- 10.Creating Notice Bar
- 11.Basic Configuration
- 12.Section Settings
- 13.Notice Types Configuration
- 14.Plain Text
- 15.Slider
- 16.News Ticker
- 17.NB Subscribe Form
- 18.Call To Action
- 19.Shortcodes
- 20.Twitter Tweets
- 21.Social Icons
- 22.Display Configuration
- 23.Visibility Configuration
- 24.Splendid Features
- 25.Multiple Notice Types
- 26.Highly Customizable
- 27.Multiple Notice Bars
- 28.Visibility Control and Scheduling
- 29.Easy Shortcodes Integration
- 30.Dedicated Subscribers Listing section
- 31.Compatibility
- 32.Support and Documentation
- 33.Frequent Updates
- 34.License
Notice Bar Pro
Notice bar pro is simple but powerful plugin to create and display custom Notice bars in WordPress websites. It helps website admins to effectively convey notices, information & messages to their visitors swiftly. With user friendly interface, tons of options to toggle and multiple notice types, Notice Bar Pro is undoubtedly one of best notice bar plugin for WordPress websites.
Notice Bar Pro is designed to be highly customizable and meets wide range of user requirements. With simple tweaks and configurations, it can be easily used by a wide variety of websites.
Installation of Notice Bar Pro is easy and simple. After Installation, Notice Bar Pro adds a new menu with bullhorn icon ( Notice Bar Pro).To get started you can easily install the plugin through one of the following methods explained below.
- Download the plugin (.zip file)
- In your Admin, go to menu Plugins > Add
- Select the tab “Upload”
- Upload the .zip file you just downloaded
- Activate the plugin
- A new menu will appear in your Admin
- Once you buy the plugin, you will get zip folder.
- Unzip the folder and Upload `notice-bar-pro` folder to the `/wp-content/plugins/` directory
- Activate the plugin through the ‘Plugins’ menu in WordPress
- A new menu will appear in your Admin panel
Notice Bar Pro is a powerful plugin developed to create and organize custom notice bars for WordPress websites. The plugin is developed to attain simplicity along with its powerful functionalities. The settings, user interface and configurations are made as concise and clear as possible for users to be able to use without unnecessary hassle.
After Installation and activation of the plugin, users will be greeted with a new notice bar menu in the admin dashboard. Clicking on the menu will open the main interface of the plugin. Depending upon your installation type you will see some differences in the main interface as explained below:
For Upgraded Users:
Users who have upgraded to the Notice Bar Pro from the free version of the plugin will get a predefined notice bar titled as “Notice Bar #1” in their Notices list. The Notice is automatically created notice bar that replicates all your settings and customization saved in Notice Bar free plugin.Users can now choose to either customize this notice bar with pro features or create a new notice bar.
For New Users:
Users who are new users of Notice Bar Pro Plugin can hover on the Notice Bar Pro icon and choose add new to add new notice bar.
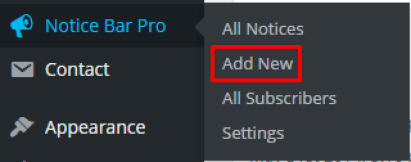
Either way, Users can proceed to edit/ create Notice Bar through the interface opened by clicking on either option. The walk through of the Notice Bar configuration interface is documented below:
Basic tab is the first active tab in the Notice Bar Pro configuration page. This tab lets users toggle the basic settings for specific Notice bar user has chosen to create/ edit. When adding a new notice bar, the first setting for users is to create a title for the notice bar.
The Basic tab can be used to toggle basic settings and configurations for the notice bar like enabling notice bar in front-end and assigning different Sections.
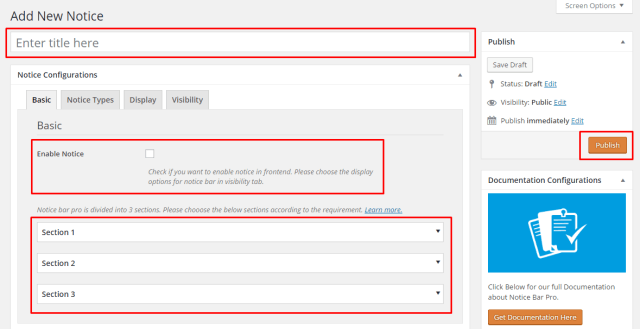
Sections:
Sections are three configurable areas in the Notice Bar. Users can choose to enable/ disable individual sections, set custom widths and colors along with applying different Notice Types in a single notice bar. Each section comes with a set of settings that can be used to configure each section individually. The settings in the section area are documented below in detail.
Once user has set set desired settings and configurations in the basic tab, user should update/publish to save the settings.
Notice Types is the second tab accessible from the notice bar configuration page. Notice Bar Pro comes loaded with Eight Different Notice Types that can be configured in various ways as per user’s choice. This range of notice types in Notice Bar Pro gives the plugin flexibility in usage. Users can enjoy various functionalities through notice types in a single notice bar.
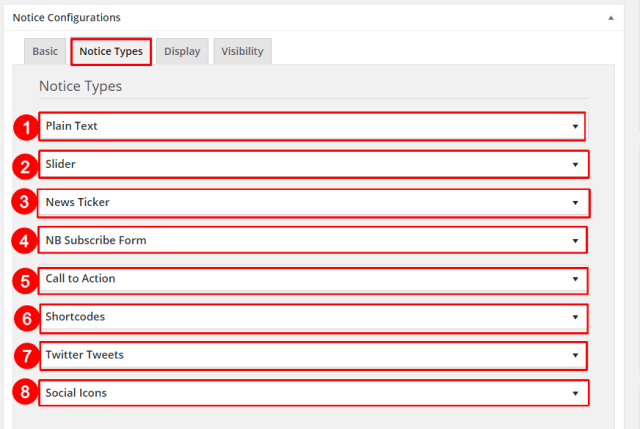
- Plain Text : Notice type to create simple plain text notices for Notice Bar. Usually for creating single line plain text notice with some HTML tags support (“<a>”,”<button>”,”<strong>”,”<em>”,”<br>”)
- Slider : Notice type to create text slider to represent text notices in a modern way. Perfect to represent multiple text notices.
- News Ticker : Notice type to create news ticker format text notices. Represents multiple notice in tickers with distinctive label.
- NB Subscribe Form : Notice type to add a simple and effective subscribe form to the Notice bar.
- Call to Action : Notice type to add an engaging Call To Action in the notice bar for special offers and announcements.
- Shortcodes : Notice type to add in custom shortcodes from other plugins in the notice bar for extended functionalities.
- Twitter Tweets : Notice type to pull and display latest twitter tweet feeds from desired twitter handle in the notice bar.
- Social Icons : Notice type to add customizable social sharing icons to the notice bar.
The Display tab in the Notice Configuration lets Users customize and handle the display settings of the specific notice bar. The tab handles settings and configurations related to visual layout of the specific notice bar.
Display tab is contained with configurations like notice bar position,color options, mobile display options and custom CSS.
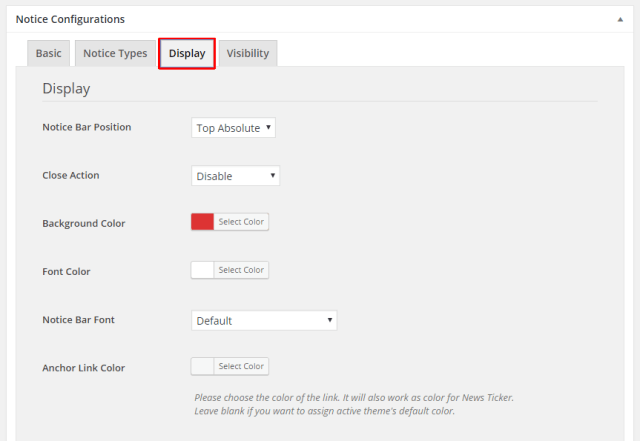
Individual settings included in display tab are explained in detail under Display Configuration section below.
The visibility tab in the Notice Configuration lets Users customize and handle visibility behavior of the notice bar. Users can toggle a wide range of settings for visibility timings and custom display controls.
The settings in visibility tab is responsible for advanced functionalities like scheduling notice display and controlling notice bar display behavior.
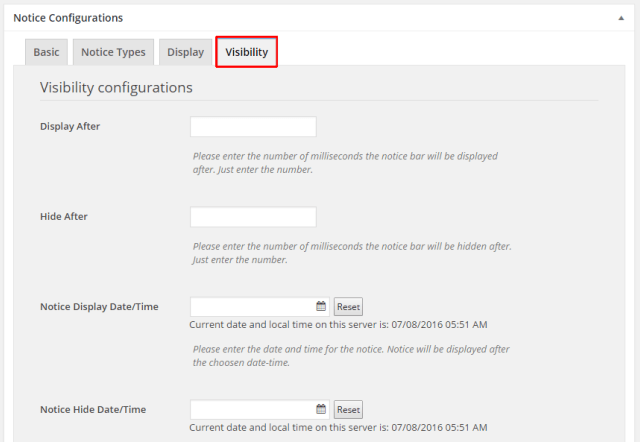
Individual settings included in visibility tab are explained in detail under Visibility Configuration section below.
The All Subscribers menu is the menu that shows under the Notice Bar Pro icon in the admin dashboard. The menu opens up a dedicated interface to represent a list of all subscribers’ email information grabbed by the NB Subscribe Form Notice type.
Under this option, website admin can view / edit the information of subscribers who have opted to subscribe through NB Subscribe Form.

Note: Subscribers email info can be accessed by clicking individual subscriber.
Settings menu consists of global settings that is applicable across all notice bars. The menu also appears below the Notice Bar Pro menu in the admin dashboard.
The settings bar consists of a checkbox to enable debug mode for the plugin. This option, when checked uses the uncompressed java script and CSS files in the plugin making debug easier in case of CSS and js conflicts.
Notice Bar Pro lets its users use and configure a wide range of configuration option to create a Notice Bar of their choice. Notice configurations is where users can tweak all the available settings as per their requirements to create their amazing notices with Notice Bar Pro.
This section follows a step-by-step walk through of all the configurations and settings available in the Notice Bar Plugin and usage instructions.
Basic Configuration settings tab is the first settings interface in notice bar creation. Users can toggle basic settings to enable / disable the notice bar display, sections setup with basic configurations.
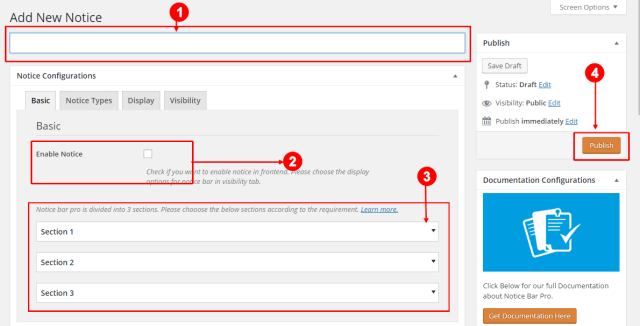
- Title Bar : Adds a title to the notice bar.
- Enable Notice : Checkbox to toggle notice bar display in front-end. Check to enable notice bar display.
- Sections : Notice Bar Pro comes with three sections to display notices in a single notice bar. Each section can be individually toggled to enable/ disable, add custom sizes and colors and display different notice type.
- Update/Publish : To save and update applied settings in the Configuration settings.
Sections are customizable areas applicable in single notice bar. Each section comes with a set of configuration settings to toggle and control display, behavior and layout of each section. Users can configure each section individually in a desired manner to setup notice bar of their choices and requirements.
Settings in each section are explained and illustrated below:
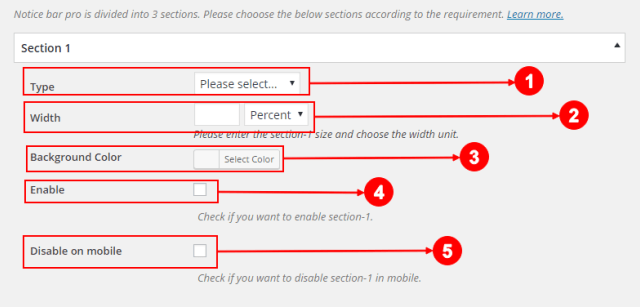
- Type : Drop-down option to select the desired Notice Type. Users can set the desired notice type for the current notice bar, however selected notice type must be configured for it to display in the notice bar.
- Width : Option to set desired width for respective section in current notice bar. Takes number input with available drop-down inputs, “percent”,”pixels” and “Em”.
- Background Color : Selects color input for background of the selected section. If left blank, the section takes up the background color from notice bar.
- Enable : Checkbox option to enable / disable the current section display. Should be checked to display the section in the front-end.
- Disable on mobile : Checkbox option to enable / disable current section display on mobile.
Notice Types configuration settings interface includes settings / options for all available notice types. Notice Bar Pro contains Eight different notice types variations users can configure.
Each notice type has its own settings that users can configure as per their requirements.
Explained below are all available settings for each notice type user can configure:
Plain text notice type options can be toggled in this section.
Individual settings available under this section for plain text notice type are described below:
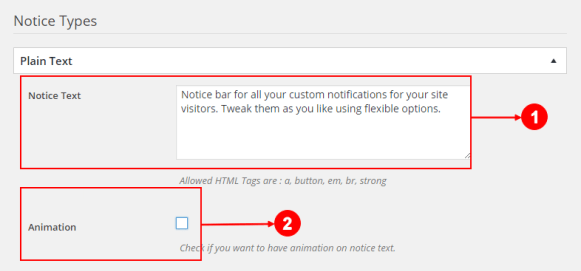
- Notice Text : This field is used to input the text notice that displays in the notrice bar on the website front-end. The field accepts text input with html tags : <a>,<button>, <em>,<strong> and <br>.
- Animation : Checkbox to enable / disable animation and animation settings to the plain text notice type. when checked, a new set of settings related to animation fires up in the section which is explained below.
Animation Checkbox : enabled & “marquee” selected :
When “Animation” checkbox is enabled and “marquee” is selected in the “Animation Options” the following settings are available for the users to configure :

- Animation Options : This option allows users to choose the type of animation to apply to the plain text notice type. Available Options: Marquee & Blink.
- Marquee Type : This option lets users to set the desired marquee scroll direction for the text notice. Available options : “Right Scroll”: to scroll the marquee text to right direction & “Left Scroll”:to scroll the marquee text to left direction.
- Marquee Speed : This option lets users to set desired speed for the marquee animation. Takes number input value, Default : 90.
Animation Checkbox : enabled & “Blink” selected :
When “Blink” option is selected, “Marquee Speed” is replaced by “Blink Speed”. The option field is also a number input field that lets users configure blink animation speed to the plain text notice. Default : 1000.
Slider notice type options can be configured in this section in Notice Configurations.
The options available in this section are detailed below :
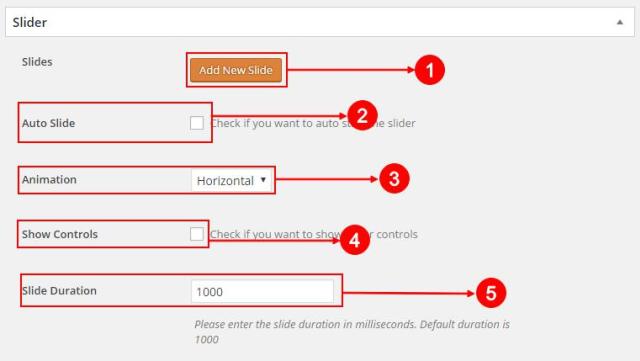
- Add New Slide : Users can create new text slides with this button. When a slide is added, it is listed in this area with options to add more or remove created slide.
- Auto Slide : Check box option to enable disable auto sliding of the slides.
- Animation : Users can select desired animation type for their slider with this option. Available Options: “Horizontal” : to make slider contents slide horizontally & “Fade” : to make slider contents slide with fade effect.
- Show Controls : Check box option to enable / disable slider controls button display in the slider in notice bar.
- Slide Duration : This option lets users to set desired slide duration timings for the slider. Takes numbered input for time units in milliseconds. Default : 1000.
News ticker are special notice types that lets users to add news / notices and display in ticker format in the notice bar.
This section contains all available options related to news ticker configuration:
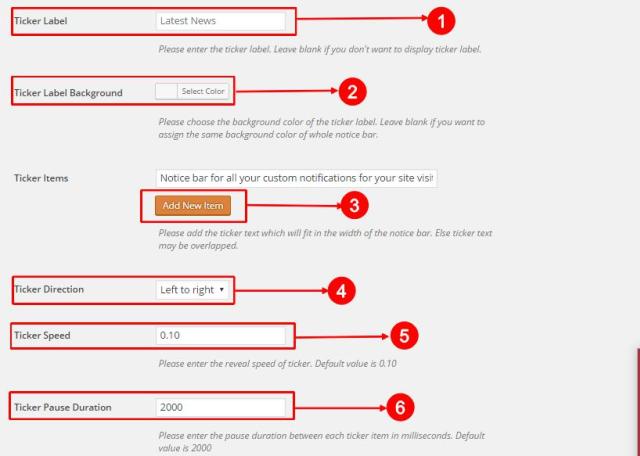
- Ticker Label : This option lets users add a custom label text for the news ticker in the notice bar. If left blank, the ticker label is disabled for current news ticker.
- Ticker Label Background : Color picker option to set color for the ticker label. Selected color will only be displayed when ticker label is set. If left blank while setting the ticker label, background of the notice bar is applied.
- Add New Items : Button to add news tickers. Takes text input. All added ticker items are also listed in this section with option to remove and add more ticker text.
- Ticker Direction : Select option to to choose the ticker display direction in the notice bar. Available options : “Left to Right”: to display ticker from left to right direction, with ticker label in left & “Right to Left” : to display ticker from right to left direction, with ticker label in right.
- Ticker Speed : Number Input field to enter desired speed of ticker reveal. Default: 0.10
- Ticker Pause Duration : Takes number input in milliseconds for the time to display individual ticker items in the news ticker. Default : 2000
Notice Bar Pro comes loaded with simple yet effective subscribe form that user can set to display in the notice bar. Titled as “NB Subscribe Form” this notice type displays subscribe form to the front end with minimal settings and configurations.
With interactive error / success messages display and dedicated “subscribers” menu in the dashboard, NB Subscribe form is a simple and effective way to build your subscribes through the notice bar.
This section has email input field that user can set accordingly to receive email updates about new subscribers through NB subscribe form. By default the input field pulls admin email that user has set as WordPress admin.
Call to action Notice type is a custom call to action text/ button creator to display in the notice bar. This notice type configurations helps users to create and customize call to action with custom links for the website visitors in three easy steps.
The options available for Call to Action notice types are :
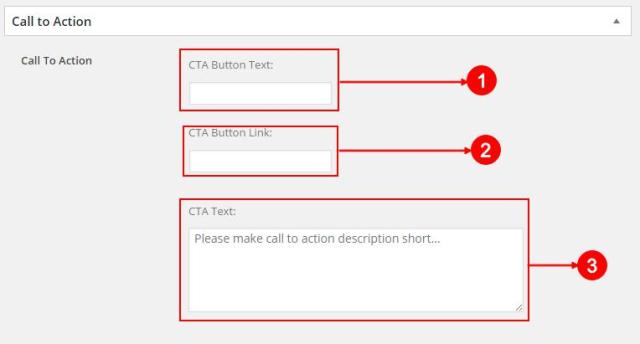
- CTA Button Text : Text input field to enter custom call to action button text.
- CTA Button Link : Input field to enter the URL to redirect users with the Call To Action Button. Link set here opens in new tab in browser window from website front-end.
- CTA Text : Users can enter custom Call To Action text that is shown in the notice bar.
Shortcodes notice type in Notice Bar Pro allows users to integrate custom Newsletter forms/ subscribe fields and any other contents with shordcode implementation. This provides flexibility to the users in vast range as it allows custom forms intigration inside the notice bar.
The shortcode notice type has one simple setting field input. The “Newsletter Form Shortcodes” field allows users to paste in shortcomdes from form plugins to display in the current notice bar.
Twitter Tweets Notice Type is a simple and effective way of adding tweet feeds into notice bar from any account. With this notice type users can set any twitter account to pull and display tweet thread in the notice bar.
The settings that users can toggle in this sections are :
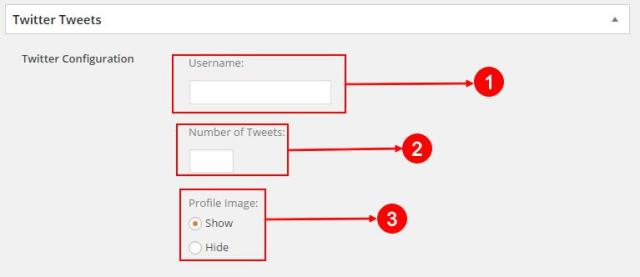
- Username : Input field to set twitter account username to pull the tweet feeds from.
- Number of Tweets : Number input field to set no of tweets to pull and display from the twitter account the user has set above.
- Profile Image : Radio select option to toggle Show / Hide option for profile image of the twitter account.
Social icons notice type is a custom method to display social media icons in the notice bar. This notice type makes it easy for website users to customize and implement social media links easily and beautifully within the notice bar itself.
Notice Bar Pro supports Eleven different popular social media icons implementation support, all with custom display configurations.
The options for user configuration in this section are listed below :
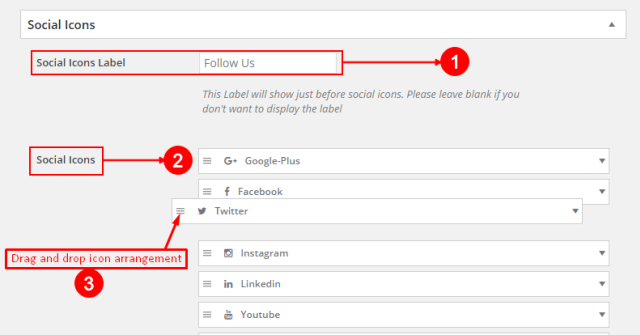
- Social Icons Label : Input field to display label on top of icons. If left blank, no label will be displayed.
- Social Icons : List of Eleven supported social icons display settings in Notice Bar Pro. Individual settings for all icons can be set to customize the display of each icon under this section.
- Hamburger Icon : Using this icon on the social icons listings, the order of icons display can be arranged in any order with simple drag and drop. The order of icons top to bottom in this section will be the order of icons left to right, when displayed in the notice bar.
Individual icon settings option:
A set of settings for individual social sharing icons can be configured by opening the list of social icons. Each setting under this section handles the display settings for each individual icons. All available options under the section can be listed as:
![]()
- URL : Input field to insert URL icon links to.
- Icon Color : Colorpicker input field to choose color for individual social media icon.
- Icon Background Color : Colorpicker input field to choose color for individual social media icon background.
- Icon Hover Color : Colorpicker input field to choose color for individual social media icon on hover.
- Icon Background Hover Color : Colorpicker input field to choose color for individual social media icon background on hover.
- Hamburger Icon : Using this icon in the social icons settings section, the order of icons display can be arranged in any order with simple drag and drop. The order of icons top to bottom in this section will be the order of icon left to right, when displayed in the notice bar.
Display Configuration options are the options which are responsible for customizing notice bar display related toggles and settings. Settings under this tab helps users to take control over how the notice bar is displayed in the front-end of the website.
Users can set a wide range of options to their preferences that handles the notice bar display positions, color options, fonts and styles among others.
Settings under this tab and their brief functionalities are listed below :
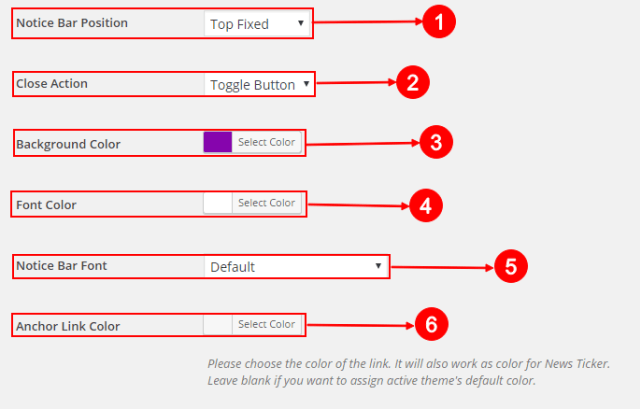
- Notice Bar Position : Select field to choose notice bar display position. User can choose from the options below to set display position for current notice bar. Options under this menu are:
- Top Absolute : This option sets the position of notice bar to top absolute position. Notice bar displays on top of the page.
- Top Fixed : Sets notice bar to top and fixed position. Notice bar will be fixed to top upon page scroll with this position.
- Bottom : Sets notice bar to be visible in the bottom of the page.
- Close Action : Select input field to enable / choose close action for notice bar in the front-end. Allows visitors to be able to close or toggle displayed notice bar. Options under this field are:
- Disable : Disables the close action in current notice bar. With this option, front-end visitors will not get privilege to close or toggle the displayed notice bar.
- Close Button : Sets a close button to current notice bar. With this option, front-end visitors are able to close off the notice bar. When set to this option a new field pops in where users can enter browser cookie expire time (in hrs) which lets notice bar to reappear after the time set in the field. If left blank, cookie will not be set and notice bar will reappear after browser refresh.
- Toggle Button : Sets a toggle button to the current notice bar. With this option, front end visitors will be able to toggle display of notice bar on / off.
- Background Color : Color picker option to set color for the entire background color for the current notice bar. Default : red(#dd3333).
- Font Color : Color picker option to set color for the texts being displayed on the notice bar. Font color applies to all texts being displayed in current notice bar. Default: white(#ffffff).
- Notice Bar Font : Select field to choose font for notice bar texts. Also applies to all texts being displayed in current notice bar.
- Anchor Link Color : Color picker option to set color for anchor link. Applies to all links displayed in current notice bar.
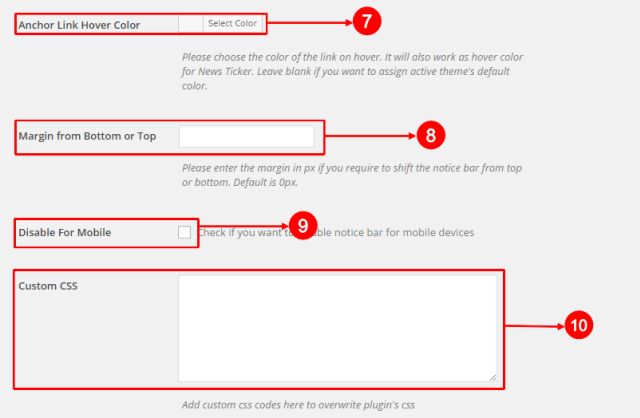
- Anchor Link Hover Color : Color picker option to set the anchor link color on hover to current notice bar.
- Margin from Bottom or Top : Number input field to set margin from top or bottom (in px ) if required. Sets the margin in entered px from top or bottom depending upon the posion applied to current notice bar.
- Disable for Mobile : Checkbox to toggle display of current notice bar in mobile device. When checked display of notice bar will be disabled on mobile devices. Note: This option will disable entire notice bar in mobile, for individual sections mobile display option, check settings under sections.
- Custom CSS : Input area for all your CSS Customizations. Users can easily paste in desired CSS modifications and customizations through this field.
Visibility Configurations are grouped together under visibility tab. Settings and configurations under this tab are responsible for overall behavior of current notice bar. Users can toggle any setting from visibility tab to set specific visibility behaviors for notice bar.
The configuration settings under this tab gives notice bar display a new level of flexibility and customization. With options like “Display After”, “Hide After” and ability to schedule specifiac notice bars to display/ hide to the front-end gives users a new level of control to custmize notice bars.
The Details on individual options stacked inside the visibility tab can be browsed in below :
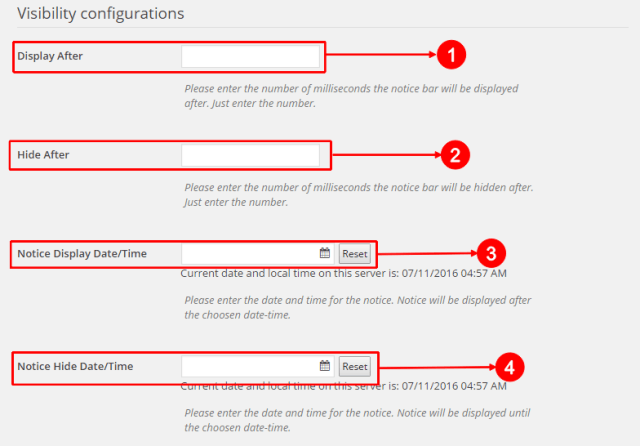
- Display After : Input field to set notice Display after timing setting. The field takes timing input in milliseconds and displays current notice bar after the input time calculated from pageload.
- Hide After : Input field to set notice Hide after timing setting. The field takes timing input in milliseconds and hides current notice bar after the input time calculated from pageload.
- Notice Display Date/Time : Date picker input field to set notice bar display date and time. User can set to display to front-end for specific notice bar on specific day/time set into the field.To clear out the field simply press the “Reset” button next to the input field. Note: The date and time settings is applied in accordance to server time.for reference of current server time refresh the page and check “Current date and local time on this server is.” below input.
- Notice Hide Date/Time : Date picker input field to set notice bar hide date and time. User can set to hide notice bar from front-end for specific notice bar on specific day/time set into the field.To clear out the field simply press the “Reset” button next to the input field. Note: The date and time settings is applied in accordance to server time.for reference of current server time refresh the page and check “Current date and local time on this server is.” below input.
Notice Display Control :
Notice Display Control multiple checkbox input field is a special field under visibility tab that gives extended control over the notice bar display. Users can choose and set to display specific notice bars in specific page / set of pages.
Notice Display Control gives users a new set of control and flexibility while displaying notice bar to the front-end.
The options under the notice display control field and their descriptions are documented below:
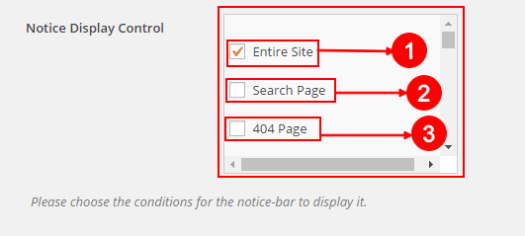
Notice Display Control field configuration can be controlled by the scrollable check-list that displays multiple conditions and options to display current notice bar to the front-end. Each option available in this configuration is documented below:
- Entire Site : Checkbox to display current notice bar to the entire website (All pages) . This option is checked by default. Note : for logical reasons, all the sections discussed below are hidden while this option is checked. User need to uncheck this option first to toggle / configure options below.
- Search Page : Checkbox to allow display of current notice bar only on the search results listing page.
- 404 Page : Checkbox to allow display of current notice bar only on the 404 page / error page.
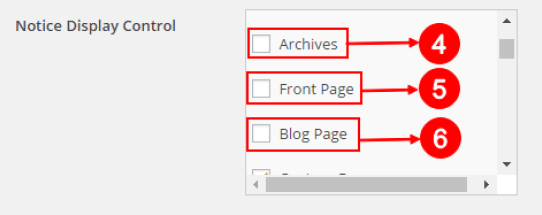
- Archives : Checkbox to allow display of current notice bar only on the archives page.
- Front Page : Checkbox to allow display of current notice bar only on the page currently being displayed on front.
- Blog Page : Checkbox to allow display of current notice bar only on the blog listing page.
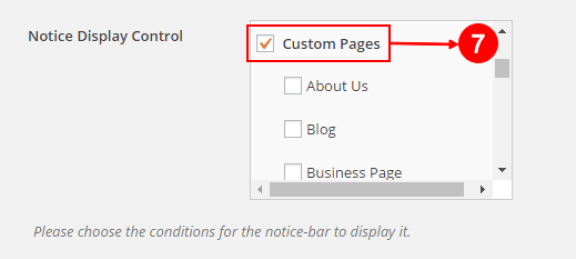
- Custom Pages : When checked, retrieves the list of all available pages from within the website.From the list, user can opt to choose a single page or multiple pages depending on requirements.
Notice Bar Pro is a feature packed plugin. It is an exciting new way to create, publish and manage custom notice, information and messages for WordPress websites. From simple text notice to slider to custom shordcode handling, Notice Bar Pro does it all. The plugin is a perfect example of how powerful features can be bundled with simple and easy settings interface. With the variety of configuration it provides for the users, it can be used by a wide range of websites.
Having said that, please find the list below of some amazing features explained in brief, that Notice Bar Pro can boast of:
Notice Bar Pro supports multiple notice types under its hood. It is not just a simple plugin to display notices and supports multiple type of notices within a single plugin. The plugin supports Eight different useful notice types that can be customized with a range of options available to the users.
From simple Notice display bar to news ticker to custom text slider to social links display tool to email-list builder and manager to Custom Call To Action the list of possibilities seems endless with using Notice Bar Pro.
Scrolled down here too soon? Get to know the amazing notice types in detail. Click Here !!
Notice Bar Pro is highly customizable as per user’s needs. There are many customization options available in the plugin. Presence of individually customizable sections in a single notice bar with custom notice bar contents within custom widths are the features that makes this plugin Highly customizable.
Sections implementation support, toggle and close buttons and independent sections responsive view support boosts up the customization factor in the Notice Bar Pro plugin.
Multiple notice bar support in a single website is something users are fond of. Notice Bar Pro delivers this feature to its users flawlessly. Users can easily set up and display different notice bars on a single page effectively. Availability of different notice bar display position makes it possible for user to display different notice bars at different locations within a single page.
Also, the special notice display control also makes it possible and handles display of multiple notice bars display.
Create and implement multiple notice bars throughout your WordPress site smoothly and swiftly, only with Notice Bar Pro!!
Notice Bar Pro has dedicated visibility configurations that handles the visibility options for individual notice bars. Users can set distinct visibility options to different notice bars without impacting one another.
Also visibility timings and date schedule options available with the plugin helps to handle the visibility behavior of the plugin.
Undoubtedly, visibility control and scheduling is a great new feature to look out for in Notice Bar Pro.
With shortcode notice type from Notice Bar Pro users will have the flexibility of adding any custom shortcode and have it displayed in the notice bar. This feature breaks the barrier of having to use plugin defaults and opens up a huge possibilities of adding custom newsletter forms, subscribe forms and customized links through the notice bar to any WordPress website.
Notice Bar Pro has a dedicated subscriber list builder feature integrated within the NB subscribe form Notice Type. Emails registered through NB Subscribe Form is automatically saved in a organized “All Subscribers” section in the dashboard itself. Users can easily review and handle the subscribers’ email information from the listings.
Being able to create a completely independent subscription list within the WordPress dashboard gives users a simple solution to organize their web subscriptions.
The plugin is compatible with all the themes built based on Underscores format. As most of the themes today are built based on Underscores, you will have no problem making the plugin compatible with the theme, for everything else you will always have the custom CSS, modification via templates/hooks and a very reliable support team to help you out.
WEN Solutions has always been know to provide valuable support and product documentation, We have a team of WordPress Developers always on standby to help our clients from anything and everything related to our products. We never rest until our clients are fully satisfied and their issues are solved. Not to mention that the support is free of cost and unlimited.
We have also provided a very helpful documentation that covers almost everything related on how to create and manage notices with the Notice Bar Pro plugin.
We also have a promising record of releasing frequent updates to make our products better and better with more features for you to enjoy and use. Our products never gets old as every update makes it brand new and exciting.
Notice Bar Pro like any other products on Theme Palace has the license validity for only one website. You can use the purchased plugin in multiple websites. Except you won’t be getting any update notifications, supports and plugin updates on them. Also the license expires after one year although you will be able to use the product but you will not be getting any updates and support on it again. You will have to re-purchase the plugin and obtain the unique license key for it.


