
Plugins Instructions
Select a Plugin from the drop down menu
Table of Contents
- 1.Intorduction
- 2.Theme Installation
- 3.Installing and Activating Plugins
- 4.How to setup front page as shown in demo?
- 5.How to use Page Builder By SiteOrigin plugin?
- 6.Additional post types in Dashboard after installing required plugins for the theme
- 7.How to use additional post types in Dashboard?
- 8.What are available widgets?
- 9.How to add widgets to different sections?
- 10.How to setup different widgets?
- 10.1.Restaurantz: Address Widget
- 10.2.Restaurantz: Availability Widget
- 10.3.Restaurantz: CTA Widget
- 10.4.Restaurantz: Featured Event Widget
- 10.5.Restaurantz: Latest News Widget
- 10.6.Restaurantz: Social Widget
- 10.7.Restaurantz: Special Dishes Widget
- 10.8.Restaurantz: Tabular Menu Widget
- 10.9.Restaurantz: Team Widget
- 10.10.Restaurantz: Testimonial Slider Widget
- 10.11.Restaurantz: Title Widget
- 11.Blog Types
- 12.Theme setting in particular page/post
- 13.How to manage Site Title, Tagline and Site Icon?
- 14.How to change Header Image?
- 15.How to change Background Image?
- 16.How to manage Theme Options?
- 16.1.How to manage Header Options?
- 16.2.How to manage Search Options?
- 16.3.How to manage Layout Options?
- 16.4.How to manage Pagination Options?
- 16.5.How to manage Content Meta Options?
- 16.6.How to manage Footer Options?
- 16.7.How to manage Blog Options?
- 16.8.How to manage Author Bio Options?
- 16.9.How to manage Breadcrumb Options?
- 16.10.How to add Custom CSS?
- 16.11.How to manage Font Family Options?
- 17.How to change different color options?
- 17.1.Basic Color Options
- 17.2.Main Background
- 17.3.Header Color Options
- 17.4.Primary Menu Color Options
- 17.5.Content Color Options
- 17.6.Sidebar Color Options
- 17.7.Breadcrumb Color Options
- 17.8.Go To Top Color Options
- 17.9.Pagination Color Options
- 17.10.Footer Widgets Color Options
- 17.11.Footer Area Color Options
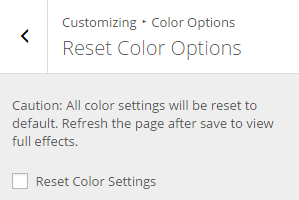
- 17.12.Reset Color Options
- 18.How to manage Menus?
- 19.How to manage Widgets?
- 20.How to Add widgets?
- 21.How to set Static Front Page?
- 22.How to Reset All Theme Settings?
- 23.Updating Theme Using FTP
Restaurantz Pro
Restaurantz Pro is a clean and professional restaurant WordPress Theme perfect for Restaurant, Cafe, Coffee house or any food business. Theme is powered by Page Builder by Site Origin, so drag-and-drop feature will be very handy to customize the page layout as you want.
Thank you for purchasing and using the Resturantz Pro. After you purchase and download your theme from Theme Palace you can choose either of the approaches given below to install your theme.
- Log in to the WordPress Administration Panels.
- Select the Appearance panel, then Themes.
- Select Add New.
- Then select Upload Theme.
- Click Browse Locate restaurantz-pro.zip Theme in your computer.
- Select restaurantz-pro.zip and click Install Now.
You can use FTP client like FileZilla to connect your web server.
- Unzip restaurantz-pro.zip to your Desktop.
- Using an FTP client to access your host web server, go to /wp-content/themes/ and upload your new copy of Restaurantz Pro Theme.
- Now, log into the WordPress Dashboard with your login details.
- Select the Appearance panel, then Themes.
- You will see the theme in the list.
- Then click Activate button.
- Now the theme will be activate and go through the following options to set up the theme step wise.
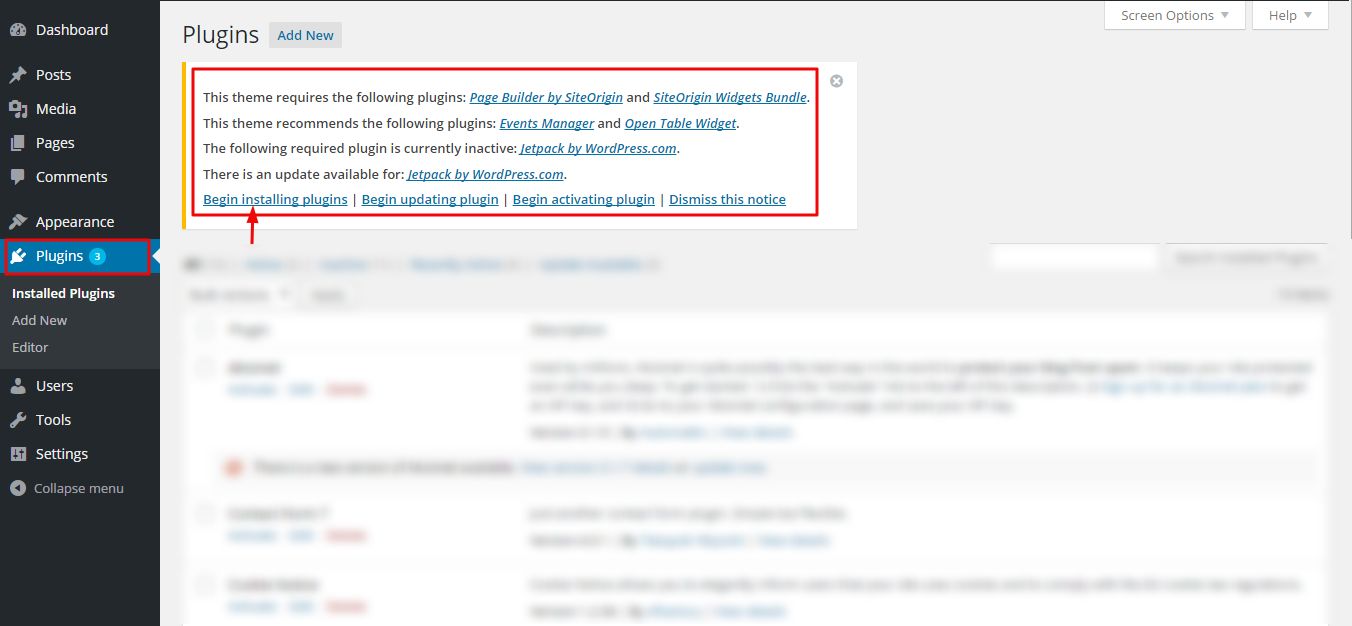
Go to Plugins from dashboard and begin installing all the required plugins for the theme(Restaurantz-Pro). You can see the suggestions of all the plugins which are essential for the theme.
You can setup your front page by two methods. They are explained below:
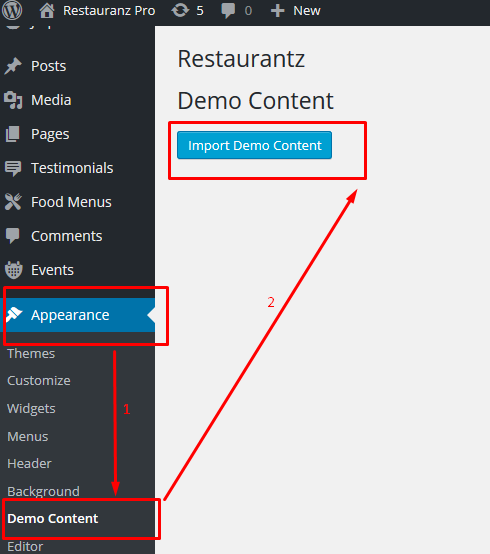
For automatic setup of front page as shown in the demo follow the steps below:
After importing demo content you will see three pages created automatically for you as shown here:
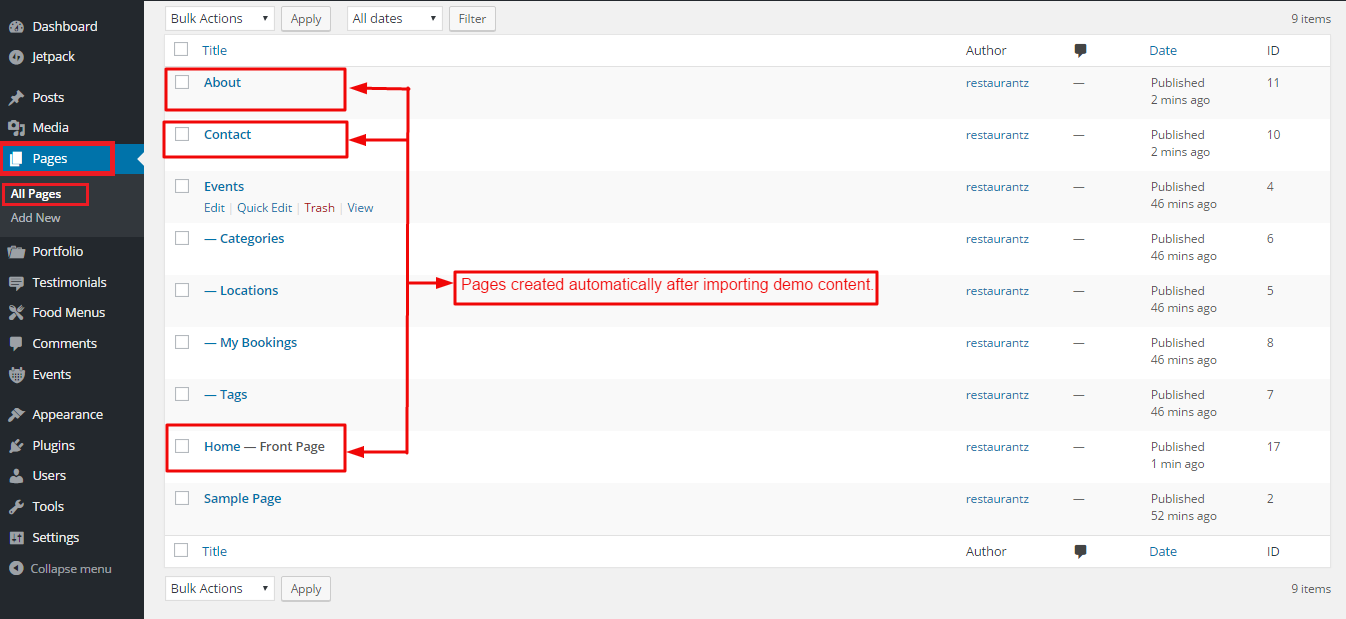
Note: If you have already created pages “Home”, “About” and “Contact” pages then importing demo content will not override these pages you have already created. These pages will be created if you haven’t created them yet.
Now in Admin Panel / Appearance / Customize / Static Front Page. Here you just need to select Front page as Home as shown in image.
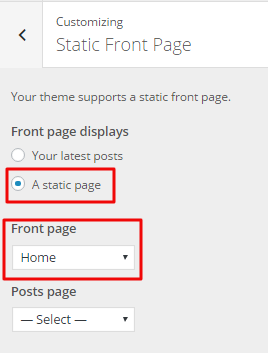
Note: Now your site layout will look similar as demo. But you need to keep background image for each section manually. Further more Special Dishes, Tabular Menu and Upcoming Events section will be empty.
To change background image of About Us section?
Go to Admin Panel / Pages and select Home to edit. Now do as shown in image.

You will see below image then.
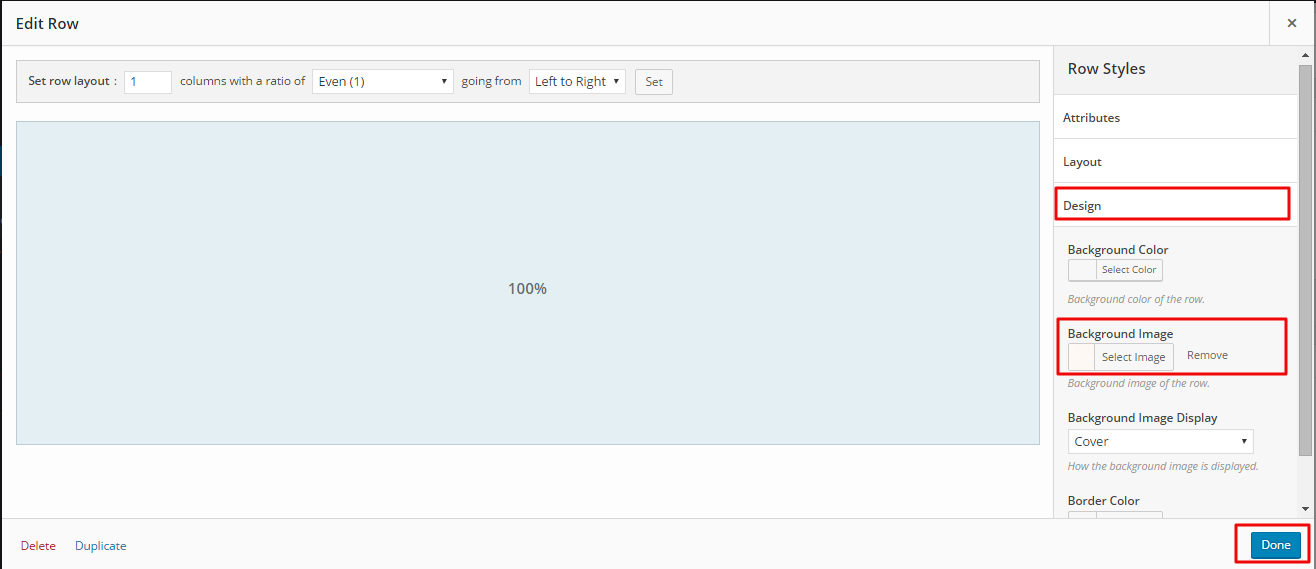
In similar way you need to change the background image of remaning sections.
To change slider image in front page.

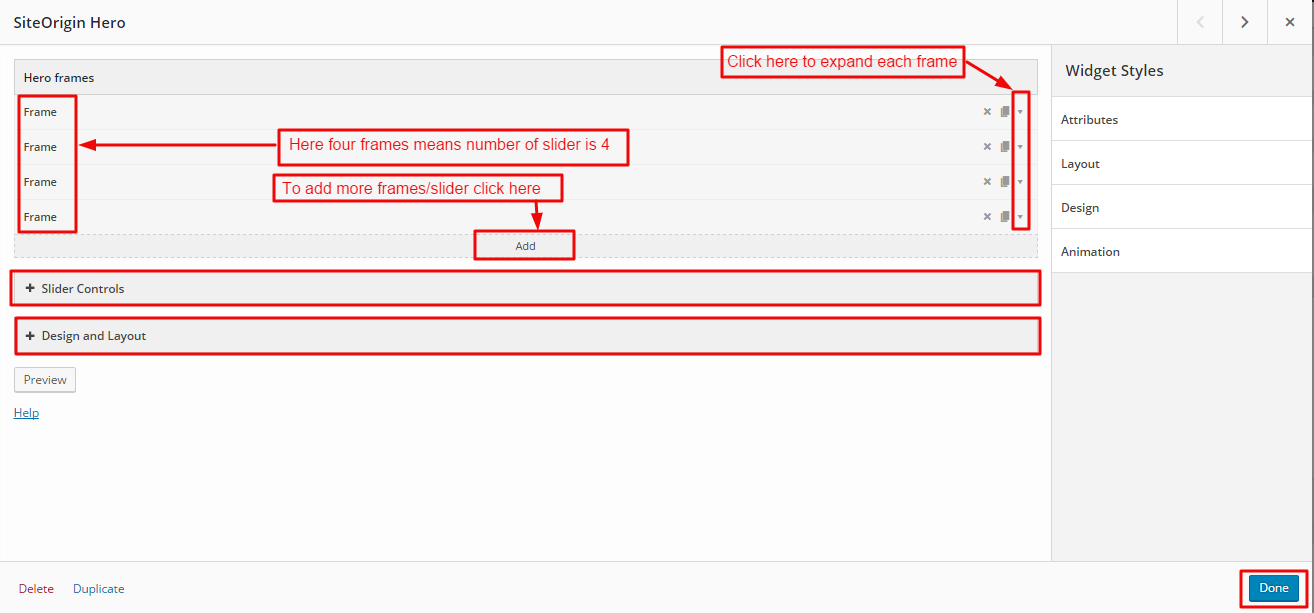
If you expand particular frame then you will see same as image below:
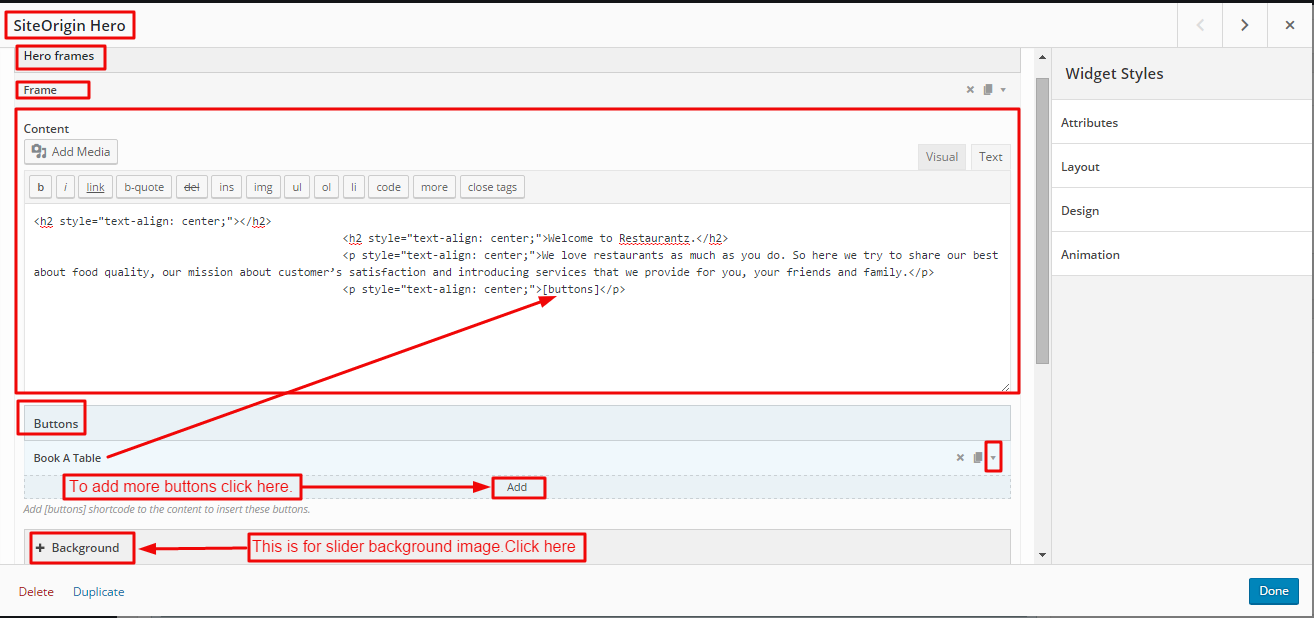
You will see more option for Slider Control and Design and Layout as you scroll down above section in image.
Note: For Special Dishes, Tabular Menu and Upcoming events you need to add data from custom post types from Dashboard. How to add data refer below section How to use additional post types in Dashboard?
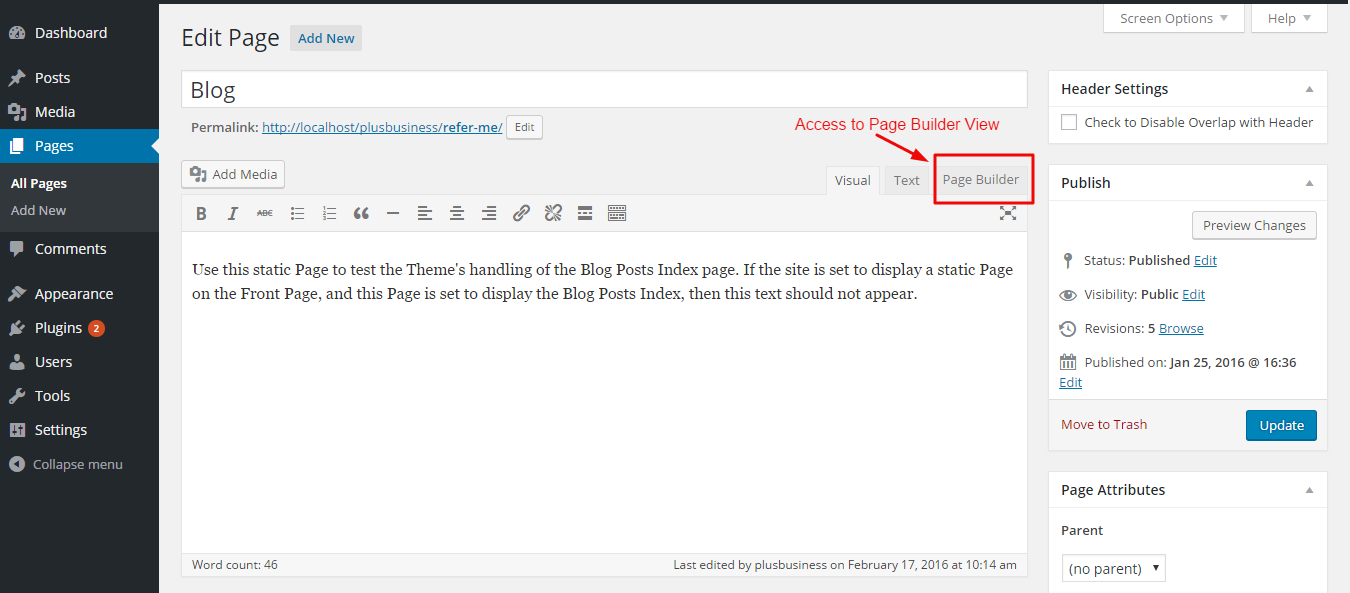
In this method you need to create page manually as shown in image below:

If you click on page builder tab as shown in above image then you will see below image.
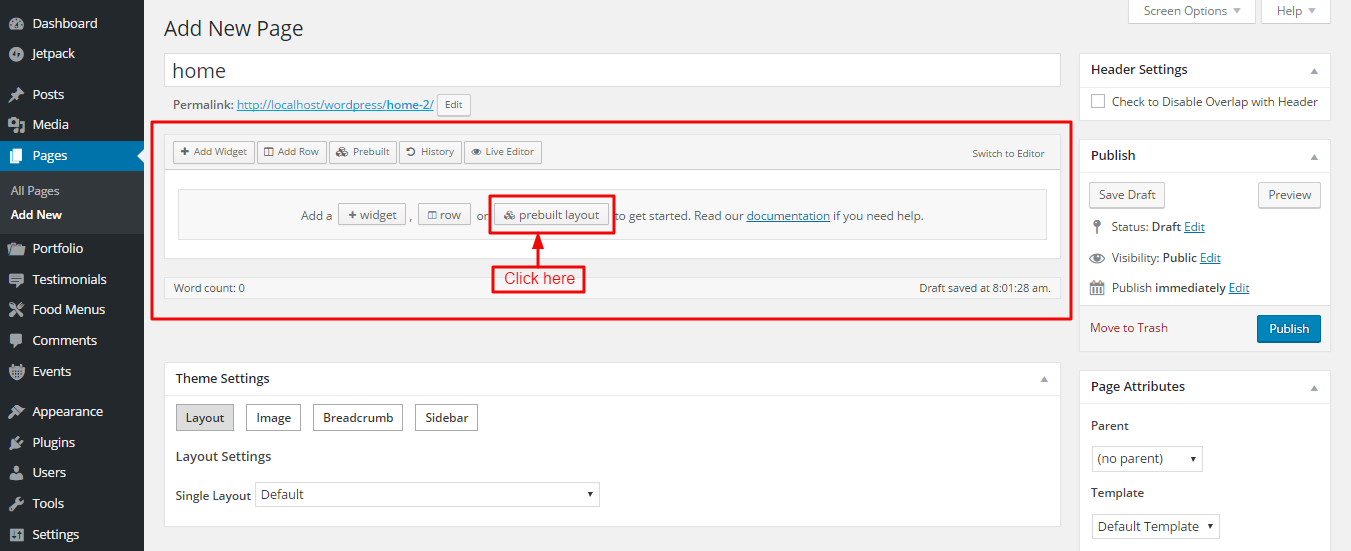
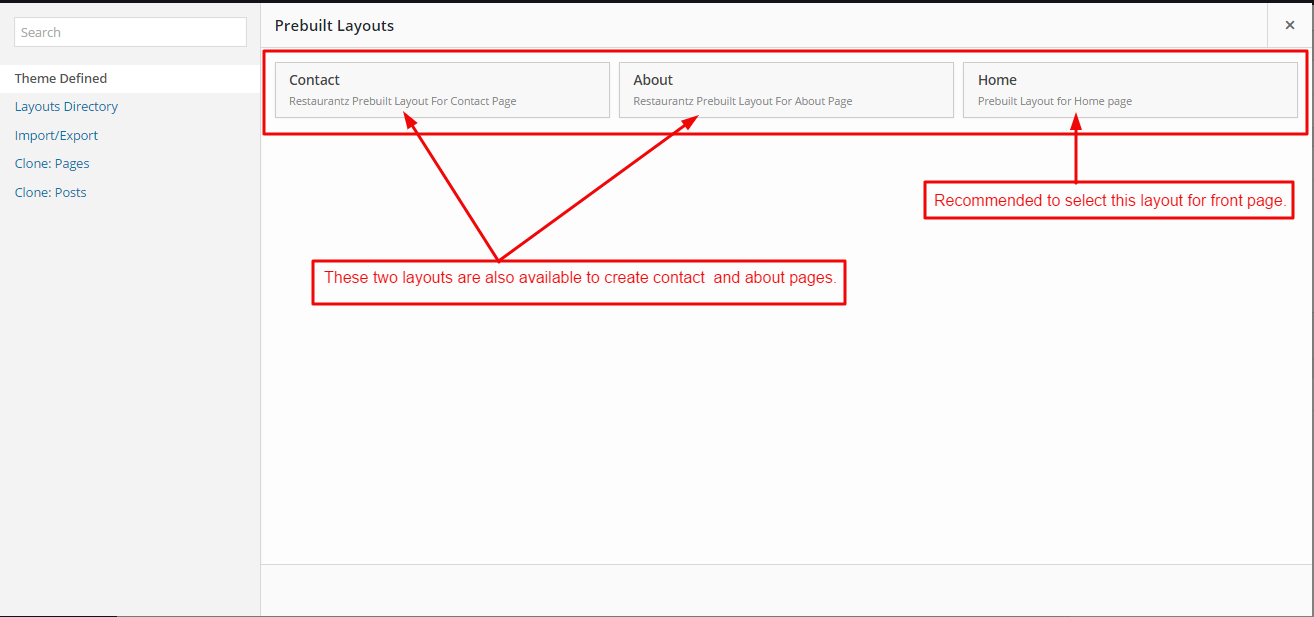
After this you might see a pop of box appear saying “Are you sure you want to overwirte your current content? This can be undone in the builder history.” Click OK.
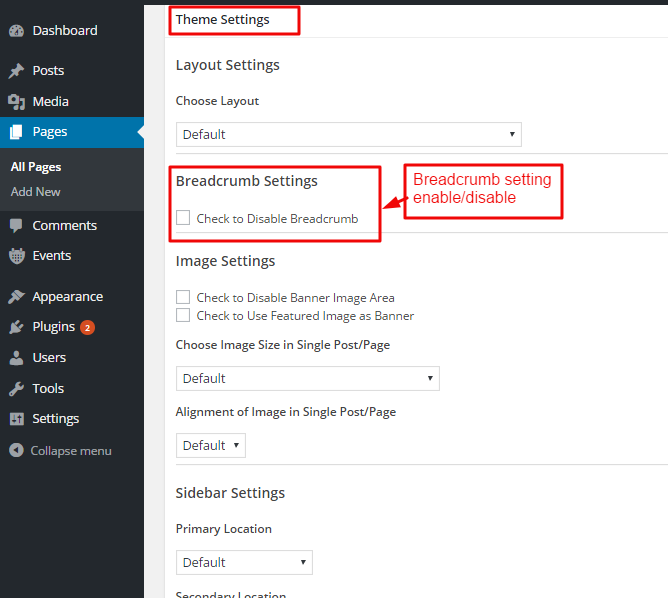
After this you will see different sections are automatically added. And if you scroll down the page then you will see Theme Settings section as shown in below image.

Now in Layout tab you need to select No Sidebar in Single Layout.
In Image tab you need to check the check-box saying “Check to Disable Banner Image Area” .
And in Breadcrumb tab you need to check the check-box saying “Check to Disable Breadcrumb” .
The click Publish to publish your page.
Now in Admin Panel / Appearance / Customize / Static Front Page. Here you need to select Front page as “home” you just created manually as shown in image.
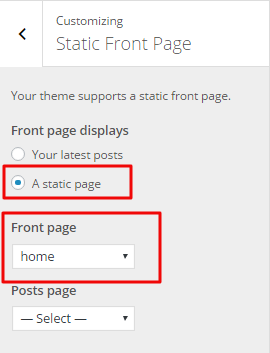
Note: Now your site layout will look similar as demo. But you further need to set background image for each section. Also Special Dishes, Tabular Menu and Upcoming Events section will be empty.
To change background image of About Us section? Similar process as explained earlier in Automatic setup section.
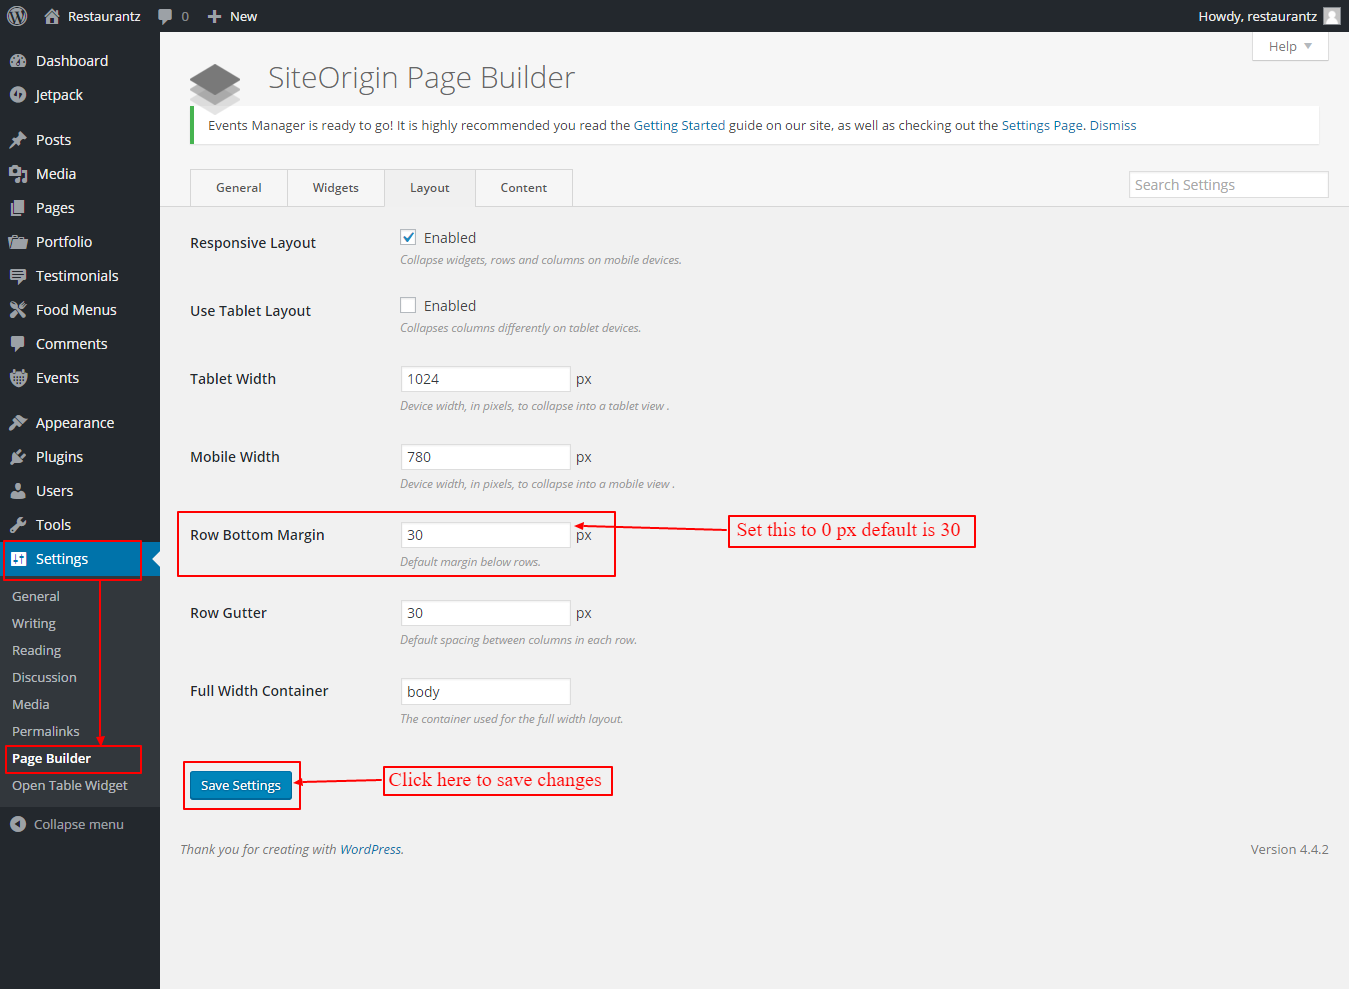
Note: After front page setup through any of the above explained method there might be gap between each section when you visit the site.If you don’t want gap then you need to go to page builder setting and set Row Bottom Margin to 0 px as shown in this image.
Restaurantz Pro comes with a simple Drag-and-Drop page builder (Siteorigin Page Builder) that simplifies building your website. Page Builder completes the transition by giving you a way to create responsive column layouts using the widgets (Shortcodes) you know and love. It’s extremely simple to use!
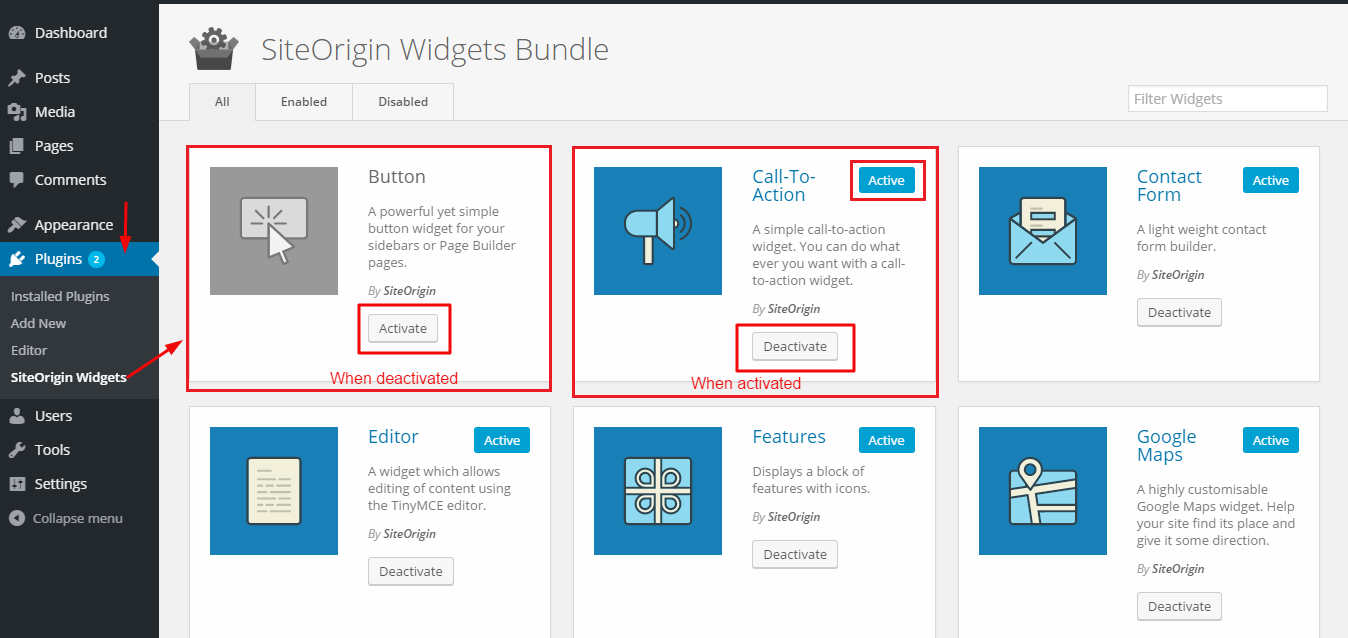
It is a very important thing that most of the people do not care about. Until and unless you Activate all the widgets included in SiteOrigin Page builder you can never see the widget. You need to Activate all the widgets from widget bundle.
Follow the Snapshots:

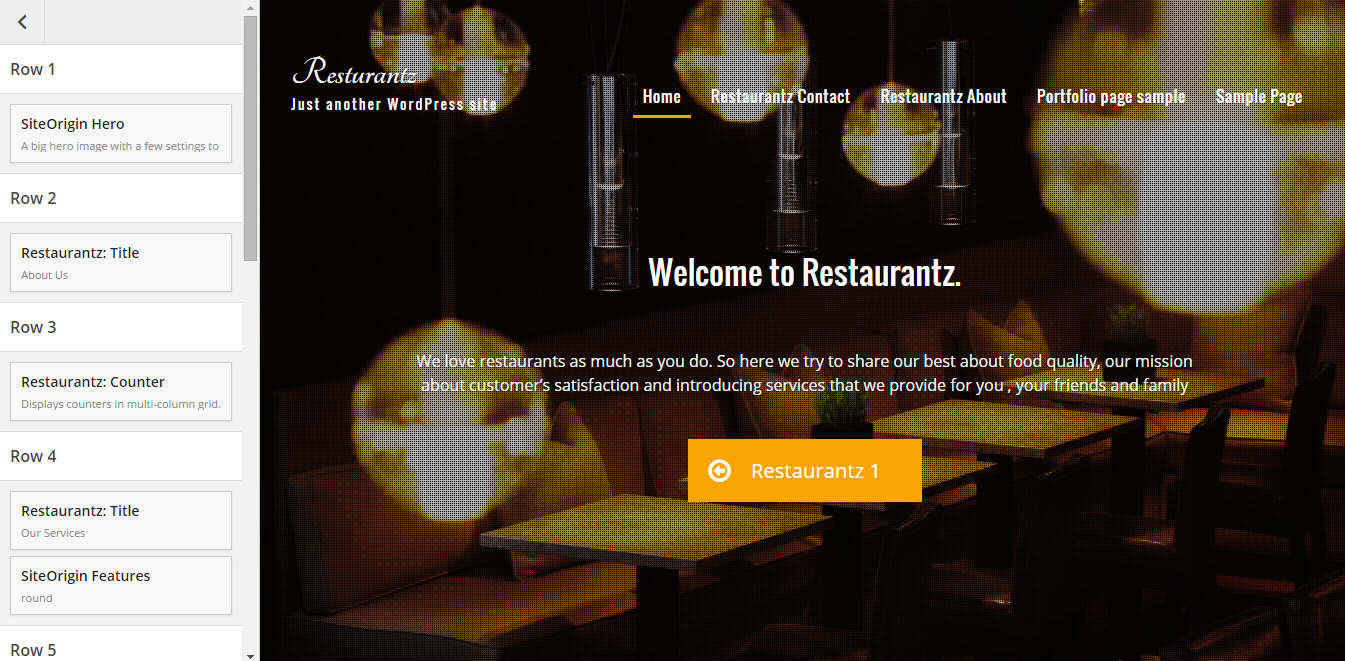
If you click on Live Editor you can have access to the Editor panel , where you can click on a widget to your left and make desired changes. Also you can see changes immediately to your right side of panel.
Live Editor screen is attached below:
NOTE (1*): Insert Blocks and Rows
For insert the block (widget), first you need to click on Add row where you want insert the column or block, then, click on “Add Widget” or “Add Row”.
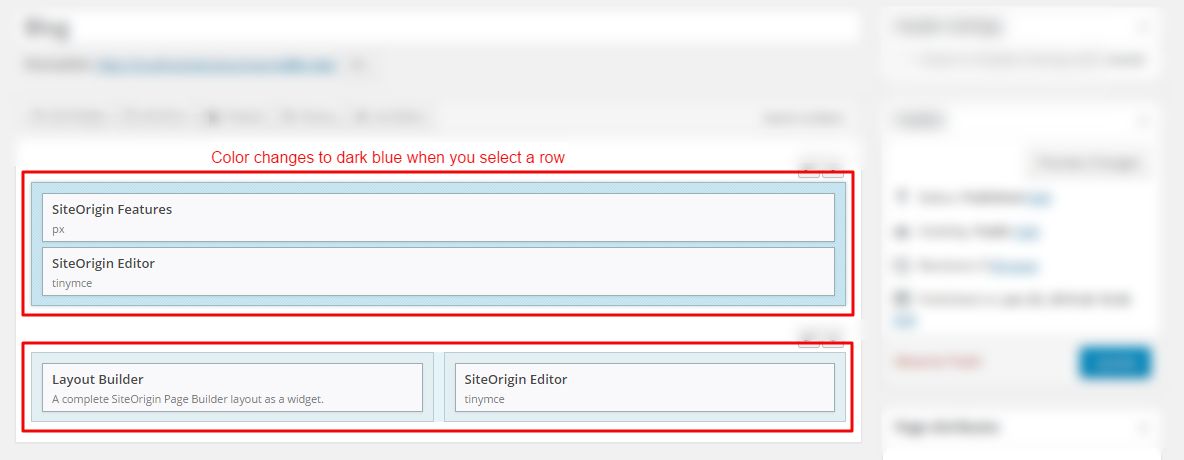
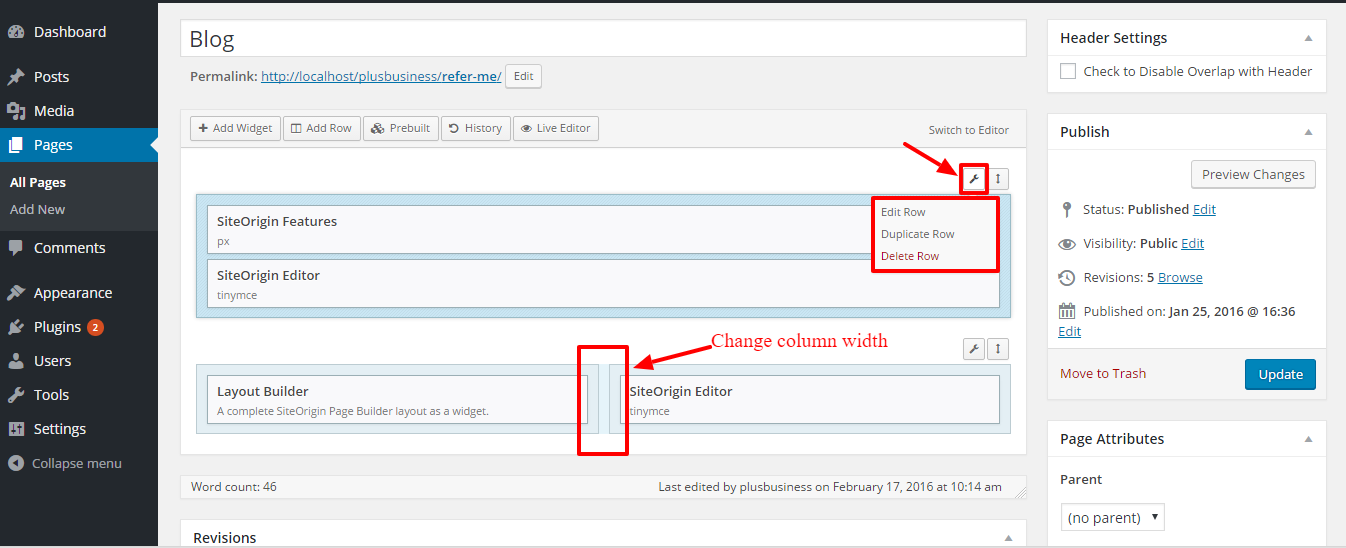
If you click on the setting icon (to your top-right most corner of builder) you can see:
- Edit Row
- Duplicate Row
- Delete Row
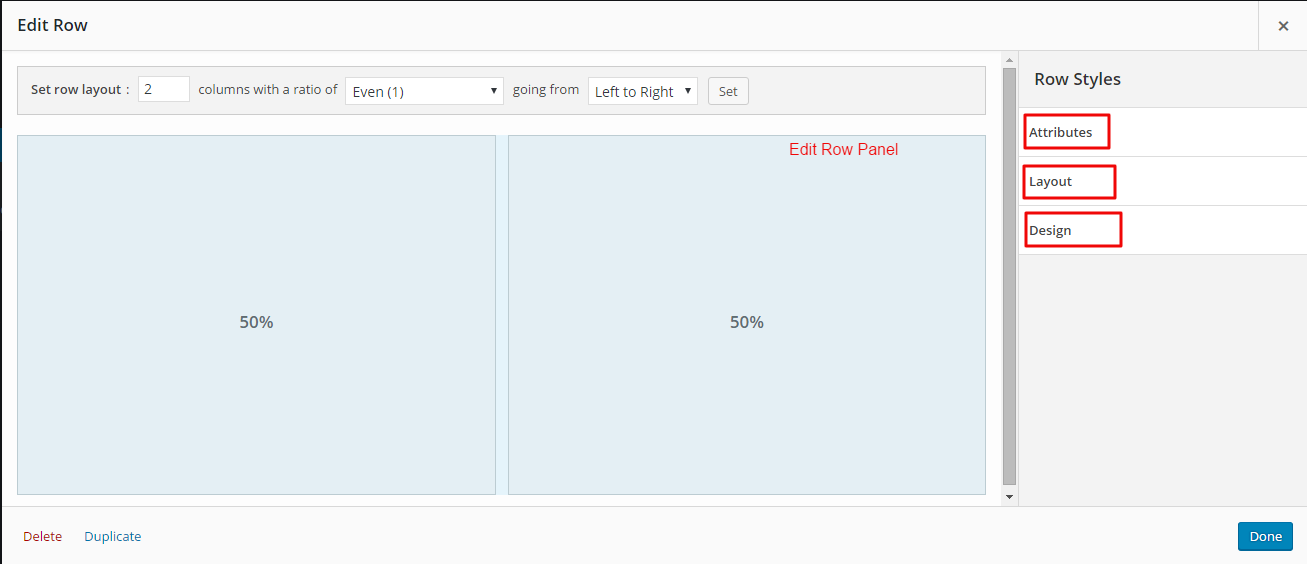
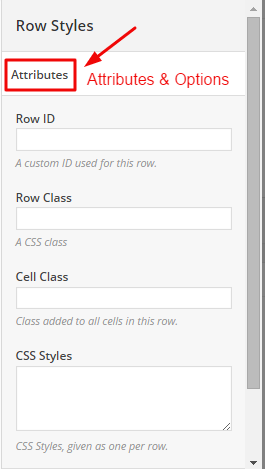
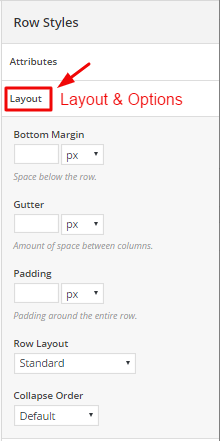
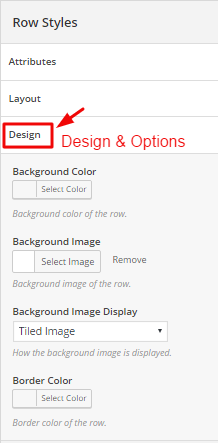
Within Edit Row you can see new panel where you can change the row’s attributes from options available to your left like Attributes, Layout ,Design. Also you can add background image, change colors, layouts, use padding and margin, give class and id etc. Check the following image.
NOTE (2*): Edit Row
Please go through all the options of “Edit row” (Attributes, Layout, Design) while editing particular row and widget and see the inputs and attributes given such as – Background Image, Parallax settings, Padding, Row Layout, Css etc.
You can see the same options to edit the widget as well. Options like:
- Edit
- Duplicate
- Delete
Go to Edit and you will see the same editing panel like in row editing.
Page builder has number of Widgets/Shortcodes that you can use and abuse!
They are very simple to insert and manage. We think that’s not need more explanation here:
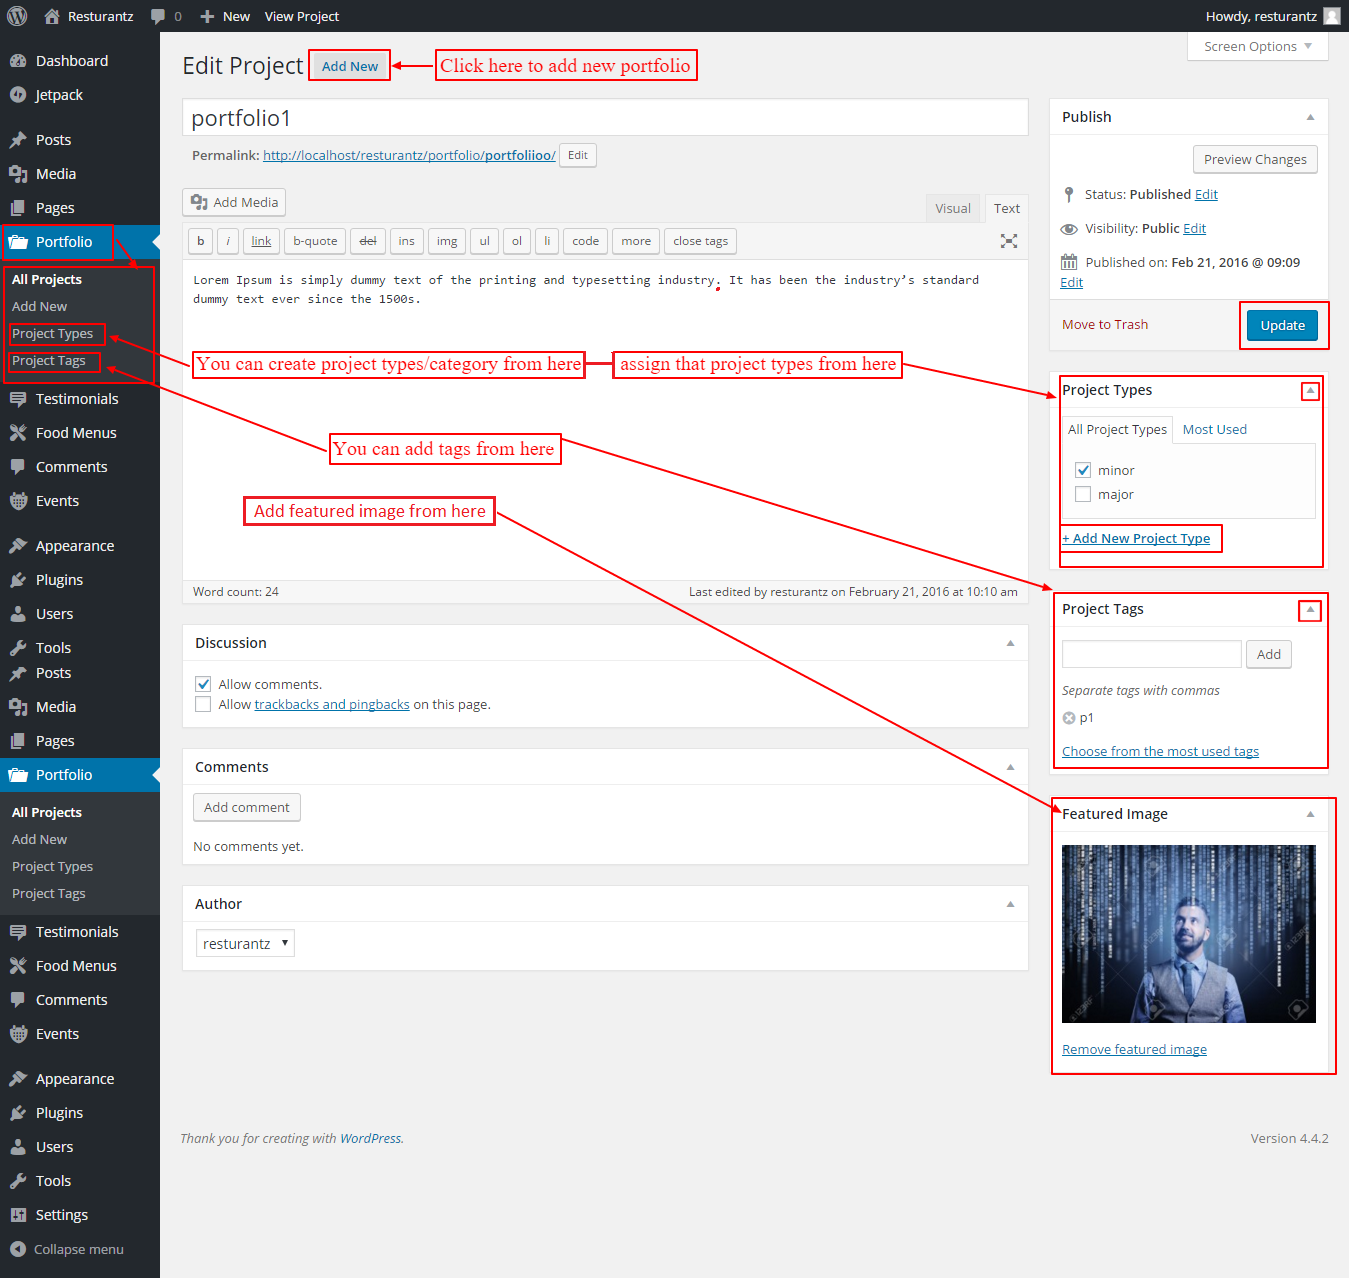
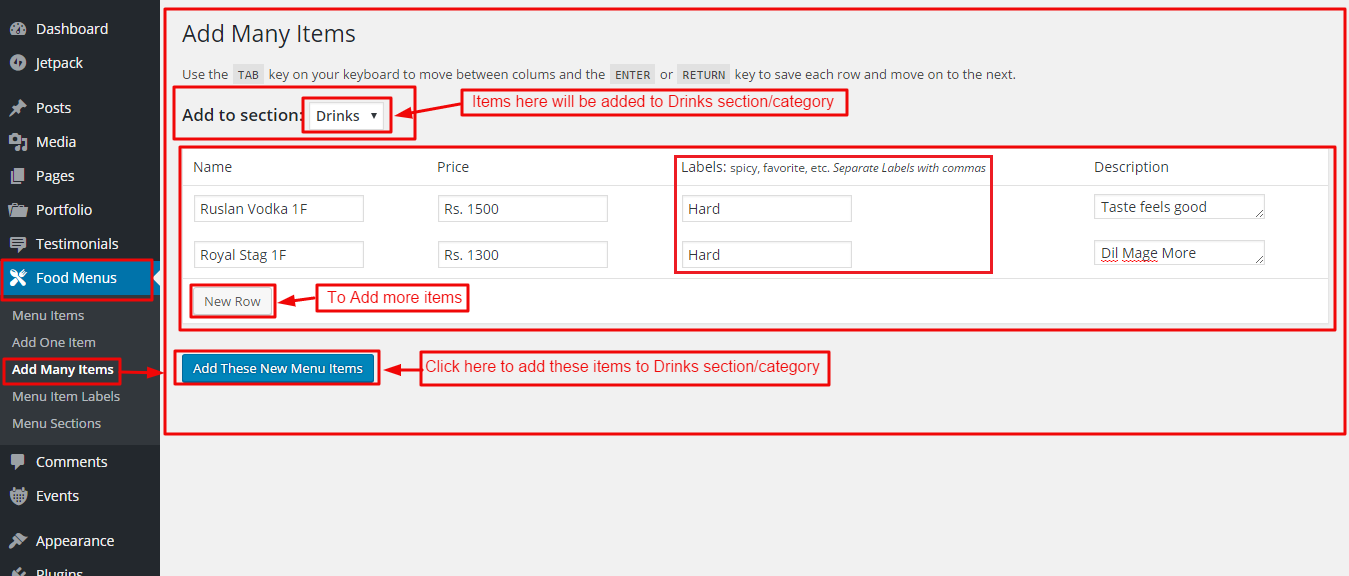
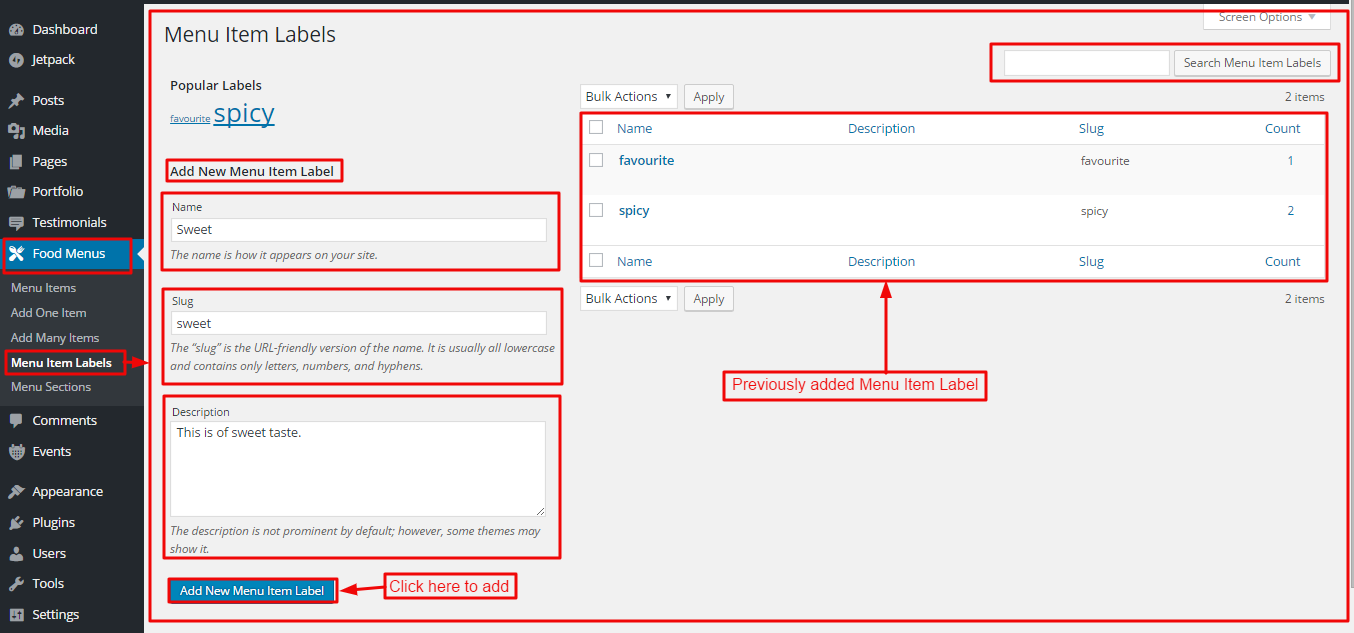
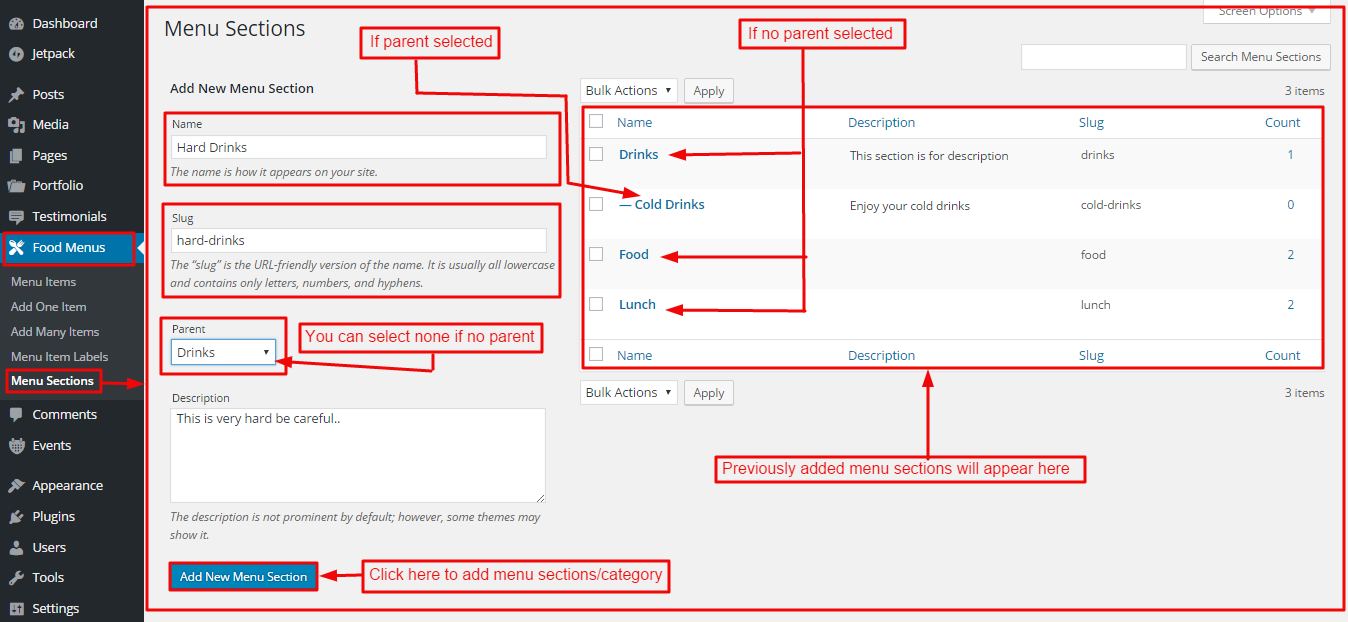
You will see additional post types after installing required plugins as shown in image:

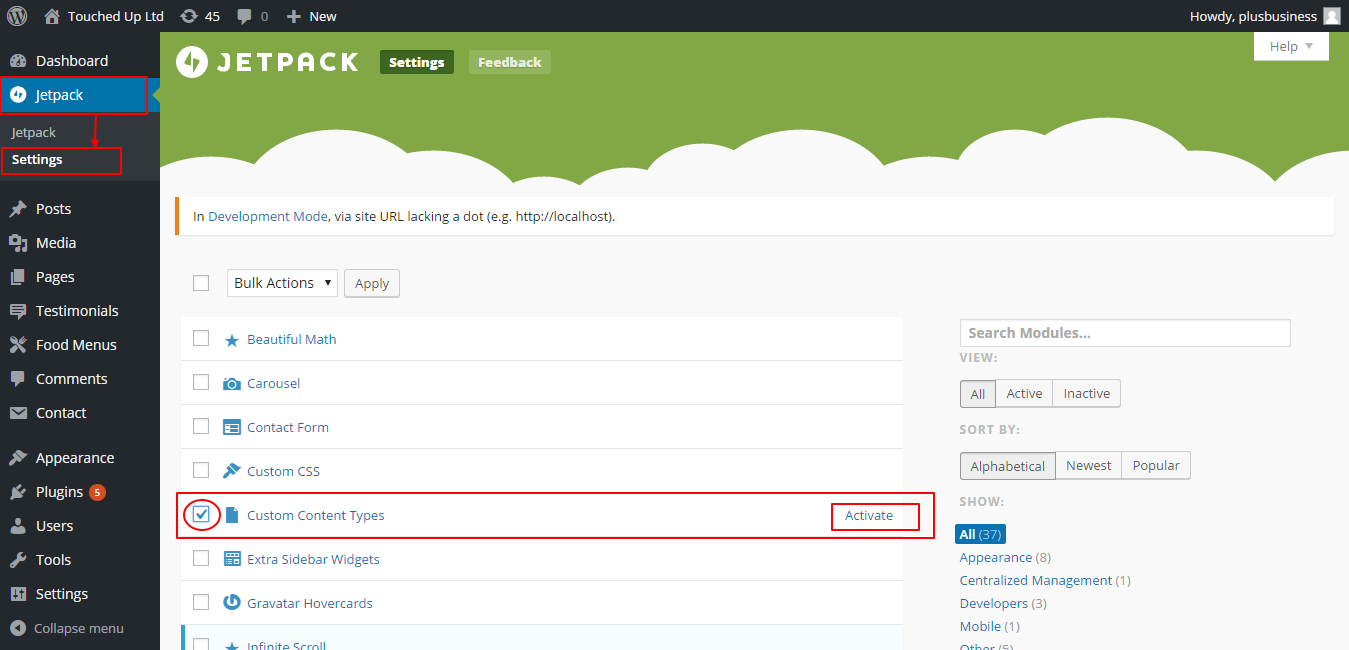
Note: For portfolio post type you need to go to jetpack settings and activate Custom Content Types as shown in this image.
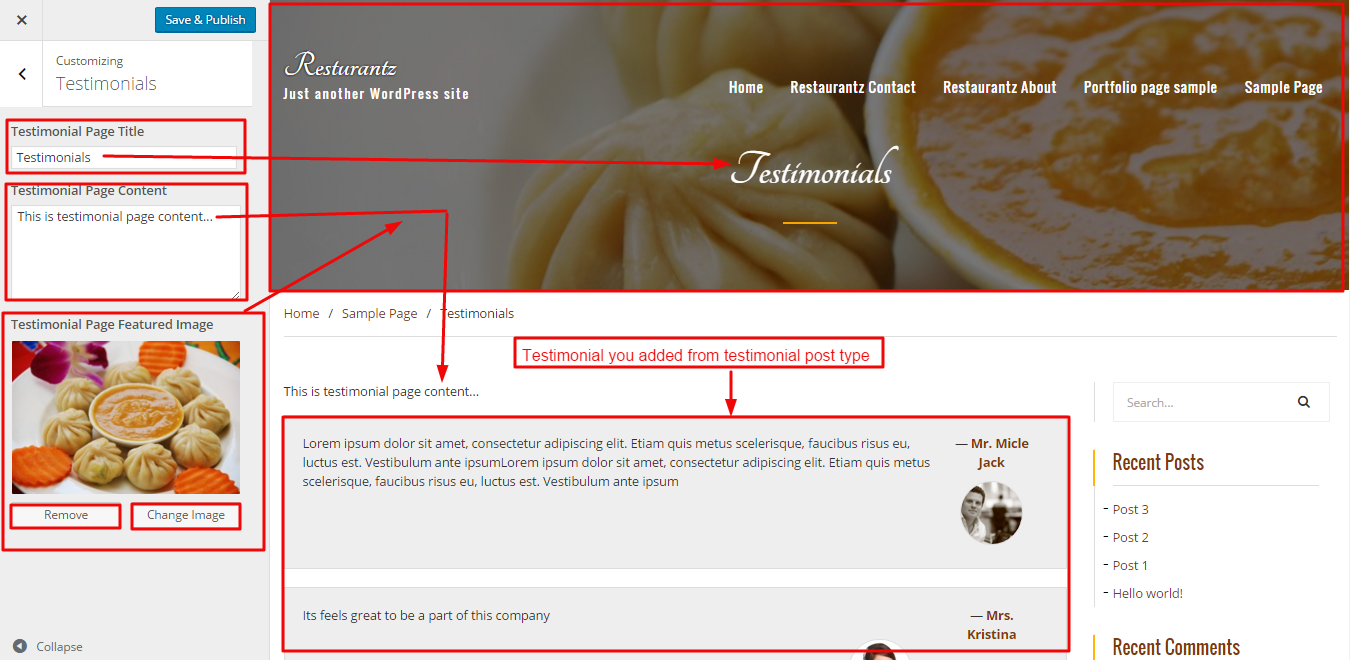
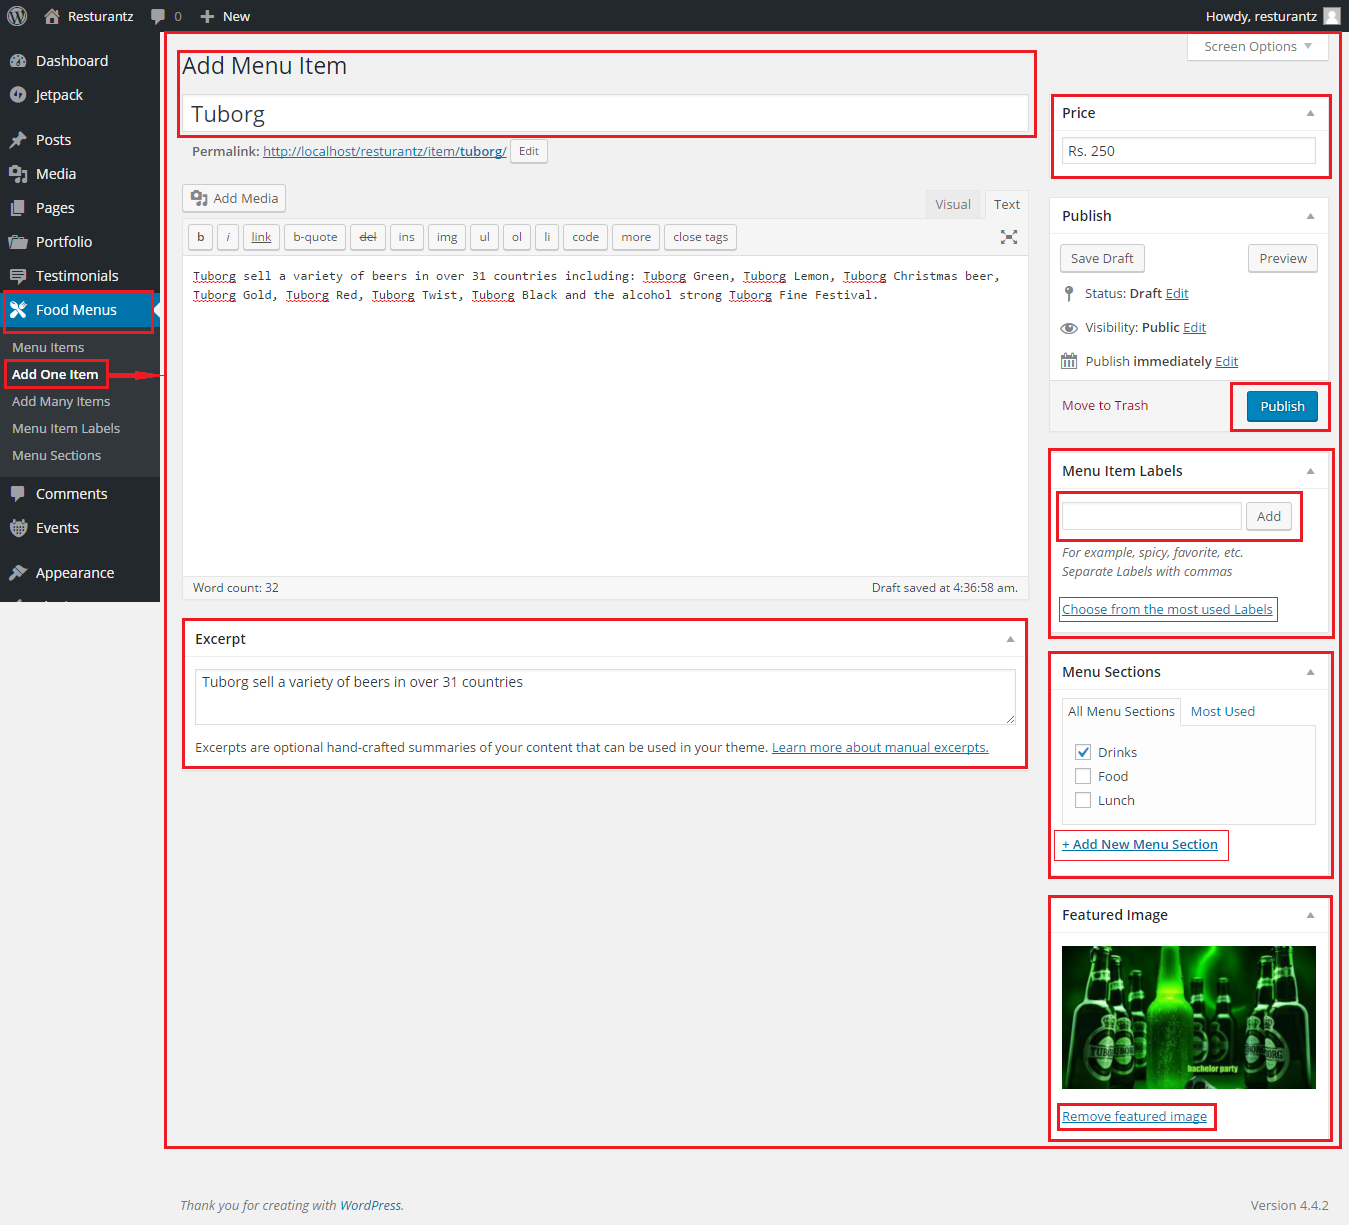
To add New Testimonial see this image.
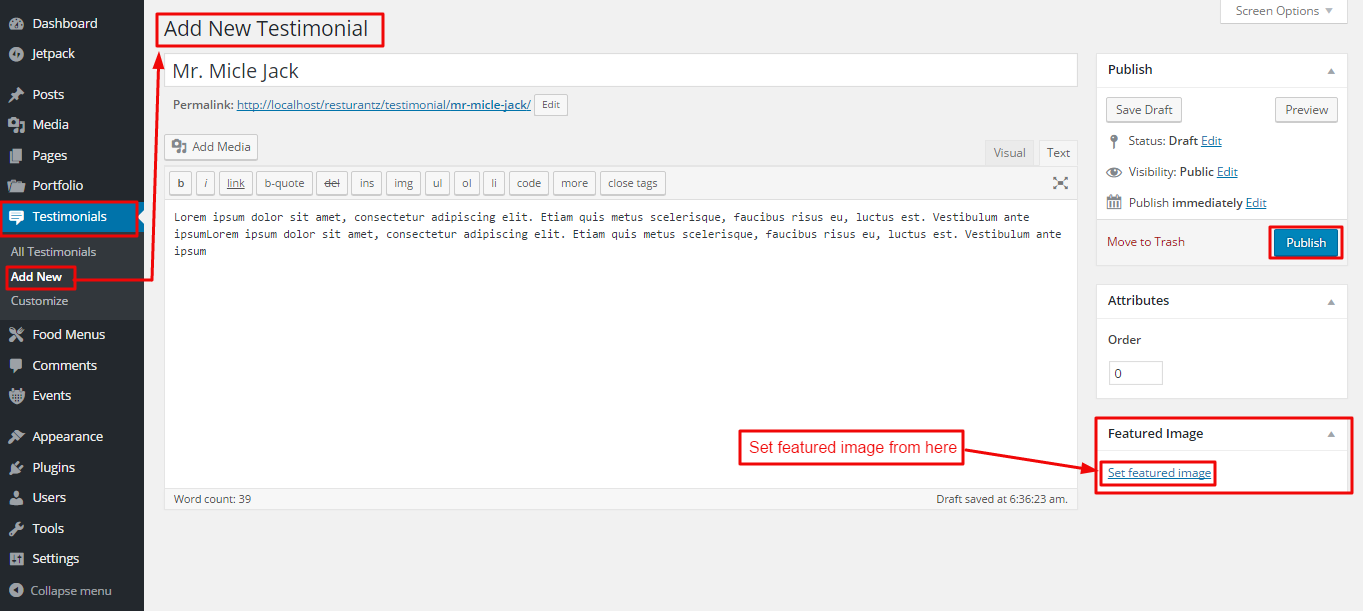
Note: After adding new testimonial you will see a new option in testimonial post type called Customize.
After clicking that options you will be redirected to customize options.
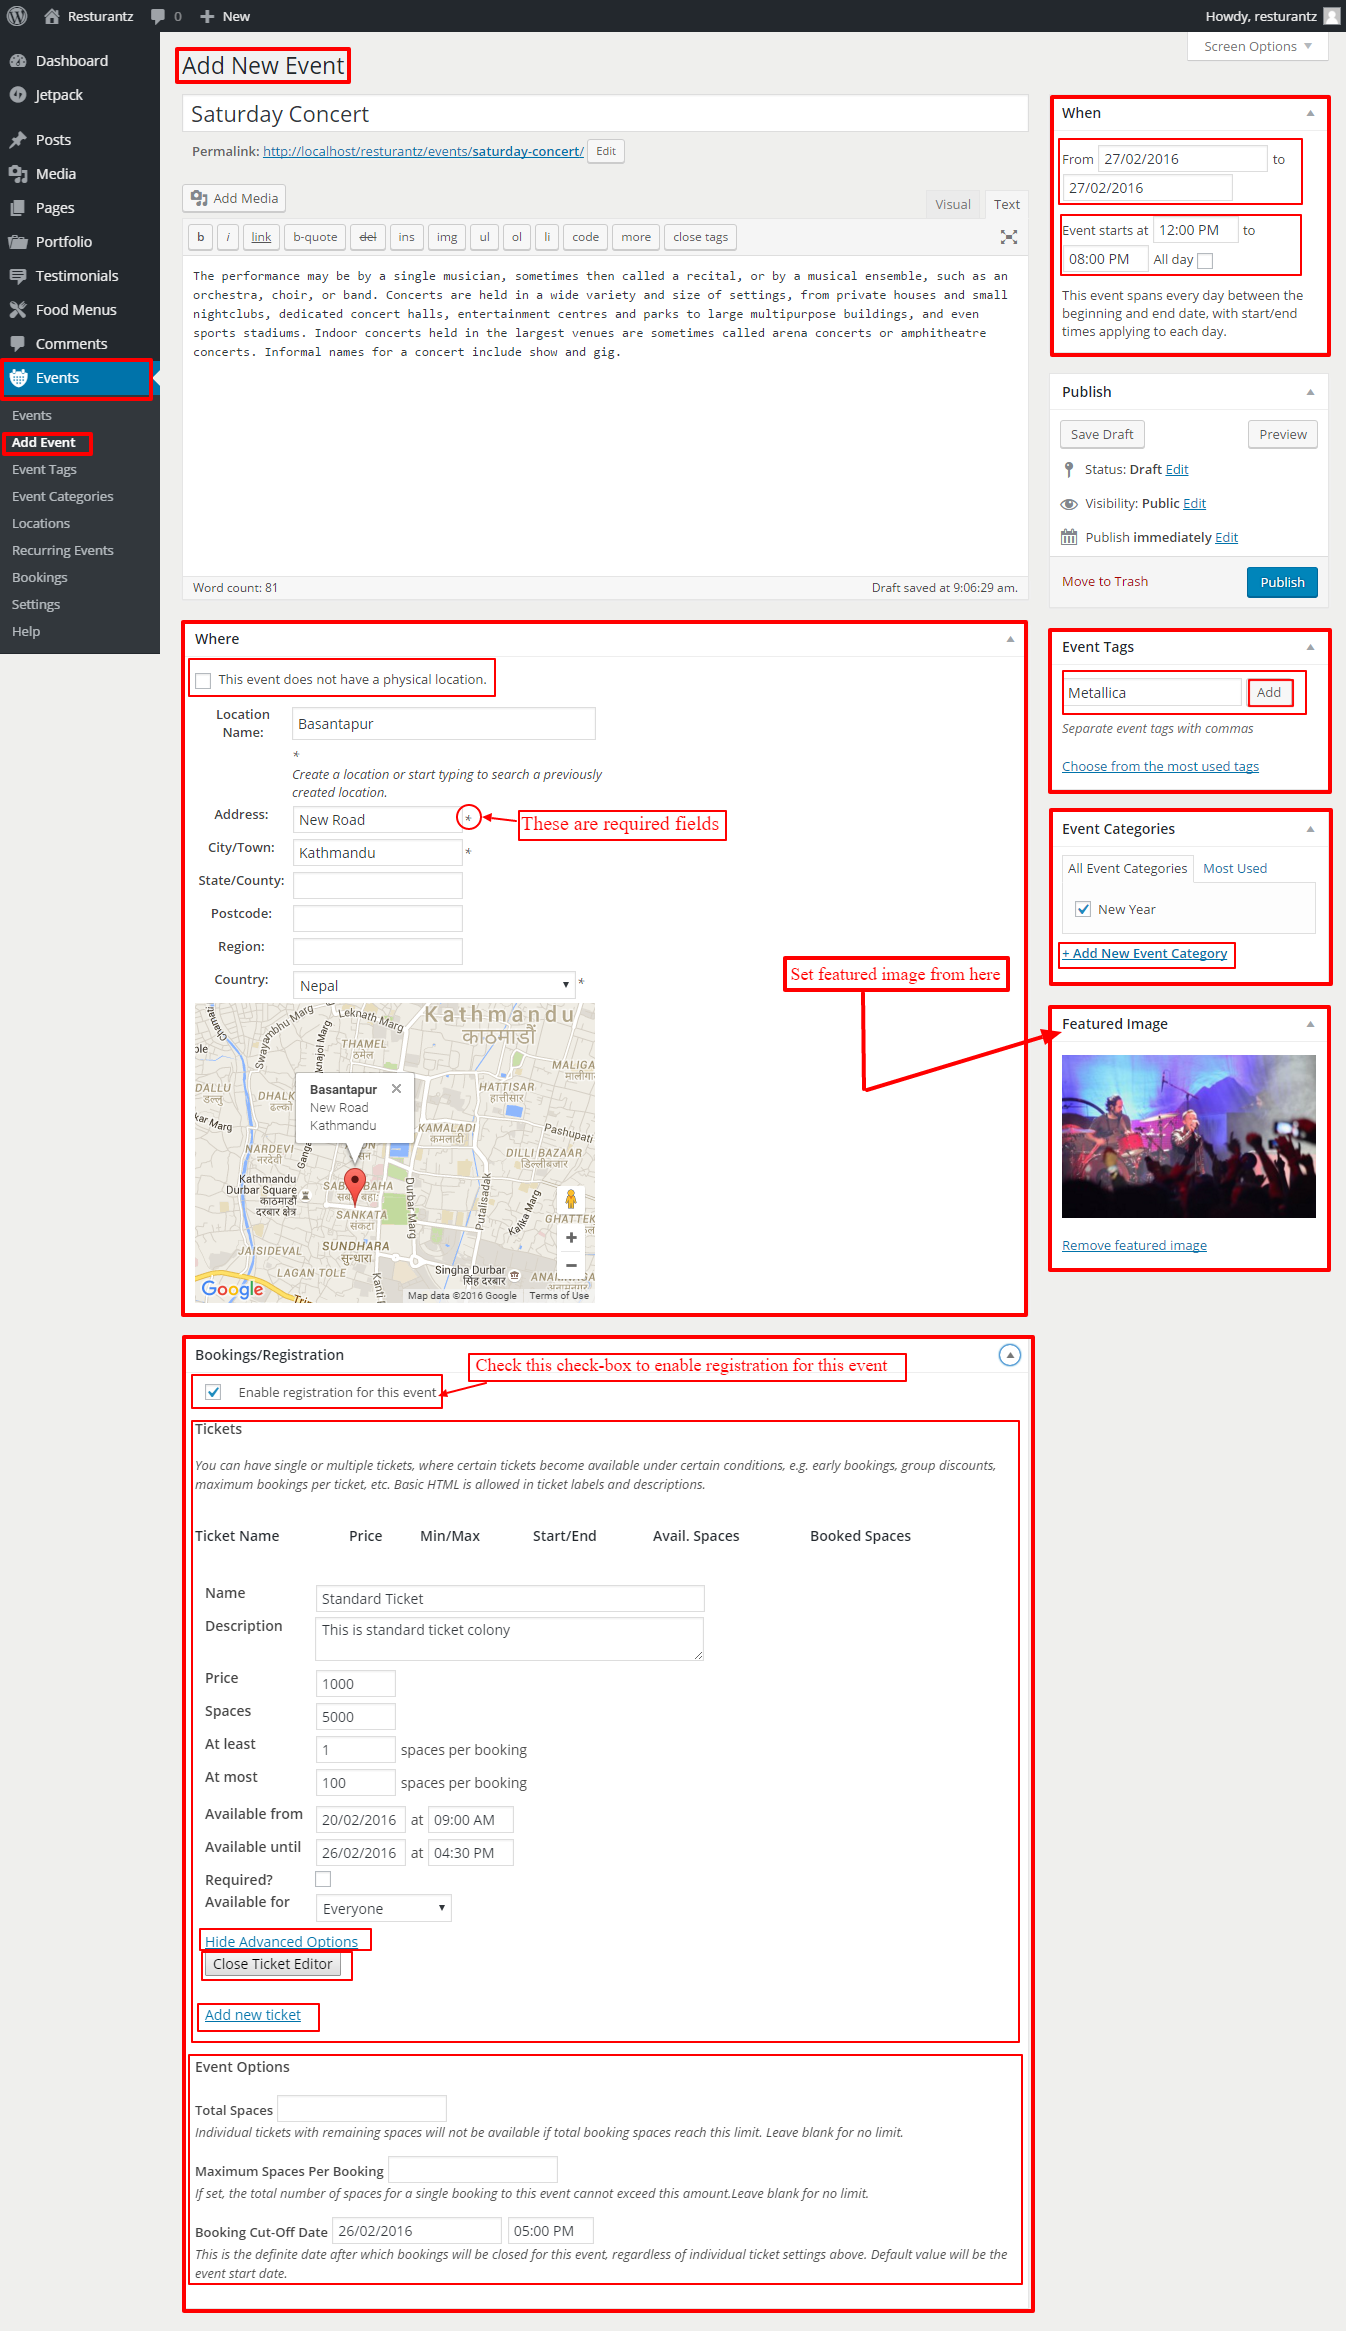
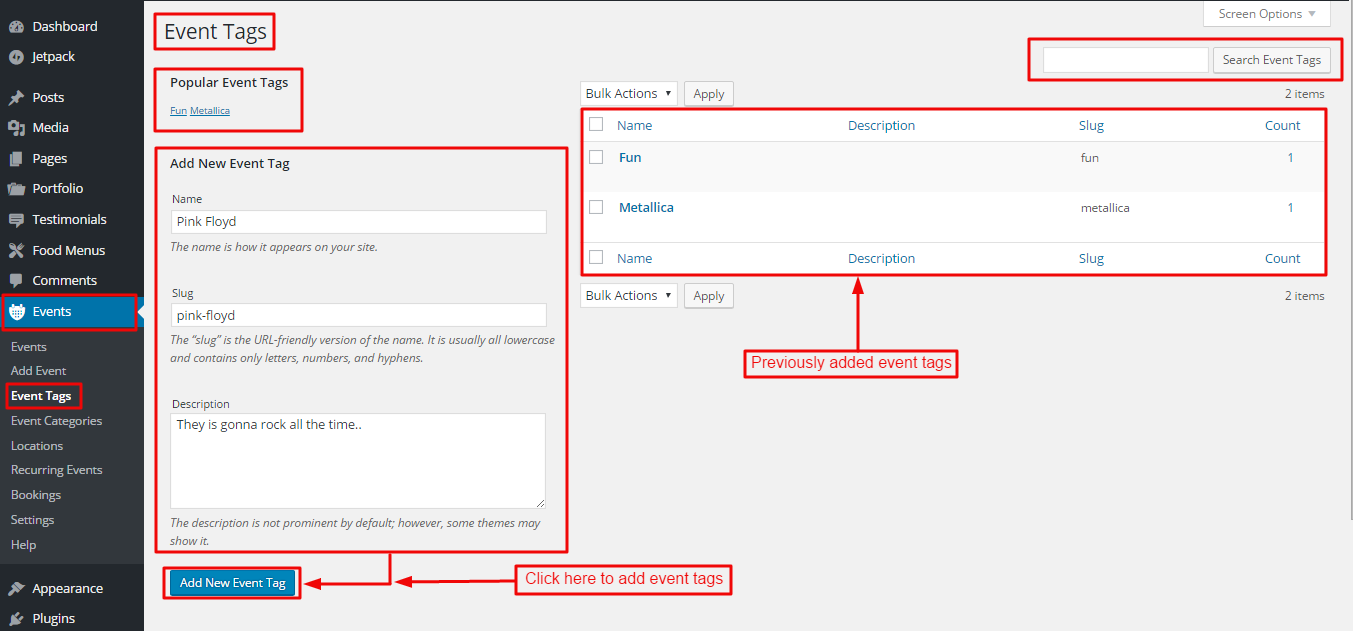
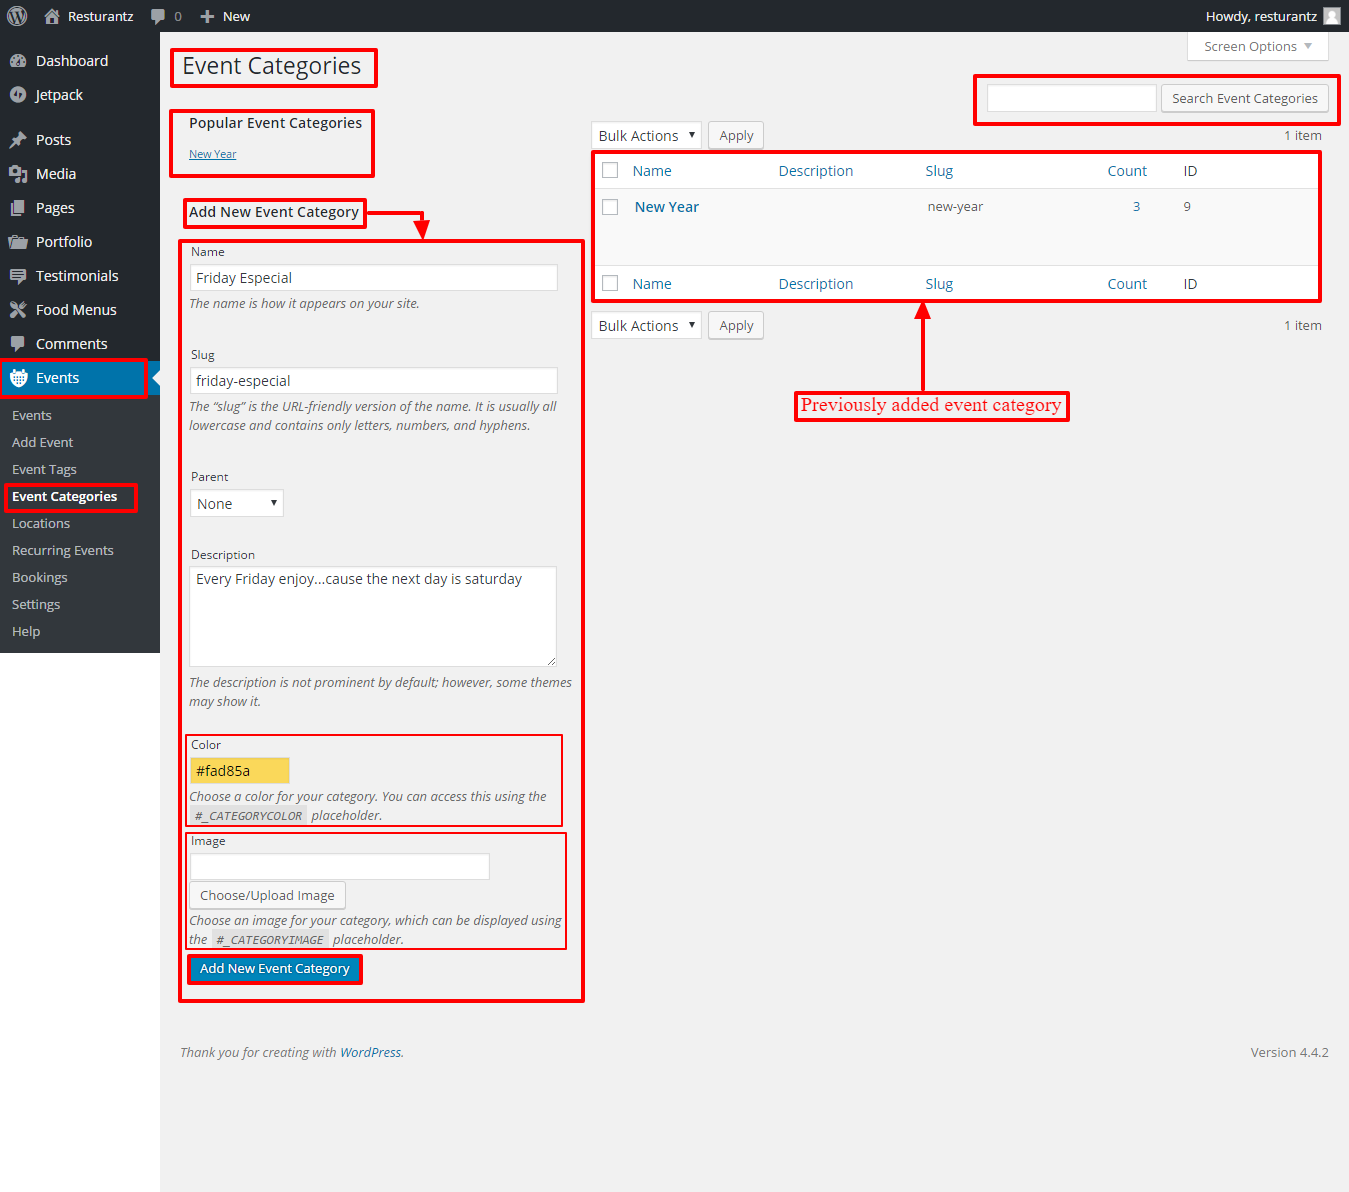
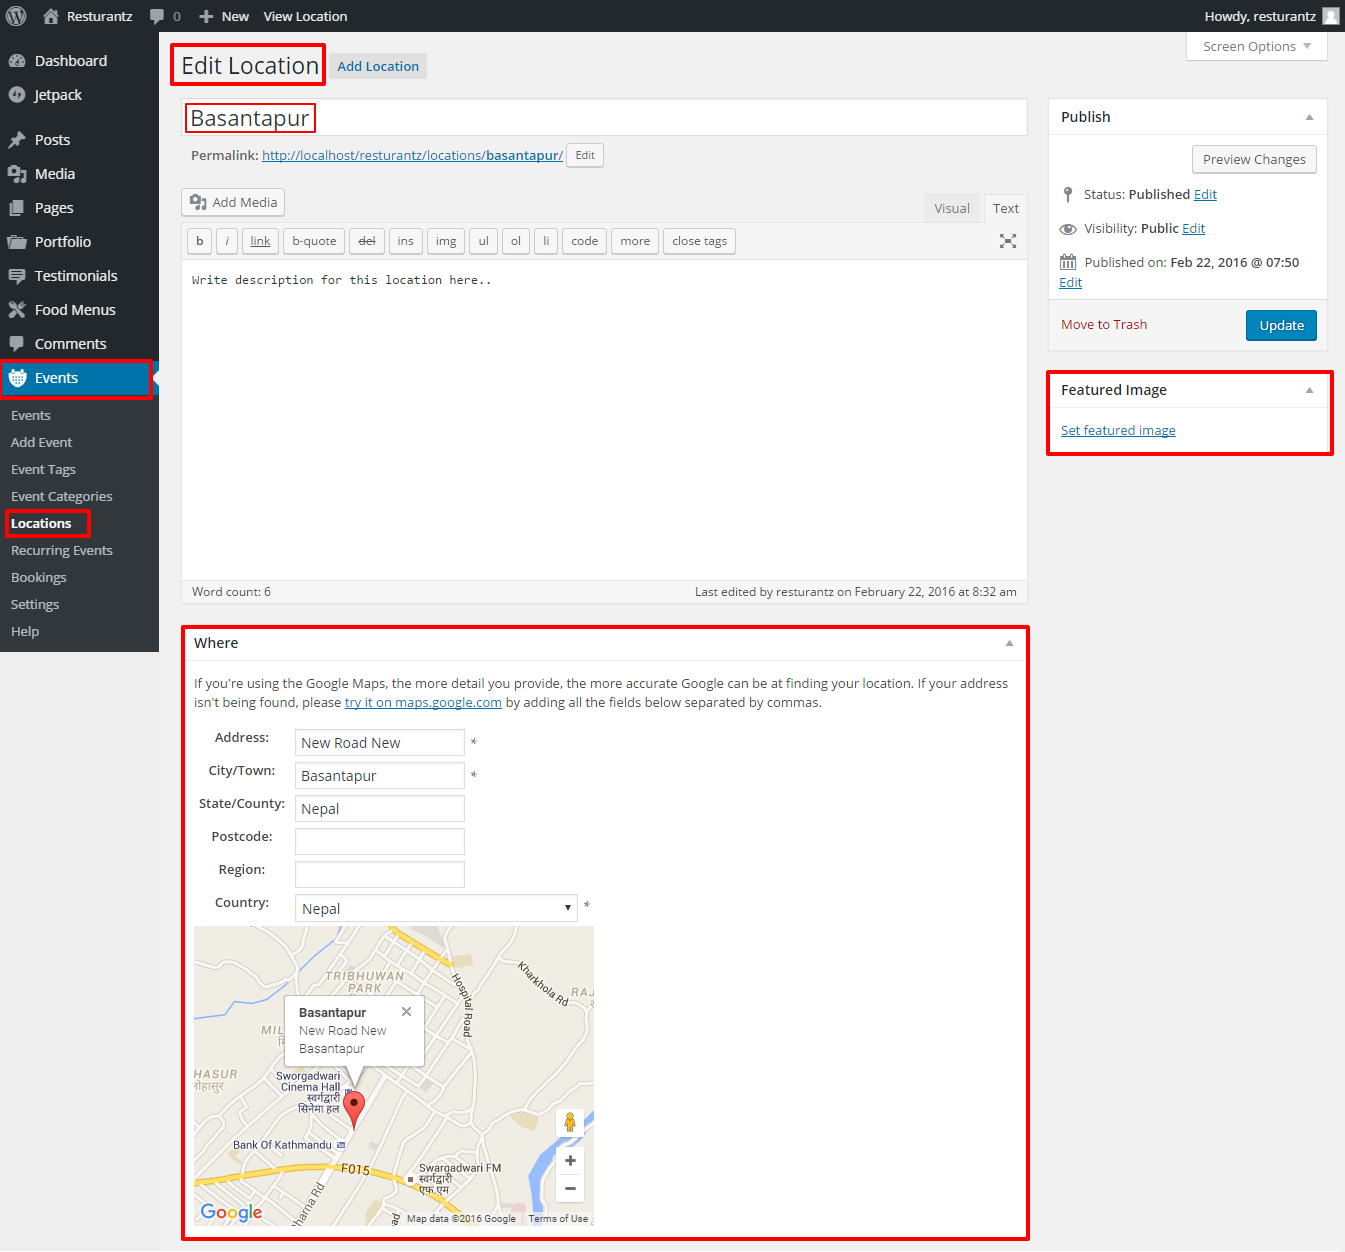
To manage event location go Location options and then click on particular location you wish to edit.
Check this image:
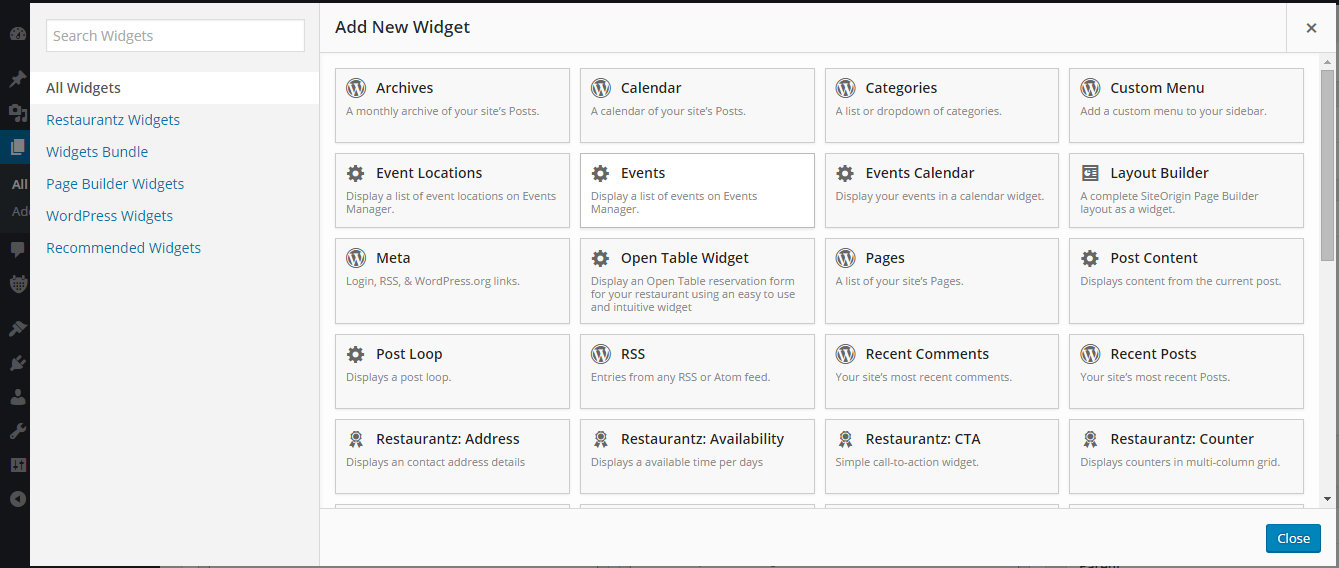
There are different widgets available from Admin Panel -> Appearance -> Widgets.
To add widgets click on that particular widgets and different sections will appear as dropdown.
Check that particular area/section and click Add Widget button.
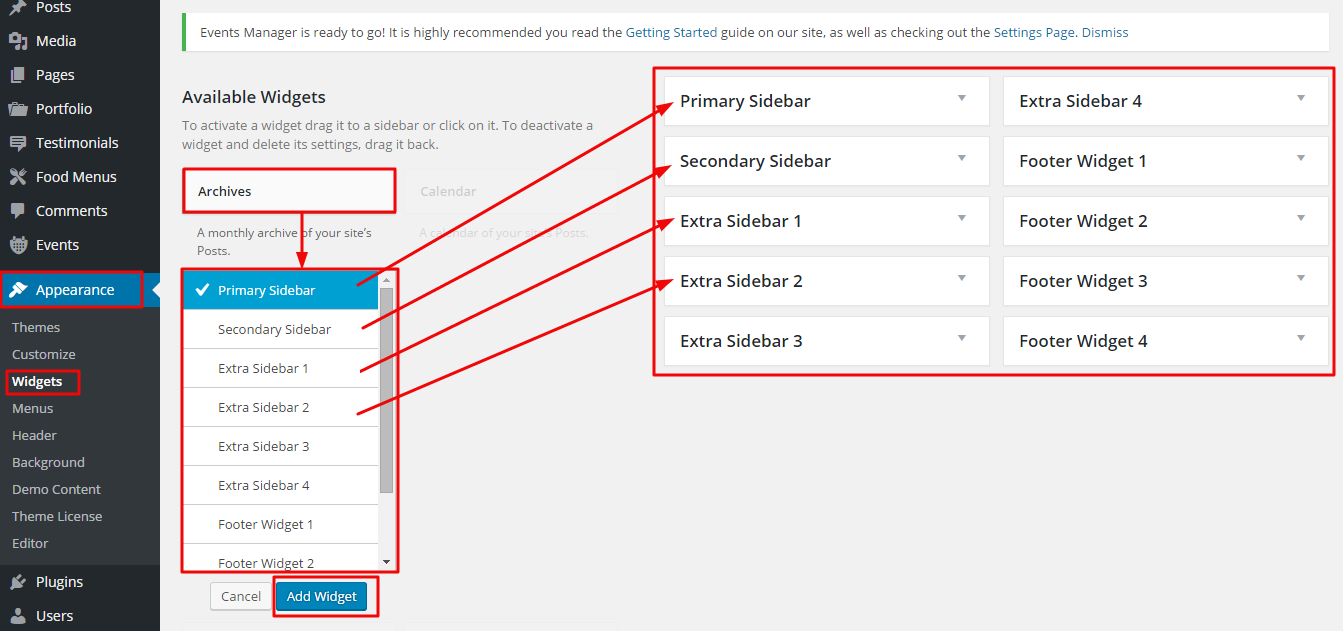
To setup different widgets see this image.
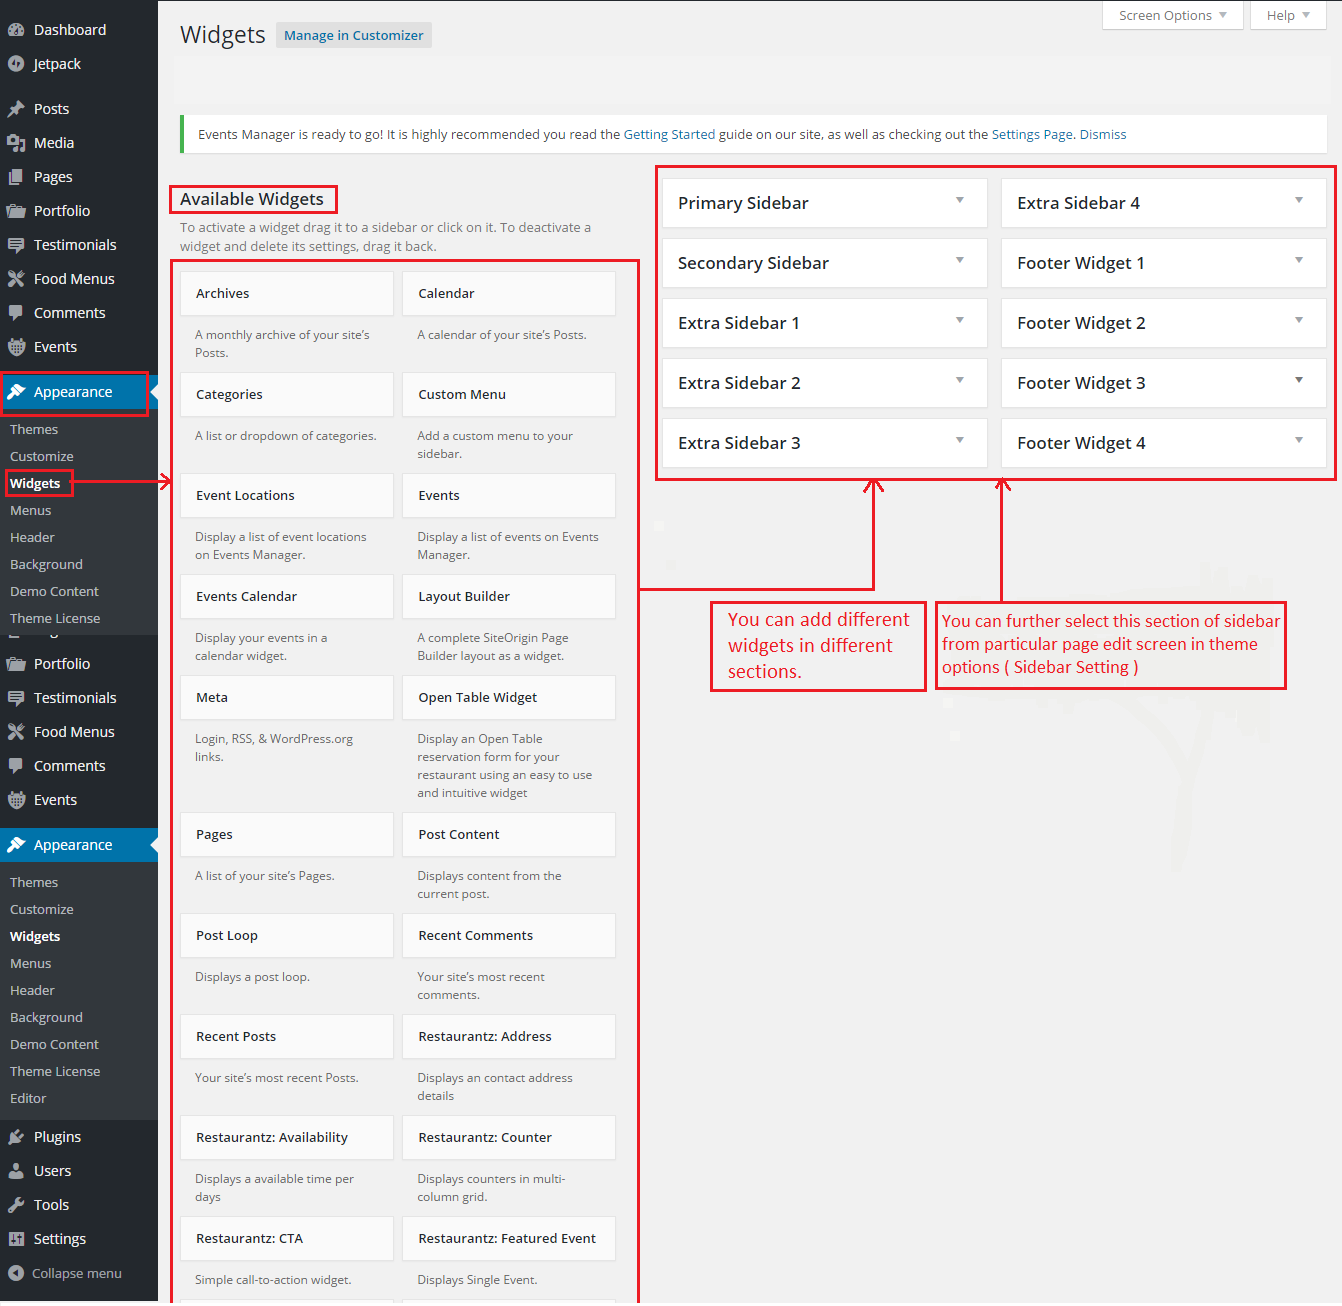
Note: After adding widgets to a particular area/section a setup panel of that widget will appear.
You need to setup your widget according to your need.
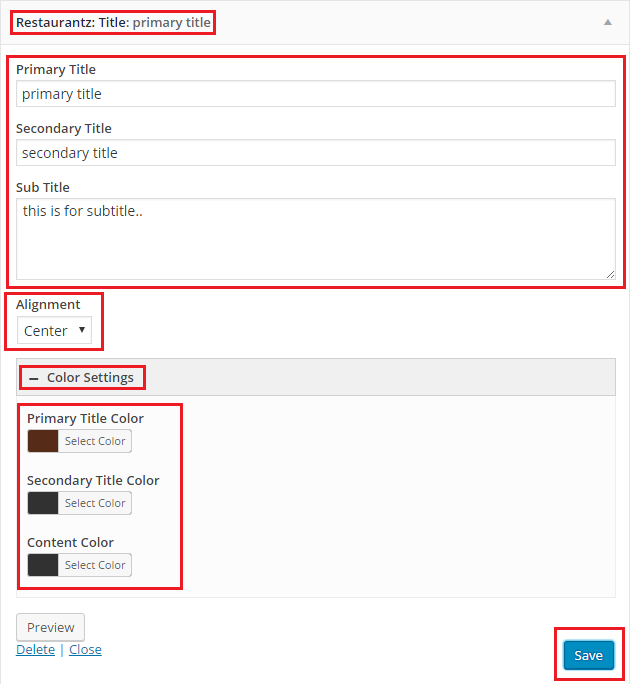
Some of the widgets setup are shown as image below:
You will find options and settings in this widget. Now setup the widget according to your need. See the below image.
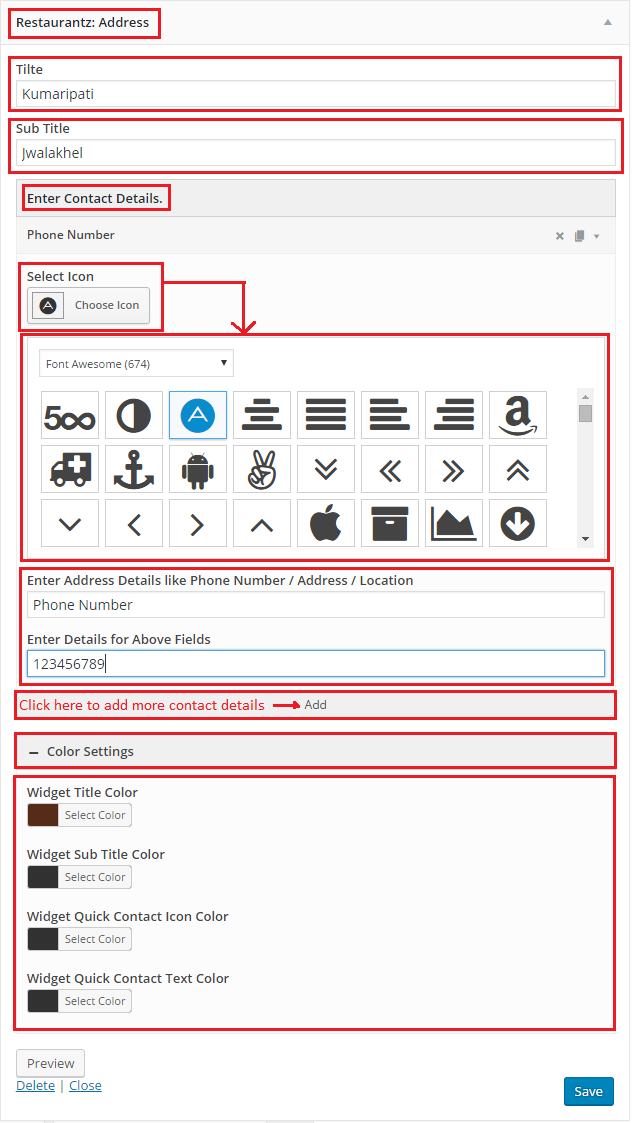
You will find options and settings in this widget. Now setup the widget according to your need. See the below image.
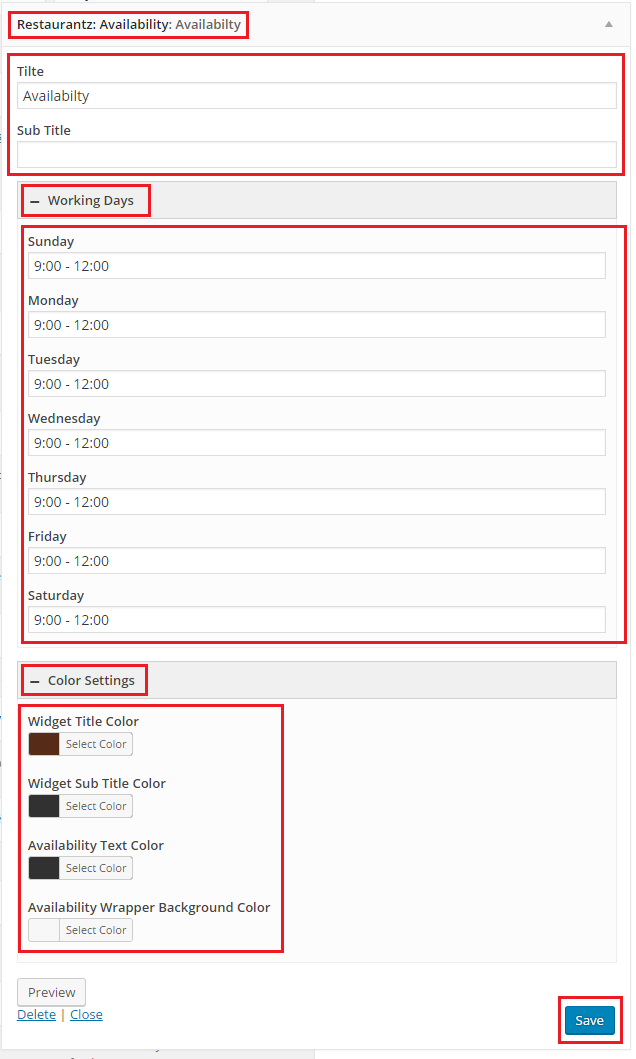
You will find options and settings in this widget. Now setup the widget according to your need. See the below image.
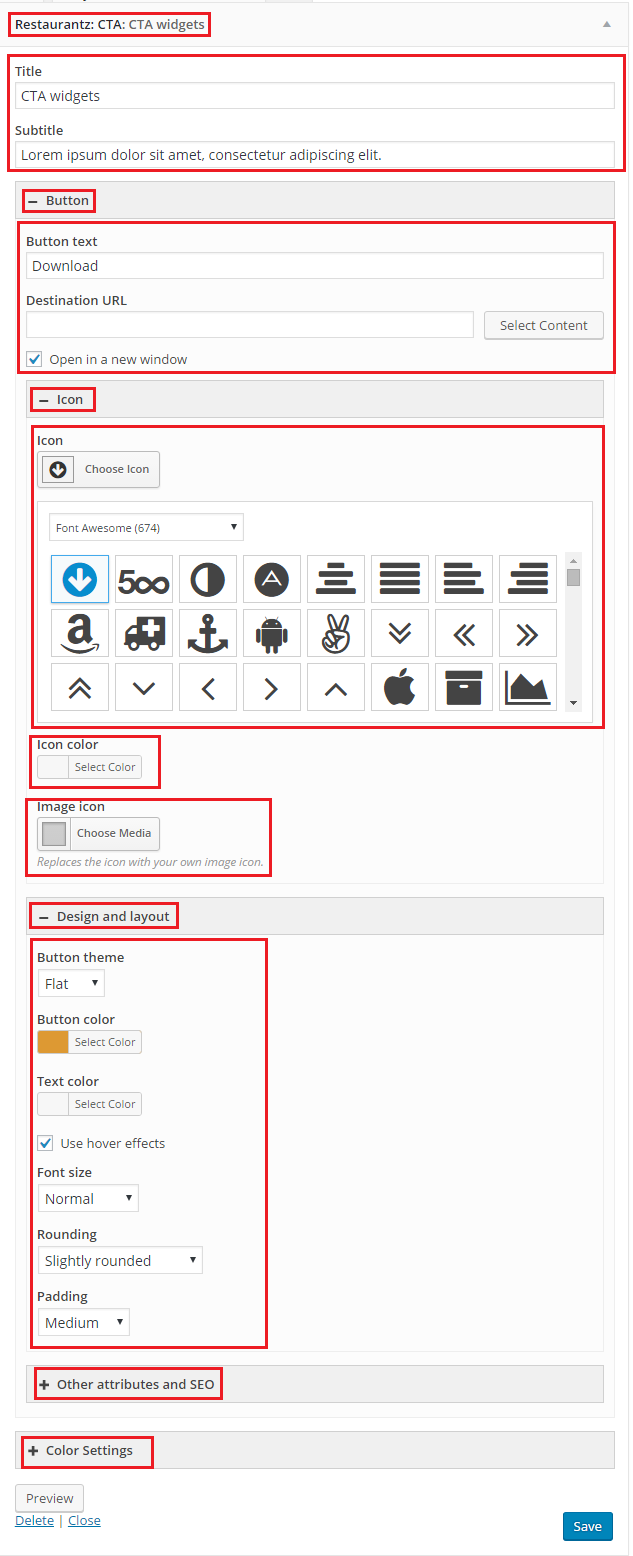
You will find options and settings in this widget. Now setup the widget according to your need. See the below image.
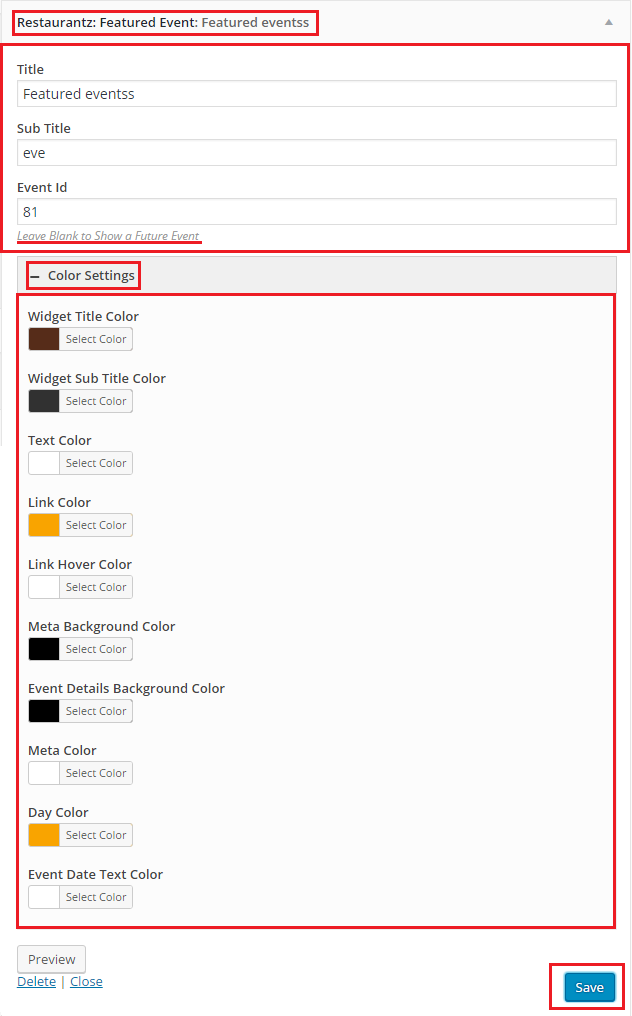
You will find options and settings in this widget. Now setup the widget according to your need. See the below image.
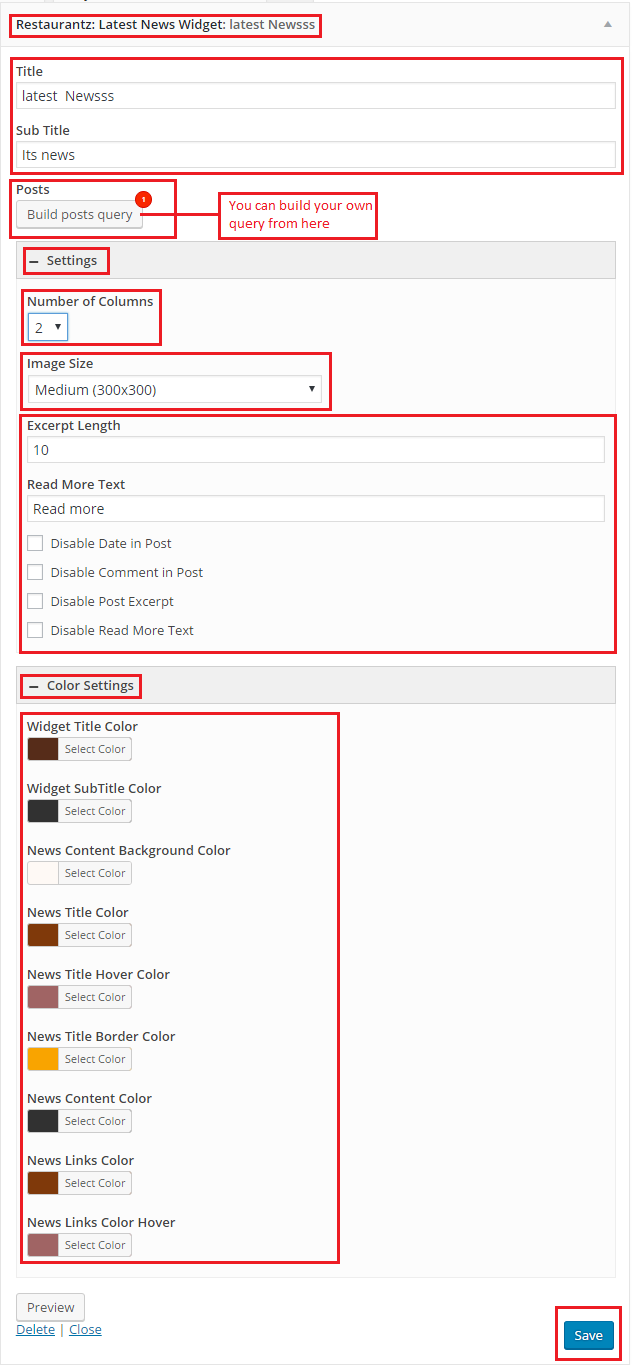
You will find options and settings in this widget. Now setup the widget according to your need. See the below image.
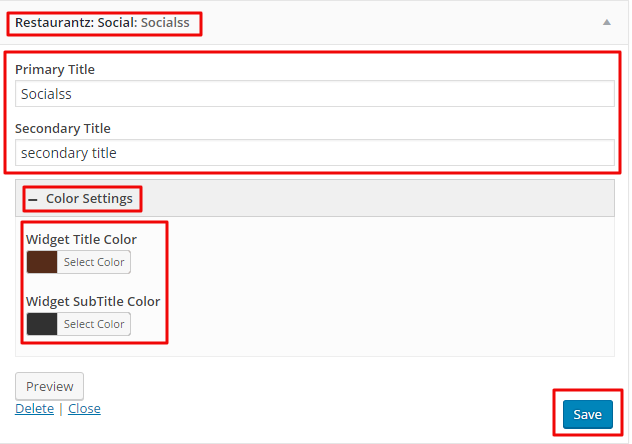
You will find options and settings in this widget. Now setup the widget according to your need. See the below image.
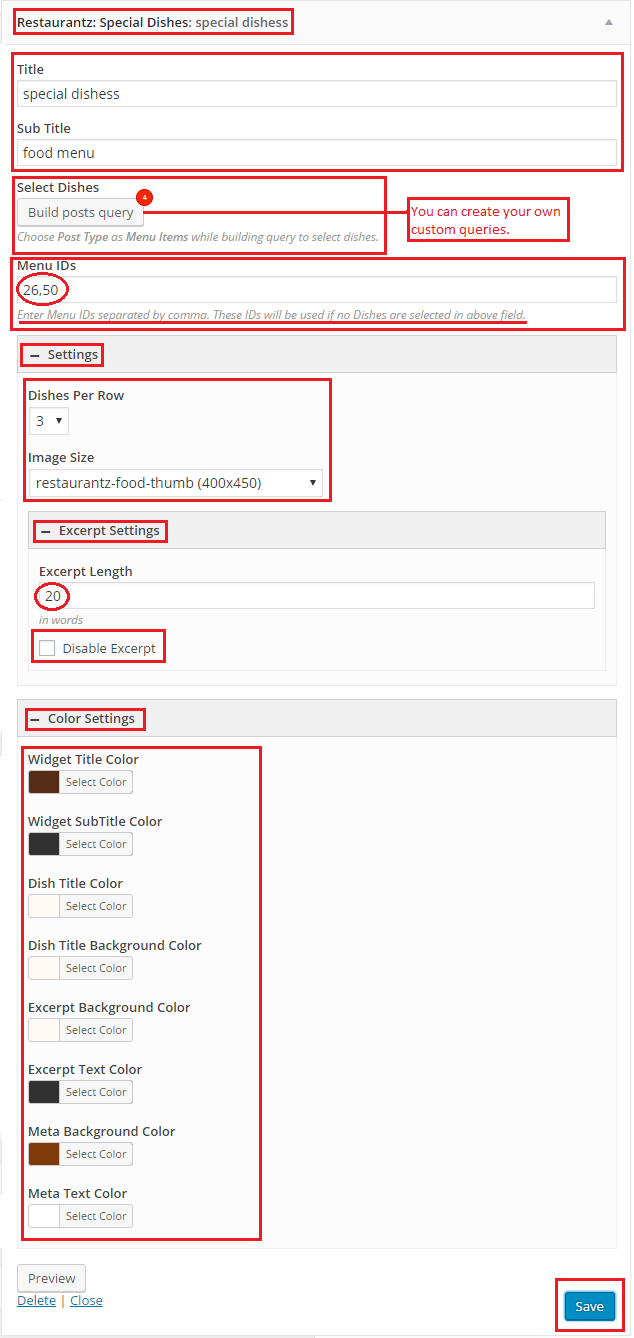
You will find options and settings in this widget. Now setup the widget according to your need. See the below image.
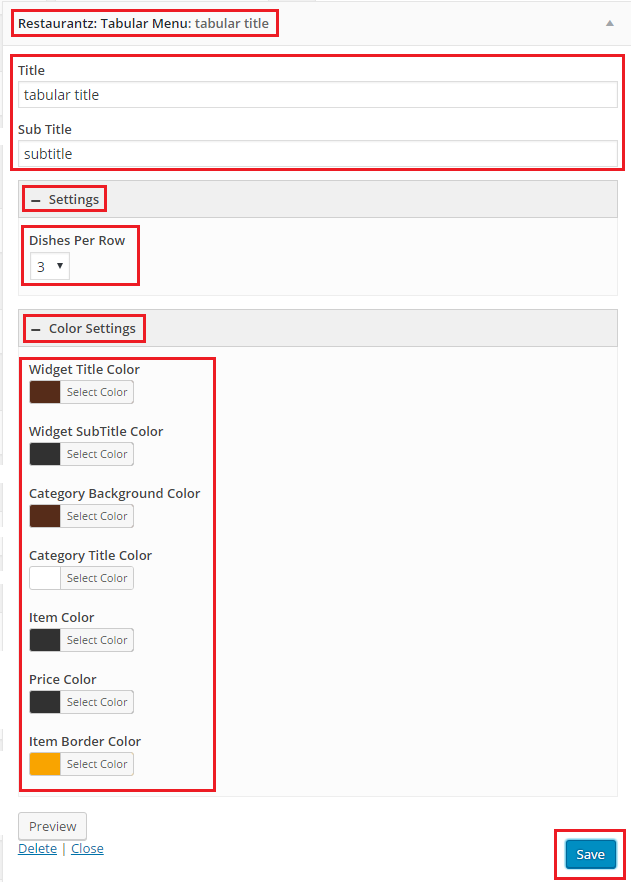
You will find options and settings in this widget. Now setup the widget according to your need. See the below image.
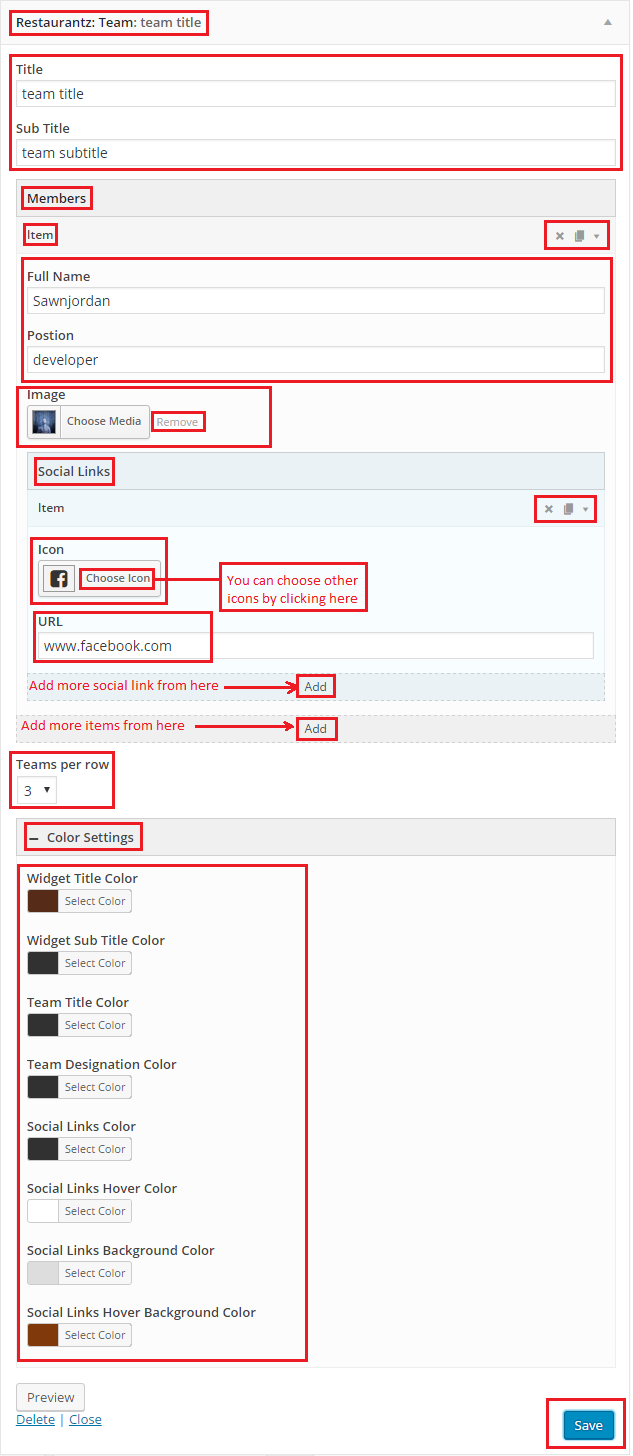
You will find options and settings in this widget. Now setup the widget according to your need. See the below image.
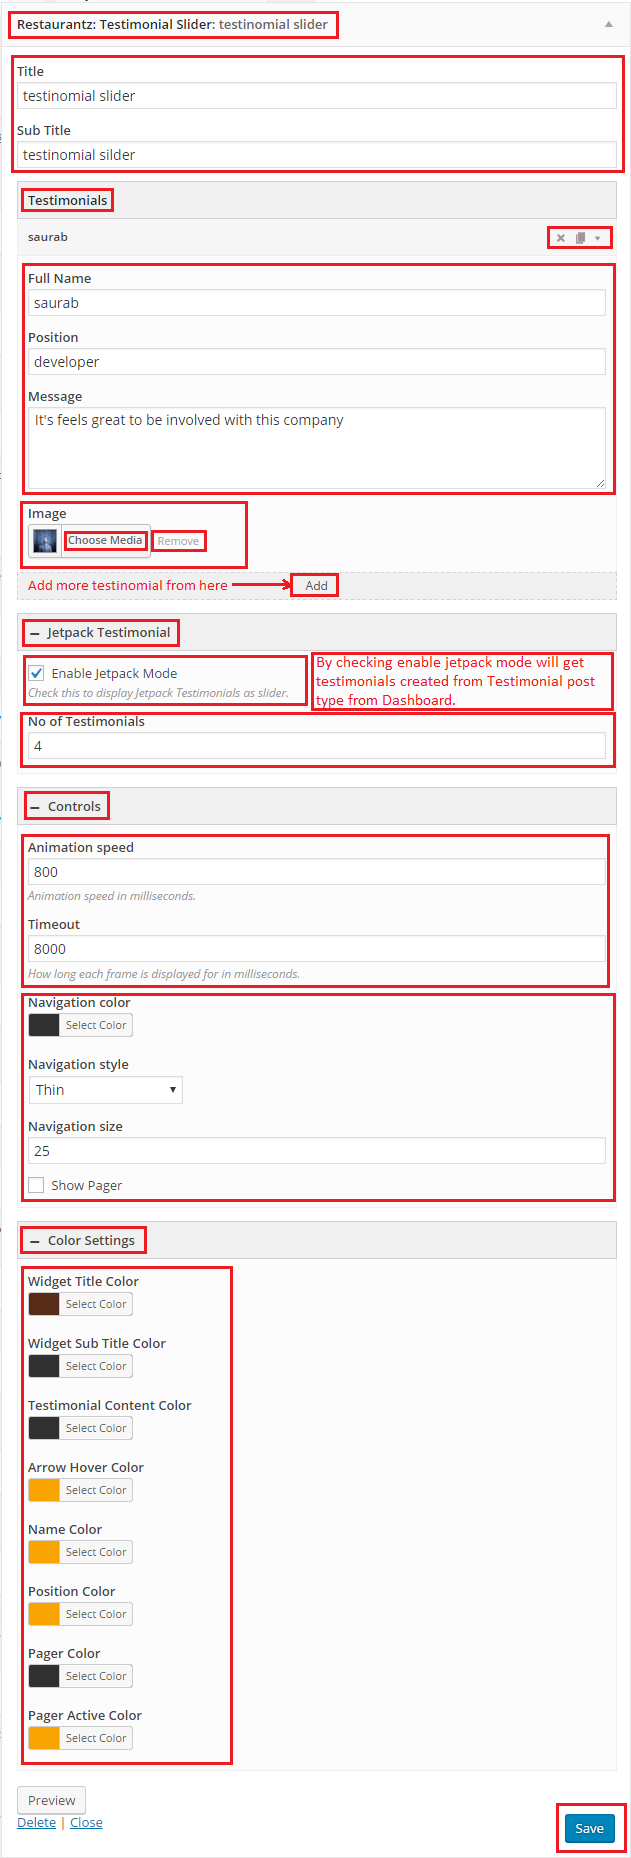
You will find options and settings in this widget. Now setup the widget according to your need. See the below image.
Restaurantz Pro comes with 2 different blog types, Default Template, Menu Page and Portfolio Page.
For use one or another you just need to create a page and choose the template you want in Page Attributes box.
Like you can see at the image.
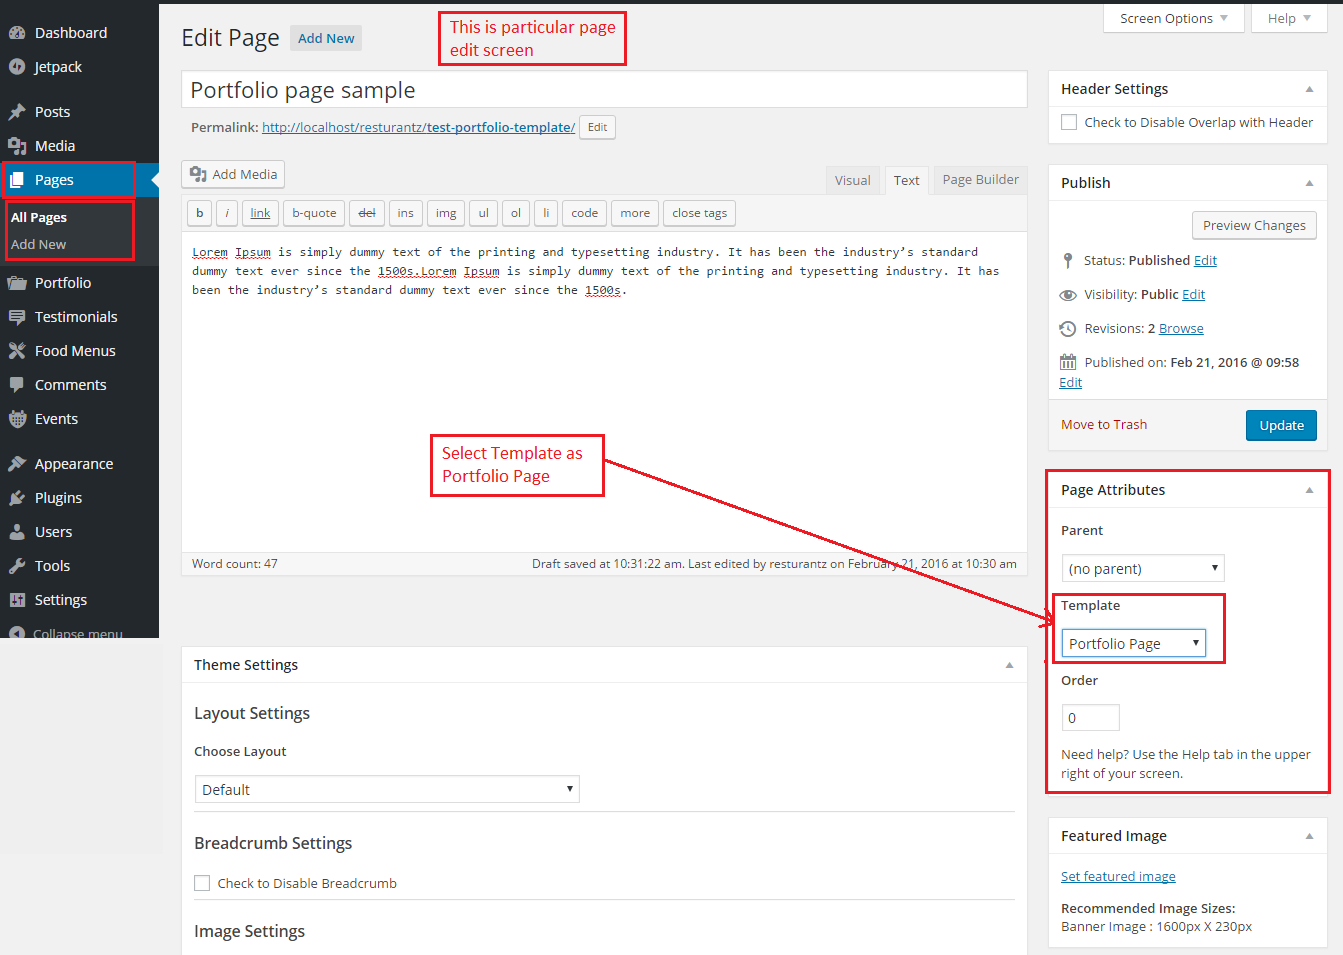

Note: If you select page template as Portfolio Page then this particular page will show the post you added from custom post types Portfolio.
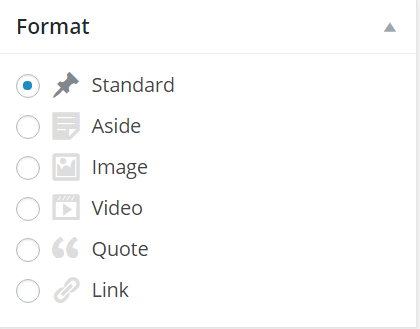
With restaurantz Pro you can define your Blog Posts on 6 different formats, such as Standard, Aside, Image, Video, Quote and Link.
Like you can see at the image
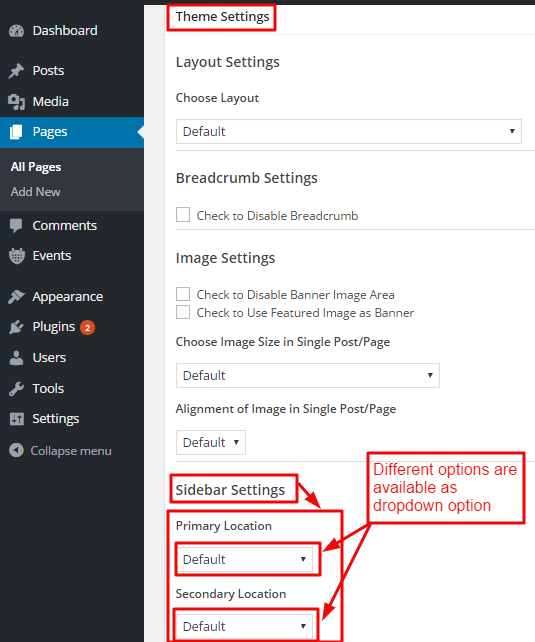
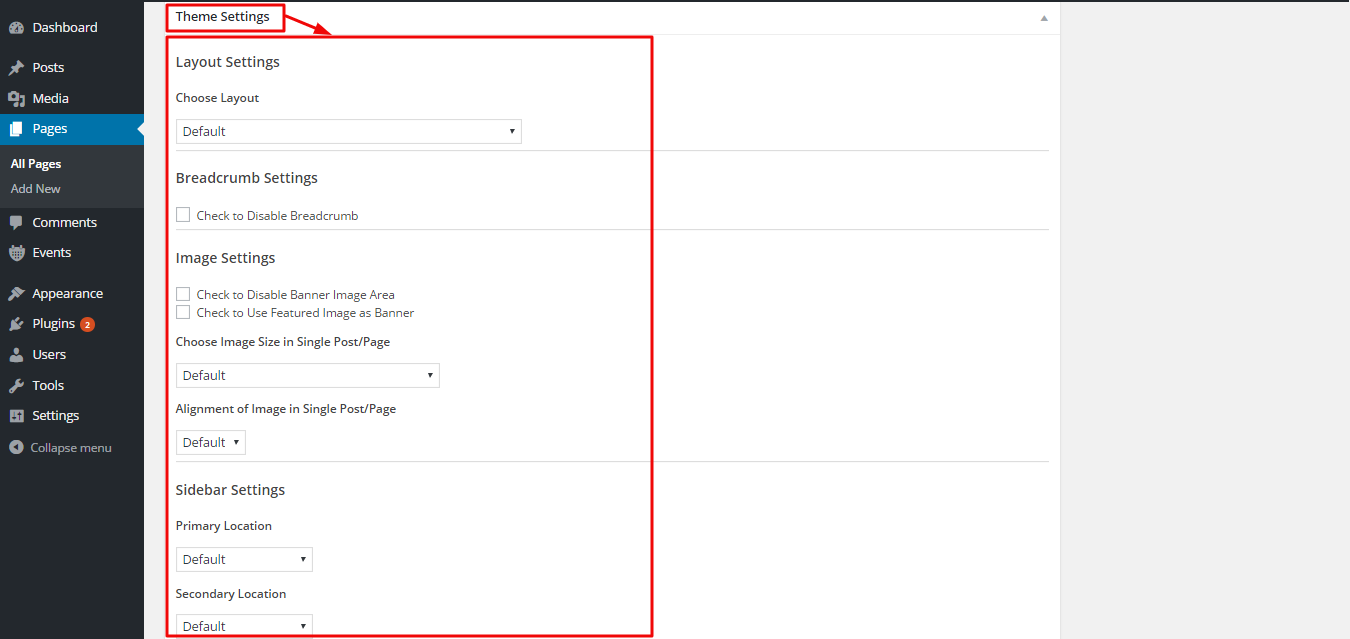
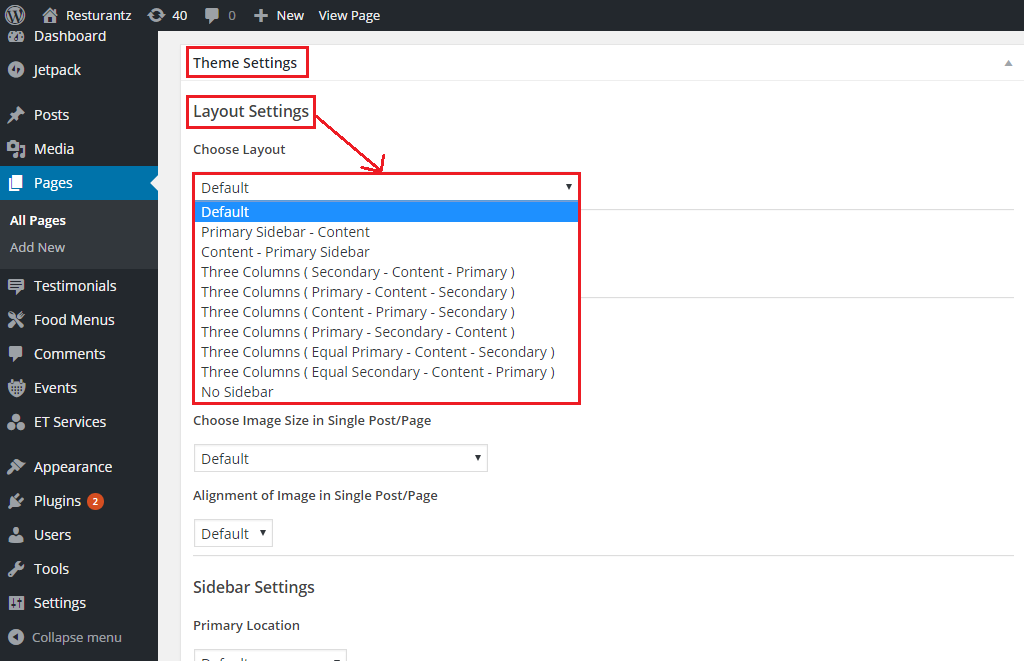
There are different options available in theme setting as mentioned below:
- Layout settings.
- Breadcrumb Settings.
- Image Settings.
- Sidebar Settings.
Restaurantz Pro comes with 9 different theme layouts.
For use you just need to select one of the two layouts from theme options
Like you can see at the image.
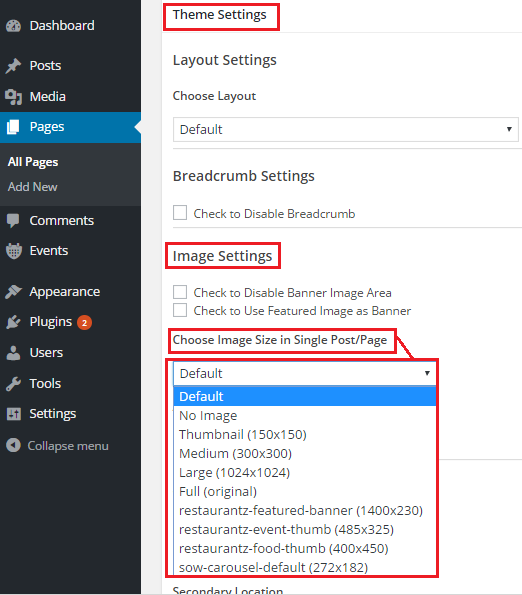
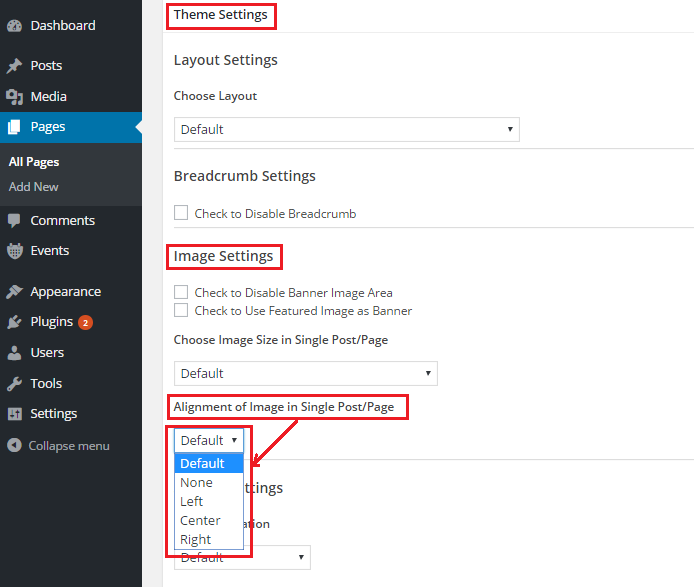
In image settings you can Choose Image Size in Single Post/Page and Alignment of Image in Single Post/Page
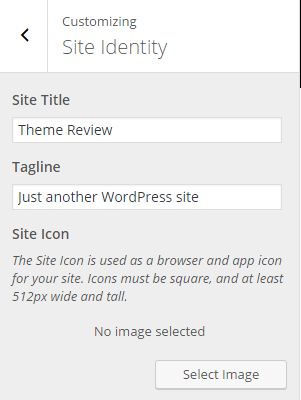
1. From Customize section, go to Site Identity.
2. From Site Identity, you will be able to add various options related to site identity like:
- Site Title: It changes the main site title of the site.
- Tagline: It changes the tagline (i.e. Description) of the site. Just below site title.
- Site Icon: The Site Icon is used as a browser and app icon for your site. Icon must be square, and at least 512px wide and tall.
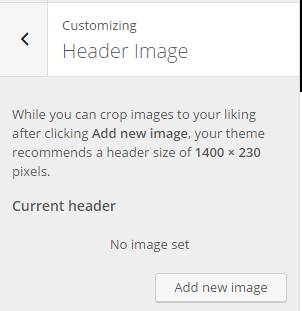
1. From Customize section, go to Header Image.
2. From Header Image, you will be able to change header image of the site above the menu.
3. While you can crop images after clicking Add new image, the theme recommends a header size of 1400 * 230 pixels.
4. If preview is fine, click on “Save and Publish” button to save the changes.
You can leave blank, if you do not want the header image.
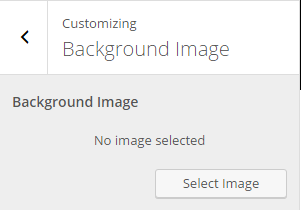
1. From Customize section, go to Background Image.
2. From Background Image, you will be able to change the background image.
3. If preview is fine, click on “Save and Publish” button to save the changes.
1. From Customize section, go to Theme Options.
2. Now, here you have different sections and settings for:
- Header
- Search
- Layout
- Pagination
- Content Meta
- Footer
- Blog
- Author Bio
- Breadcrumb
- Advanced
- Font Family
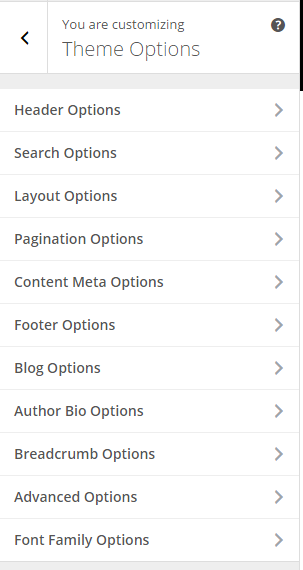
The above mentioned section are described below.
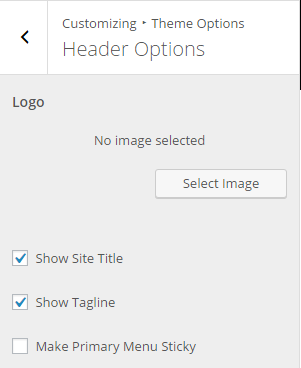
1. From Customize section, go to Theme Options and inside it there is Header Options.
2. From here, you can set:
- Logo: You can change your site’s logo by clicking on “Select Image” and choosing/upload image from Media.
Other Available Options:
- Show Site Title -To enable/disable Site Title
- Show Tagline – To enable/disable Site Tagline
- Make Primary Menu Sticky – To select whether to make Primary Menu Sticky or not
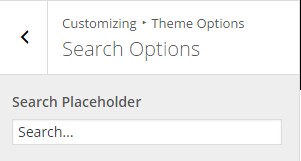
1. From Customize section, go to Theme Options and inside it there is Search Options.
2. From here, you can set the placeholder text inside the “Search” field.
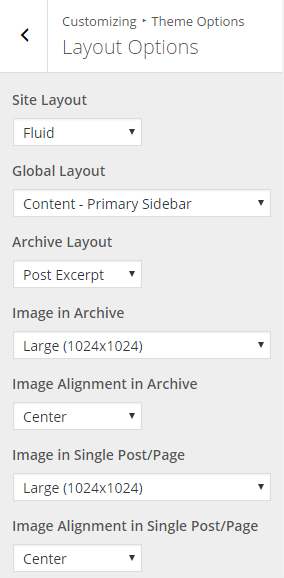
1. From Customize section, go to Theme Options and inside it there is Layout Options.
2. Now, here you can set layouts for:
- Site Layout: (Options: Boxed OR Fluid).
- Global Layout: (Options to show content with sidebar/s)
- Primary Sidebar – Content
- Content – Primary Sidebar
- Three Columns (Secondary – Content – Primary)
- Three Columns (Primary – Content – Secondary)
- Three Columns (Content – Primary – Secondary)
- Three Columns (Primary – Secondary – Content)
- Three Columns (Equal Primary – Content – Secondary)
- Three Columns (Equal Secondary – Content – Primary)
- No Sidebar
- Archive Layout : (Options: Post Excerpt OR Full Post).
- Image in Archive : (Options to show Image in Archive page):
- No Image
- Thumbnail
- Medium
- Large
- Restaurantz-featured-banner
- Restaurantz-event-thumb
- Restaurantz-food-thumb
- Show-carousel-default
- Image in Single Post/Page :(Options to show Image in Single Post/Page):
- No Image
- Thumbnail
- Medium
- Large
- Restaurantz-featured-banner
- Restaurantz-event-thumb
- Restaurantz-food-thumb
- Show-carousel-default
- Image Alignment in Single Post/Page : (Option: None, Left, Center OR Right).
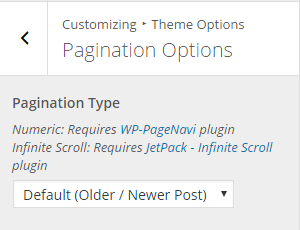
1. From Customize section, go to Theme Options and inside it there is Pagination Options.
2. Here you can set pagination option as Default, Numeric, Infinite Scroll – Scroll and Infinite Scroll – Click.
Numeric: Requires WP-PageNavi plugin
Infinite Scroll: Requires JetPack – Infinite Scroll plugin
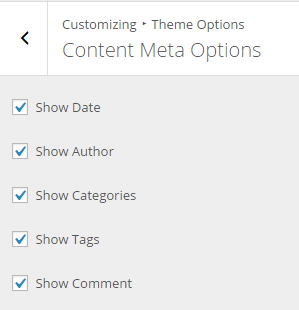
1. From Customize section, go to Theme Options and inside it there is Content Meta Options.
2. Here you can set the meta options which are displayed with the post.
- Show Date
- Show Author
- Show Categories
- Show Tags
- Show Comment
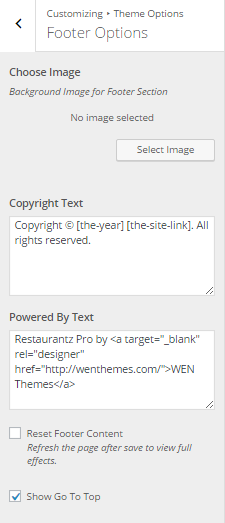
1. From Customize section, go to Theme Options and inside it there is Footer Options.
2. In order to show background Image for Footer Section click Select Image.
3. Here you can set Copyright Text and Powered By Text.
4. Also, you can check Reset Footer Content to reset the field value in the fields Copyright Text and Powered By Text.
5. In order to show the button Show Go To Top, check the box to display the functionality to take the user to the top of the page.
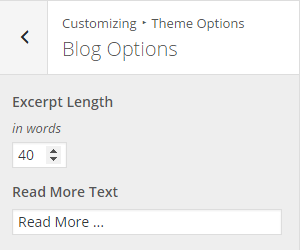
1. From Customize section, go to Theme Options and inside it there is Blog Options.
2. Here you can change the default values for:
- Excerpt Length (in Words)
- Read More Text
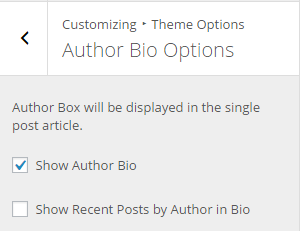
1. From Customize section, go to Theme Options and inside it there is Author Bio Options.
2. Here you can set:
- Show Author Bio
- Show Recent Posts by Author in Bio
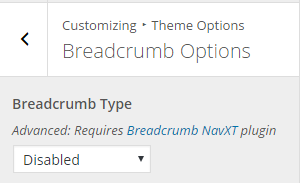
1. From Customize section, go to Theme Options and inside it there is Breadcrumb Options.
2. Here you can set Breadcrumb Type:
- Disabled
- Simple
- Advanced
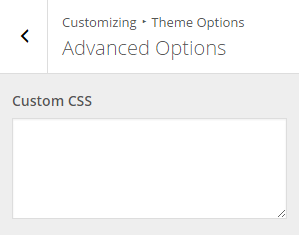
1. From Customize section, go to Theme Options and inside it there is Advanced Options.
2. Here you can add Custom CSS inside the box.
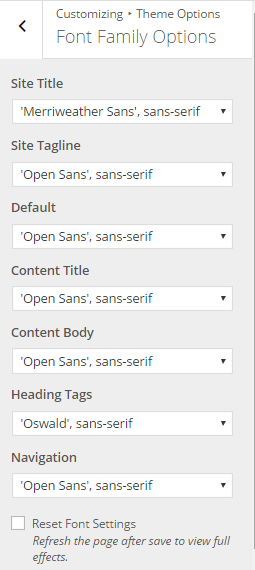
1. From Customize section, go to Theme Options and inside it there is Font Family Options.
2. Here you can set font for:
- Site Title
- Site Tagline
- Default
- Content Title
- Content Body
- Heading Tags
- Navigation
3. Also, you can Reset Font Settings to reset the default value of the default Font.
4. If preview is fine, click on Save and Publish button to save the changes.
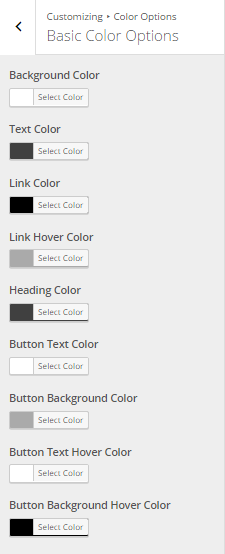
1. From Customize section, go to Color Options section.
2. Here you can set:
It includes color options for Background, Text, Link, Link-hover, Heading, Button Text, Button Background, Button Text Hover AND Button Background Hover color for overall site.
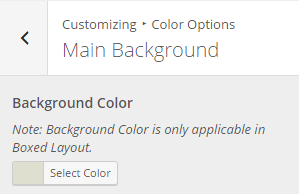
It includes the option to change Background Color that is applicable only in Boxed Layout.
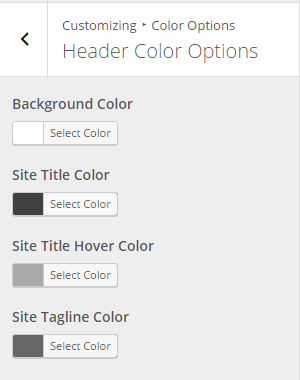
It includes color options for Background Color, Site Title, Site Title Hover AND Site Tagline for header.
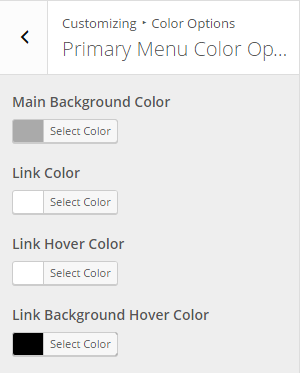
It includes color options for Main Background, Link, Link-hover AND Link Background Hover for primary menu.
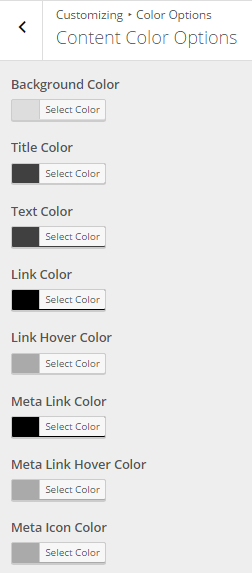
It includes color options for Background, Title, Text, Link, Link Hover, Meta Link, Meta Link Hover AND Meta Icon for content.
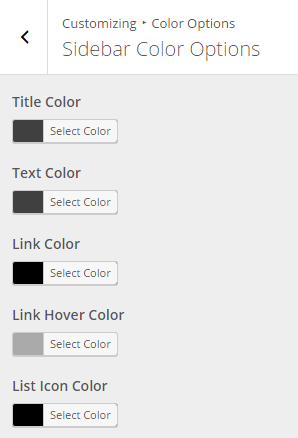
It includes color options for Title, Text, Link, Link Hover AND List Icon for sidebar.
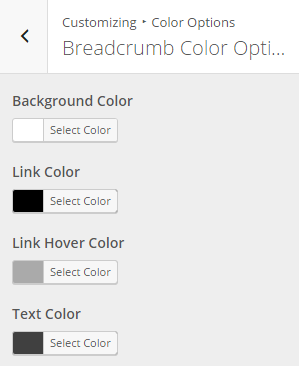
It includes color options for Background, Link, Link Hover AND Text for breadcrumb.
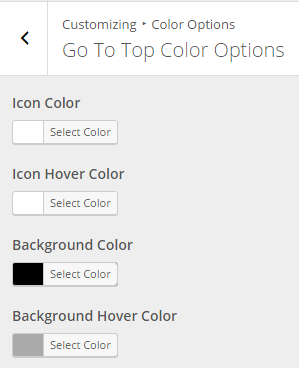
It includes color options for Icon, Icon Hover, Background AND Background Hover for go to top.
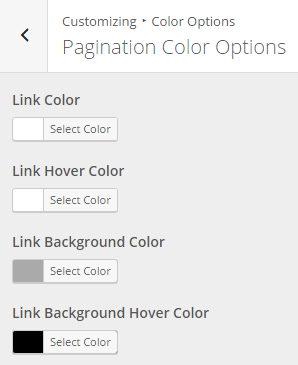
It includes color options for Link, Link Hover, Link Background AND Link Background Hover for pagination.
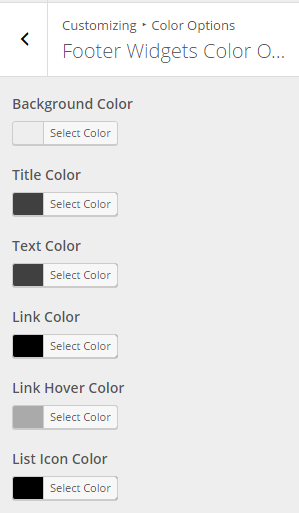
It includes color options for Background, Title, Text, Link, Link Hover AND List Icon for footer widgets.
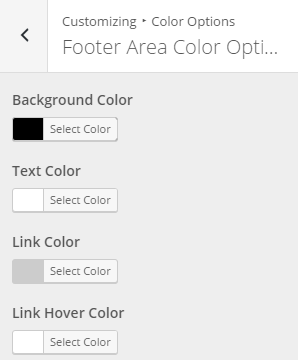
It includes color options for Background, Text, Link AND Link Hover for footer area.
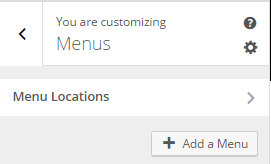
1. From Customize section, go to Menus.
2. From Menus, click “Add a Menu” button and you will be able to create a menu.
3. Now, click Add Items and you will be able to Add or Remove Menu Items according to your requirement.
4. Select the Menu locations.
5. If the preview looks fine, save the changes by clicking on Save and publish button.
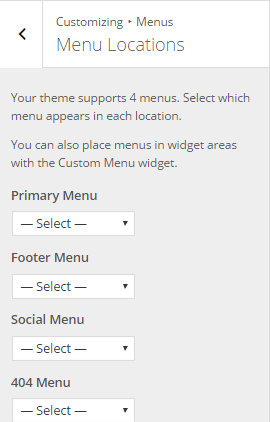
1. From Customize section, go to Menus and inside it you will find Menu Locations.
2. Here you can:
- Select the menu for Primary menu. Primary menu appears as a main menu in header section.
- Select the menu for Footer menu. Footer menu appears on the footer section.
- Choose the Social menu, which shows the social links title as a menu.
- Select the menu for 404. This menu appears on 404 page.
3. If the preview looks fine, save the changes by clicking on Save and publish button.
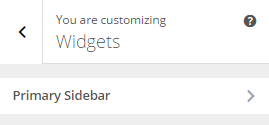
1. From Customize section, go to Widgets.
2. From Widgets, you will be able to manage Primary Sidebar.
3. Here, you will be able to Add/Remove/Reorder Widgets according to your requirement.
4. You can simply click on Add a Widget button and select various available options according to your requirement.
5. Added widgets will appear in your Primary Sidebar.
6. If the preview is fine, you can click on Save & Publish.
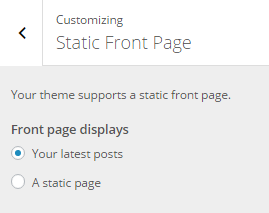
1. From Customize section, go to Static Front Page.
2. From Static Front Page, you will be able to set any page as A Static Page and you will find your latest posts page option as well.
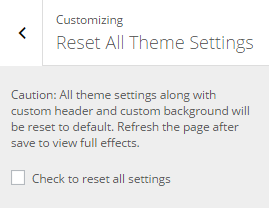
1. From Customize section, go to Check to reset All settings.
2. From Reset All Theme Settings all the changes and configurations you have done to all of your options will changes back to default.
To update Theme though FTP, follow these basic steps:
- Download the latest version of restaurantz Pro from your Theme Palace member My-Account to your Desktop
- Unzip restaurantz-pro.zip to your Desktop
- Using an FTP client to access your host web server, go to /wp-content/themes/ and upload your new copy of Restaurantz Pro Theme which shall replace the old files
