Themes Instructions
Select a Theme from the drop down menu
Table of Contents
- 1.Introduction
- 2.Theme Installation
- 3.How to set Homepage setting?
- 4.How to Import Demo Content for Themepalace Business
- 5.How to create Custom Menu?
- 6.How to add Menu?
- 7.Patterns
- 8.List of Patterns
- 9.How to Edit Pattern Content?
- 10.Duplicating the designs and sections for patterns having more than one column
- 11.TEMPLATES
- 12.Template Parts Provided by ThemePalace Fashora
- 13.Footer Section
Themepalace Business
Themepalace Business is a modern and professional child theme of Themepalace FSE, designed for businesses, startups, and agencies. Built as a Full Site Editing (FSE) theme, it gives you complete control over your website’s design using the WordPress block editor. With its fast-loading, minimal codebase, this theme ensures optimal performance and user experience. Themepalace Business is fully responsive, adapting beautifully to all screen sizes and devices, and is compatible with all major browsers. Whether you’re creating a landing page or a corporate site, this theme provides a flexible, lightweight foundation for building a sleek and reliable online presence.
After you download the theme, you can choose either of the approaches given below to install your theme.
- Log in to the WordPress Administration Panels.
- Select the Appearance panel, then Themes.
- Select Add New.
- Then, select Upload Theme.
- Click Browse. Locate themepalace-business.zip theme in your computer.
- Select themepalace-business.zip and click Install Now.
You can use FTP client like FileZilla to connect your web server.
- Unzip themepalace-business.zip to your Desktop.
- Using an FTP client to access your host web server, go to /wp-content/themes/ and upload your new copy of Themepalace Business theme.
- Now, log into the WordPress Dashboard with your login details.
- Select the Appearance panel, then Themes.
- You will see the theme in the list.
- Then, click Activate button.
- Now, the theme will be activated and go through the following options to set up the theme step wise.
- Go to Settings -> Reading in the left sidebar of your site dashboard.
- Your latest posts: When you choose this option your homepage will display your latest posts. This option is used when you are creating a simple blog site. But if you want a static front page with custom sections then you need to go with the A static page (select below)” option.
- A static page (select below): When you choose this option, you will be able to select the page for your Homepage as well as the page to show your latest posts in Posts page. That is why you will get the following two options
- Homepage: Here you can select any page that you want to show on your homepage.
Note: All the custom sections of homepage will only be visible on Homepage once you set a page for the Homepage Setting option. - Posts page: Here you can select any page where you want to show all your latest posts.
- Homepage: Here you can select any page that you want to show on your homepage.
- Click Save Changes at the bottom of the page.
Importing demo content allows you to quickly set up your website with pre-built pages, layouts, and settings.
Follow the steps below to get started with Themepalace Business:
Step-by-step instructions to import demo content:
Ensure the necessary plugins are installed and activated before proceeding.
- Jetpack
- Contact Form 7
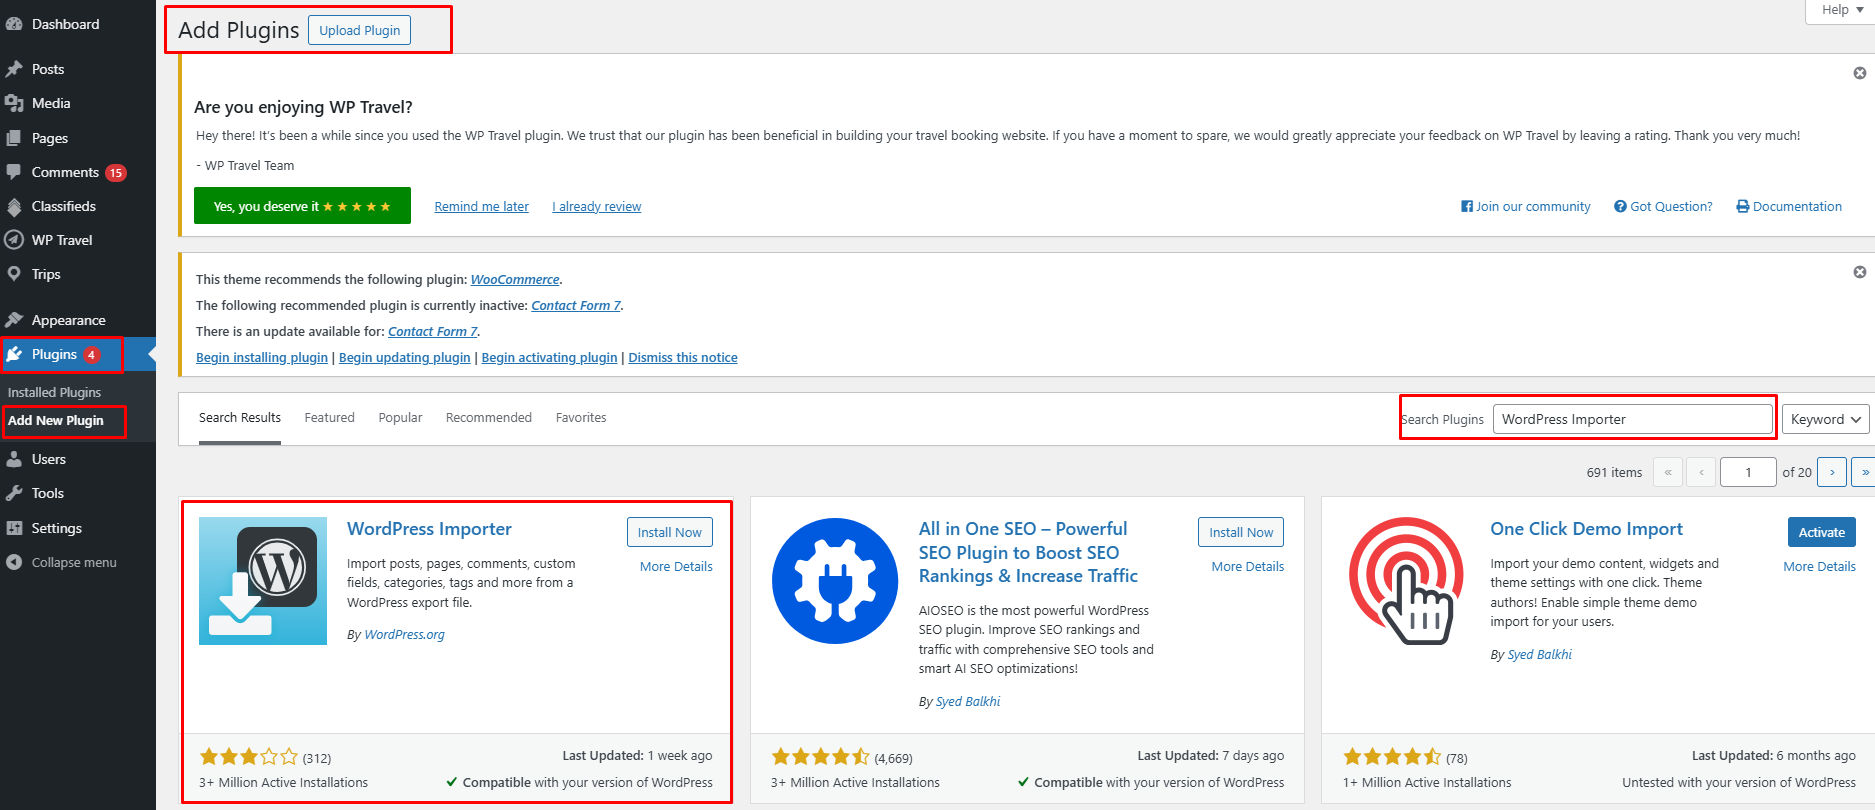
The WordPress Importer plugin is required to import demo content.
- Go to Plugins → Add New in your WordPress dashboard.
- Search for “WordPress Importer”.
- Click Install Now, then Activate.
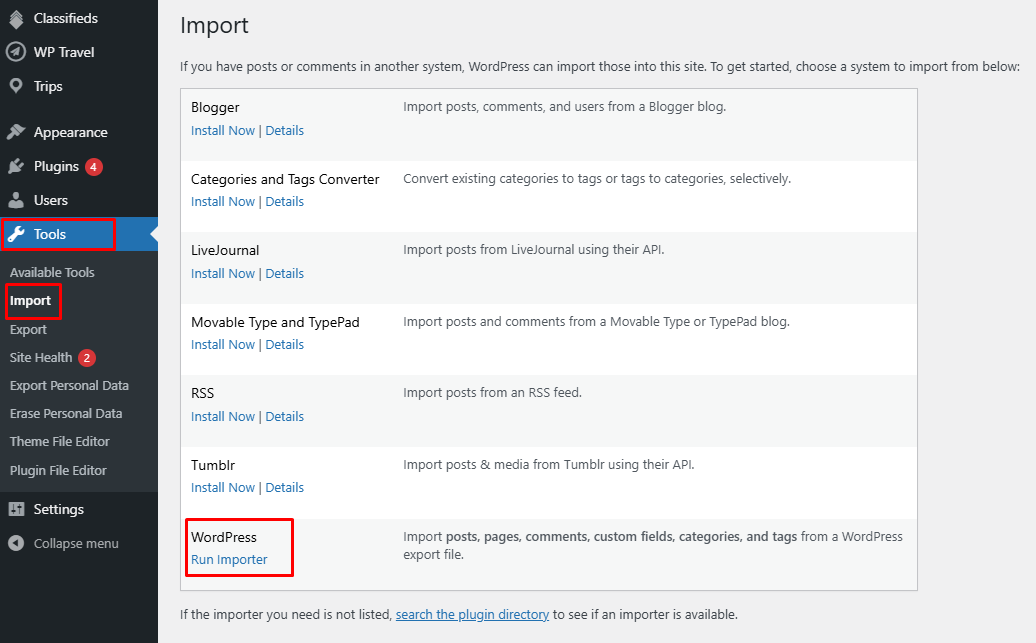
- Navigate to Tools → Import in your WordPress dashboard.
- Under WordPress, click Run Importer.
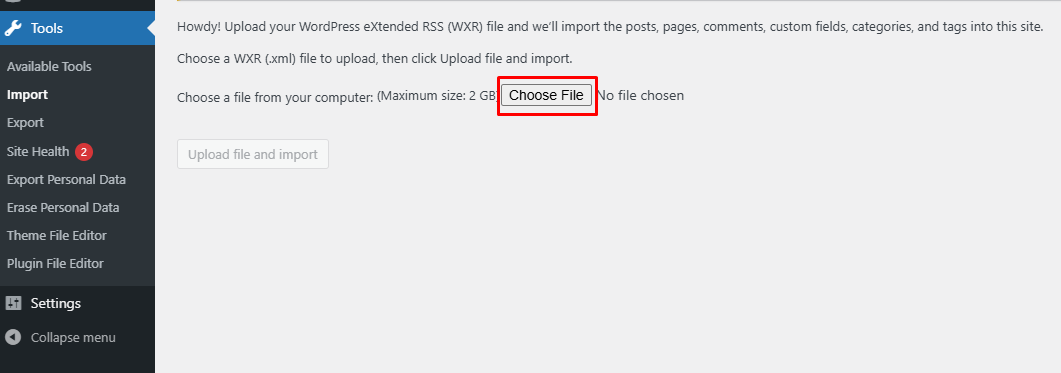
- Click Choose File and select the demo content XML file.
- Click Upload file and import.
- Assign an existing user or create a new user to import content.
- Check the option to Download and import file attachments if available.
- Click Submit and wait for the import to complete.
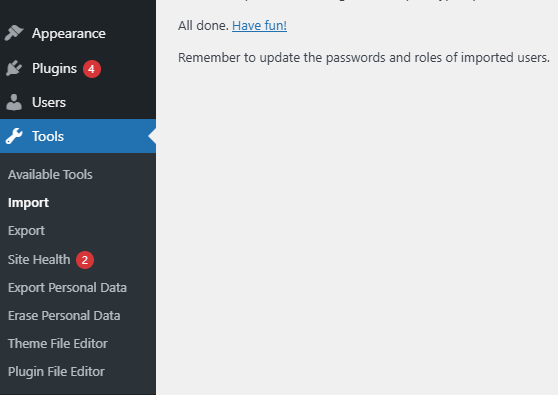
Note:
Images may not be imported due to licensing restrictions. You may need to manually replace them with your own images.
- Log in to your WordPress Admin Dashboard.
- Navigate to Appearance → Editor.
- This will open the Site Editor, allowing you to customize your website.

- Visit the frontend of your website.
- Look for the WP Admin Bar at the top of the page (visible when logged in).
- Click on Edit Site to open the Site Editor.

You can create you own custom menu in ThemePalace Fashora. You can go to Navigation Block on header Or Simply go to the “Template Editor -> Template Parts” and click on Template Parts with header to edit the header navigation.
Here are steps to create Custom Menu:
- Go to Site Editor
- Click on Navigation Block on Header from “List View,” then you will find Navigation tool bar Click on “Select Menu” and “Create on New Menu”
Or you can Go to Template Editor -> Template Parts with Menu (Header With Header Top – Default) - Click on Default Menu and start editing, to create new custom menu, open setting on top right
- After click on Start Empty, click on Add Block and type Page you want to add in your custom menu
- You will find menu items there, click on three dots menu and click “Create new menu” under TOOLS
- You can add more links edit link text and menu items by clicking on “+” sign to add more items in your custom menu
- Further you can create sub menus also, just click on the menu item there you will find icon to create “Sub Menu” add items in your sub menu accordingly
- Rename you menu by clicking on itself
- Note: To avoid confusion, click on List View to edit or select menu
You can Select a predefined menu in your header navigation block
- Go to Site Editor
- Click on Navigation from “List View”, then you will find the Navigation toolbar there you can click on “Select Menu” and select your predefined menu
- Click on Save to view changes
- Click on the “+” sign on the top bar to display Patterns.
- If you want to add Patterns, click on Patterns, scroll down, and find “Themepalace Business”. Choose the pattern you wish to add provided by Themepalace Business.
- Simply drag and drop your block/pattern to the desired site area.
- Make necessary changes.
- Finally, click SAVE to save changes.
- Click on the “+” sign on the top bar to display Patterns.
- If you want to add Patterns, click on Patterns, scroll down, and find “Themepalace Business”. Choose the pattern you wish to add provided by Themepalace Business.
- Click on the desired pattern to add.
- Make necessary changes.
- Finally, click SAVE to save changes.
- Click on the “+” sign in the template or page to display patterns.
- Then search for the pattern in the search bar.
- Make necessary changes.
- Finally, click SAVE to save changes.
First, click on the pattern content you wish to edit/customize
You can select the section/content in three ways
- Clicking on the section itself
- List View
- Footer Interface Bar
Once the section is selected you can edit its content or if you want to customize the section’ properties/options, click the three dots and select your desired action. Duplicate, Remove, Copy or Add desired section before or after the current section.
Duplicate section can be used if you want to add a similar section in your pattern.
For Example: If you want to add one more column in between your Featured Content Duplicate section can be used, as it will create a similar section and you can edit the content accordingly.
Duplicate section is a very easy step to add on particular sections in your pattern.
Select the column via ListView/Footer Interface, then click on three dots and select Duplicate then change the content accordingly
List of templates supported by Themepalace Business
- All Archive
- Blog Home
- Front Page
- Index
- Page 404
- Pages
- Search Results
- Single Posts
- Header: The top section of the website, typically containing the logo, navigation menu, and other key elements.
- Footer: The bottom section of the website, usually including contact details, social links, and additional navigation.
Themepalace Business allows you to add and edit the footer.
Follow these steps to add and edit the footer on your page or post:
- Go to Page/Post or click on New/Edit.
- Click on the “+” sign on the top bar to display the Pattern menu, then select “Themepalace Business”.
- Scroll down to find “Footer” or use the search bar to locate it.
- Drag and drop the Footer section into your page or template, or click the “+” sign in the desired location.
- Edit the copyright information and update social links as needed.
- For advanced options, click on the top-right settings button to:
- Change styles (default, logos only, pill shape, circle shape).
- Modify link settings.
- Adjust colors (icon color, icon background).
- Click “Save” to apply the changes.